
Working with archives in Linux is easy. There are a few commands that take care of almost all the archive types for you. The gzip command in Linux is one such command. Without any arguments, the gzip command will automatically compress the files that you specify right after the command.
Compression is a common practice in today’s time. When we need to transfer a large amount of data, compression comes in handy as a compressed file is faster to be shared or replicated. These files also take less time to download over the internet compared to non-compressed files. Everyone wishes to deal with data in its shrunk format.
These features make file compression a popular practice. There are many tools available to compress and decompress files. These tools help a user optimize their storage space use and network usage while dealing with a file. One popular data compression tool is the Gzip command in Linux.
What is the gzip?
GZIP is a popular file compression method. The standard procedure with using GZIP compression is to take multiple files and create a tar archive. Later, the archive is compressed. This takes advantage of the redundancy of files to compress the files to lower sizes than most other compression methods.
It preserves the details about the files’ ownership, mode, and timestamp while creating a compressed archive. GZIP works at its highest efficiency when it is compressing a large number of files at once. GZIP can provide about 10 times better compression when compared to the ZIP compression method in terms of compressed archive size.
Basics of the gzip Command in Linux
The best way to understand any command is through understanding its syntax. Here is how the syntax for the GZIP command in Linux looks like.
gzip [option] [file]
The ‘file’ can refer to an uncompressed file for compression or a compressed archive for decompression. The GZIP command in Linux allows several options to dictate how you compress and decompress your data. Here is a list with some of the commonly used options offered by the GZIP command in Linux.
| Option | Effect |
| -f | This option is used to tell the gzip command to forcefully compress a file, even if a .gz archive for the file already exists. |
| -d | This option is used to tell the gzip command to decompress a .gz archive |
| -k | By default, any file you compress using the gzip command is replaced with a .gz archive of the same name. This option is used to tell the gzip command to retain the original uncompressed version of the file, even after a .gz archive for the file has been created. |
| -v | This option is used to tell the gzip command to give verbose output while compressing a file. |
| -r | This option is used to tell the gzip command to recursively compress a file present in the current directory and its subdirectories. |
| -L | This option is used to tell the gzip command to display the GZip license for a given .gz archive. |
While this list covered all the basic options used in the GZIP command, you may explore the other, less-used options to learn more about the GZIP command in Linux.
How to Compress Files With the gzip Command in Linux?
It’s as simple as typing gzip followed by the filenames. Have a look at the syntax below:
gzip <filenames separated by spaces>
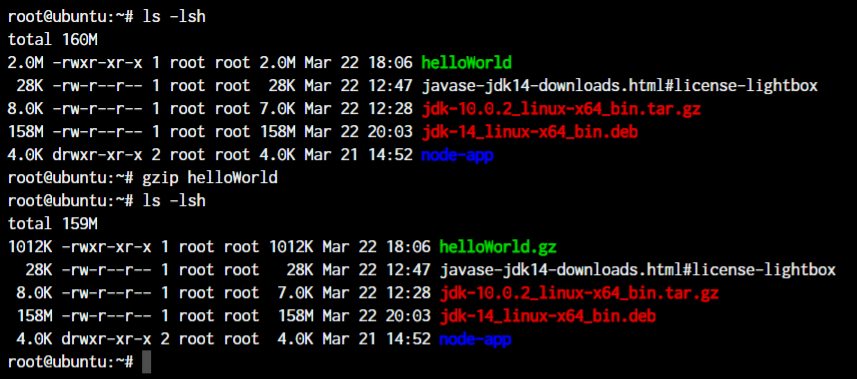
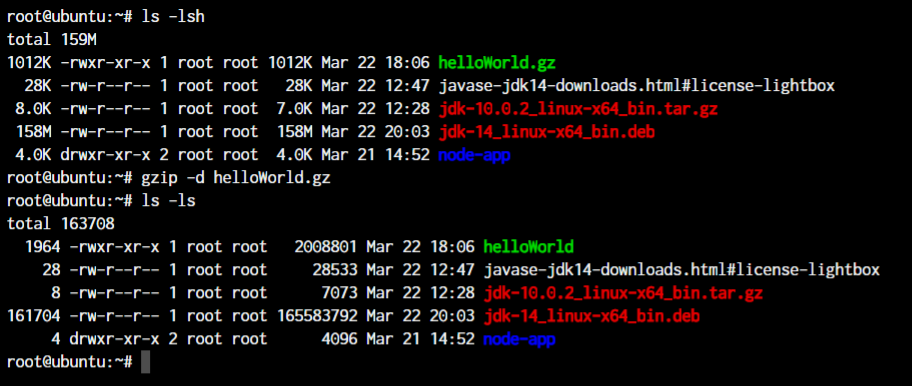
Notice how the “helloWorld” file went from 2MB to 1012KB after we compressed it using gzip. But there’s one problem. The gzip command doesn’t understand if you want to compress multiple files.
In such a case, you need to compress those multiple files in a tar format and then compress that to gz. That’s why we have tar.gz files.
Check Compressed File Statistics
To check what the compressed and uncompressed file sizes would be, you can use the -l command option.
root@ubuntu:~# gzip -l helloWorld.gz
         compressed        uncompressed  ratio uncompressed_name
            1035475             2008801  48.5% helloWorld
The sizes and the compression ratio is displayed right here. You can display the same data for all the gzip files in the directory with the use of the asterisk wildcard.
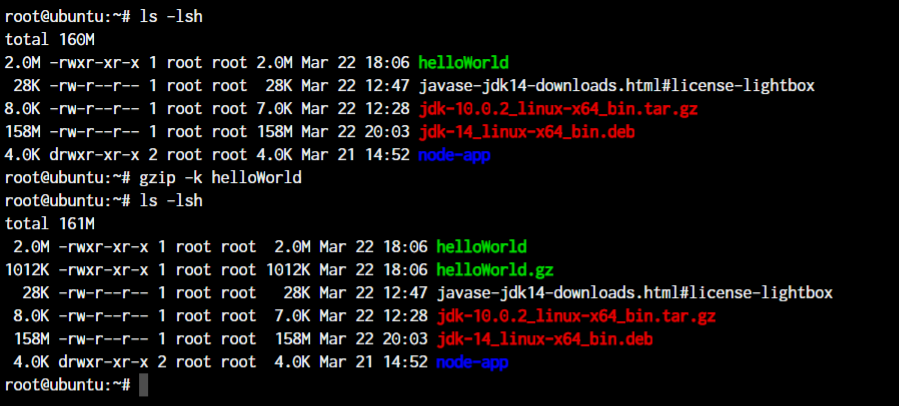
Keep The Original File After Compression
As you saw above, the original file was lost after the compression. But if you want to keep the original file even after the compression is complete, you can use the -k option.
gzip -k <filename>
Setting Compression Levels Using the gzip Command in Linux
By default, gzip command in Linux performs a level 6 compression but allows us to specify the compression levels based on speed or compression quality.
The compression levels range from 1 to 9 where level 1 offers the fastest compression speeds whereas level 9 offers the highest compression ration.
Let’s find out if there’s any difference when we compress our helloWorld file with level 9 compression.
gzip -9 <filename>

Since the file is already pretty small, the compression difference is just as small. By default, the compression resulted in a 1012K file. With the best compression, it’s now 1007K. This difference is very noticeable when you’re working with large files.
Now that we know how to compress files, let’s learn to decompress files using the gzip command in Linux.
Decompress/Uncompress a Gzip File
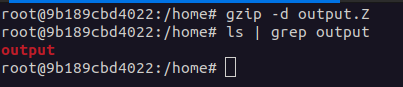
Once you’ve compressed a file, you cannot just rename the file and remove the .gz extension to retrieve the original file. We need to decompress the file. To decompress the file, we can use the -d option.
gzip -d <filename>.gz
Retain the Compressed Files After Decompression
Alright, now similar to the problem with compression, decompressing a file deletes the original compressed version of the file that we pass as input. How do we solve that? We use the -k option again.
gzip -dk <filename>.gz
This will keep the compressed file intact when decompressing a file with the gzip command in Linux.
Compress and Decompress Entire Directories
We have been working with individual files up until now. When you want to save the disk size of entire directories, you need to use the -r option which stands for recursive. A common option among many Linux commands to denote that we’re working with directories.
gzip -r <directory>   # Compress

gzip -dr <directory>   # Decompress
This will compress or decompress all the files within a directory as shown below:
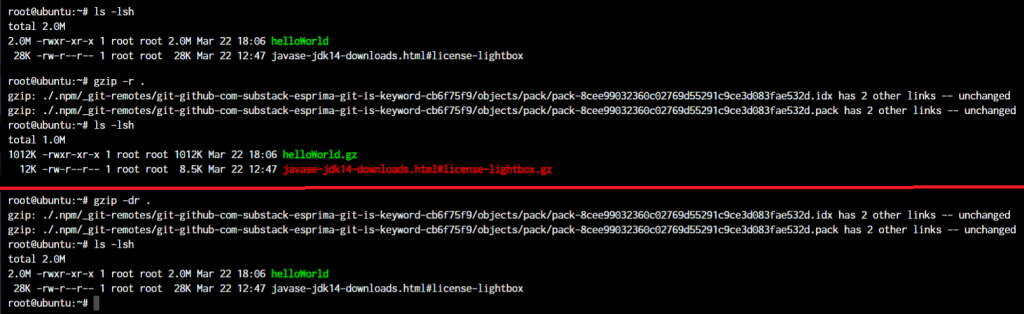
In the above screenshot, I’ve compressed and decompressed the entire directory. As you can see, the two files in the directory were compressed to a smaller size and then decompressed later.
What is the gzip command used for?
The gzip command is used to compress files in Linux. It reduces the size of the files, making them easier to transfer and saving space on the storage device.
How do I use the gzip command to compress a file?
You can use the following command to compress a file using gzip: gzip [filename]. This will create a compressed file with the .gz extension.
What is the gunzip command used for?
The gunzip command is used to decompress files that have been compressed using gzip. It reverses the compression process, restoring the file to its original size and format.
How do I use the gunzip command to decompress a file?
You can use the following command to decompress a file using gunzip: gunzip [filename.gz]. This will restore the file to its original format.
Can I use the gzip cmd to compress multiple files at once?
Yes, you can use the gzip command to compress multiple files by providing their names as arguments. For example, gzip file1 file2 file3 will compress all three files simultaneously.
Conclusion
Storage space and network bandwidth are two of the most valuable resources in any system. When you are storing some files or transferring them over a network, you don’t wish to devote more resources than you need to.
Using the right compression methods can reduce your requirements massively and the GZIP command in Linux is a massive tool to help you with creating and managing compressed archives for your data.
The gzip command in Linux is pretty straightforward. If you’re interested in learning more about the command, you can read the manual page using the man command. If you have any questions about the gzip command in Linux, do let us know in the comments below.
Also Read: 5 Fun Linux Commands You Should Try Today!