
The LEMP stack is a group of software that you can use to serve dynamic web pages written in PHP. LEMP is the combination of Linux, Nginx (pronounced as Engine-x), MySQL, and PHP. In this article, we’ll look at how to install and set up the LEMP stack on an Ubuntu/Debian machine. Since we will be using Ubuntu/Debian, we will already have Linux from the LEMP stack. Let’s now look at the steps to install rest of the stack.
Steps to Install the LEMP Stack on Ubuntu/Debian
Let’s go over the steps to install the LEMP stack on Ubuntu or Debian based systems. We’ll go over each step in-depth and if a specific step cannot be covered in this brief article, you can refer to the full articles linked within the section in case you experience any difficulties while setting up the system.
Step 1 – Install Nginx
Nginx is available in the default repos and can be installed using the apt command:
sudo apt update
sudo apt install nginx

To check the status of nginx using the systemctl command, type
sudo systemctl status nginx

Enable the nginx service
You need to enable the Nginx service, so that it automatically starts on bootup. This can be done using the systemctl command.
sudo systemctl enable nginx

Enable Firewall Ports
You also need to allow traffic on the ports Nginx is listening on. First, let’s list all the application profiles using the ufw command:
sudo ufw app list

Now specifically allow the Nginx profile. If you want to allow both HTTP and HTTPS connections, use Nginx Full profile. Other Nginx profile names are self-explanatory.
sudo ufw allow in "Nginx Full"

Check if Nginx is working on the server machine
You can check the ports on which nginx listens using the netstat command:
netstat -pnlt | grep 80

By default it runs on port 80. So, you should see LISTEN on port 80 and nginx as the service.
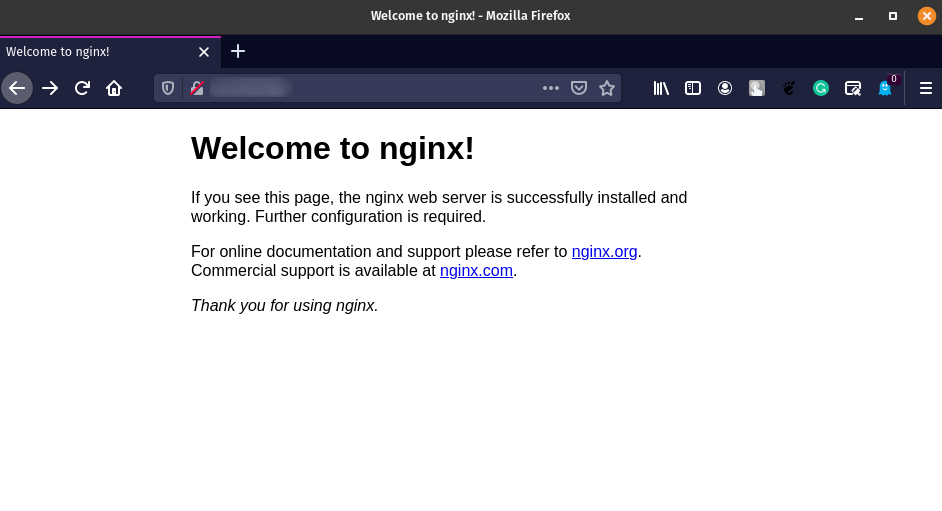
Check if Nginx is serving pages on the client machine
Go to any browser’s address bar on any client machine and type the IP Address/Domain Name of the machine on which Nginx is running. You should get a page like this.
Step 2 – Install MySQL
Now that E of LEMP is installed we move on to the M that is MySQL. MySQL is an open-source relational database management system. To install it, type
sudo apt install mysql-server

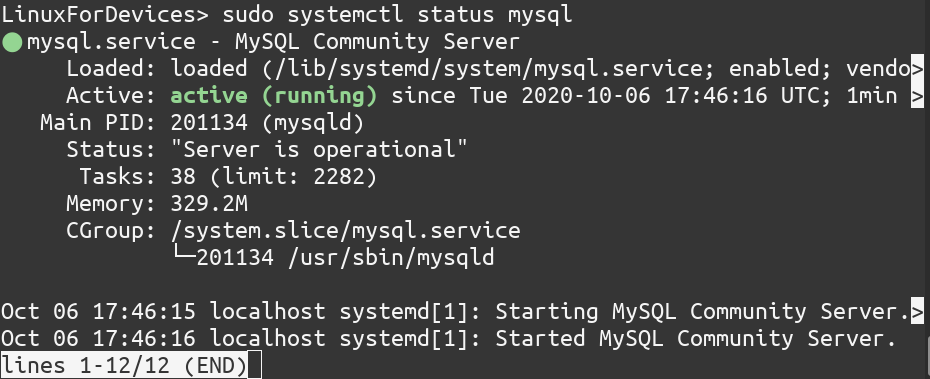
Check the status of mysql service
To check the status of mysql using the systemctl command, type
sudo systemctl status mysql
Now enable it so that it starts on bootup automatically:
sudo systemctl enable mysql
Secure the mysql installation
When the installation is finished and MySQL Server is up and running, it is recommended that you run the mysql_secure_installation program. This makes the MySQL installation more secure.
sudo mysql_secure_installation
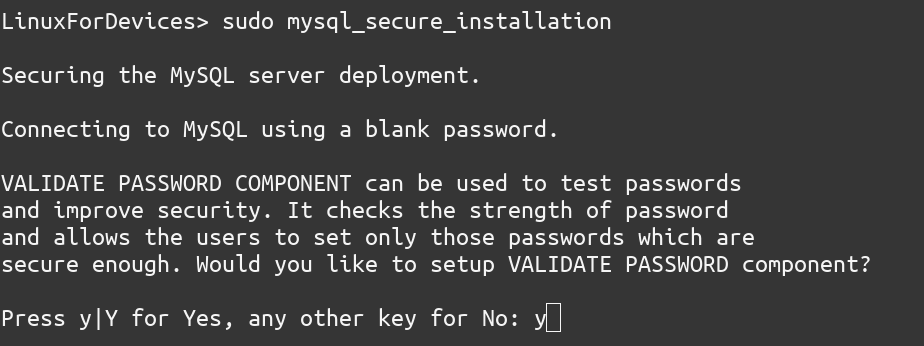
Then, you need to set the strictness policy of the password. Ideally, you should set it to at least MEDIUM. I have set it to LOW for the purpose of demonstration.
After the password policy, it’ll ask you to set a root password. This is the password for the admin of the database. (not be confused with the root user’s login password.)
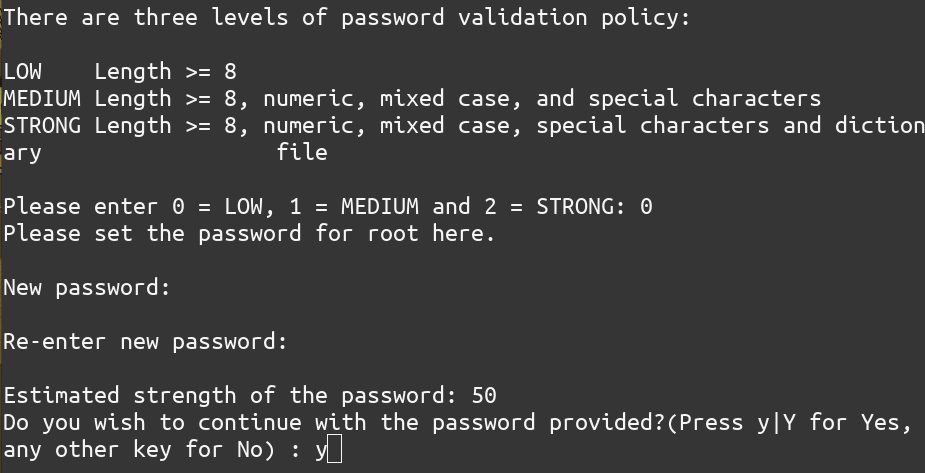
After you confirm that you want to continue with the password provided, it will ask for some other measures like removing anonymous users, disallowing root login remotely, etc. You can type y in all these questions.
Login to MySQL Console (Optional)
You can login to the MySQL console by typing and entering your login password (UNIX password)
sudo mysql
It gives you a prompt where you can run queries. We’ll use it to query the plugin used by the MySQL root user. plugin is the MySQL nomenclature for the authentication method.
Type
mysql> SELECT user, plugin FROM mysql.user;
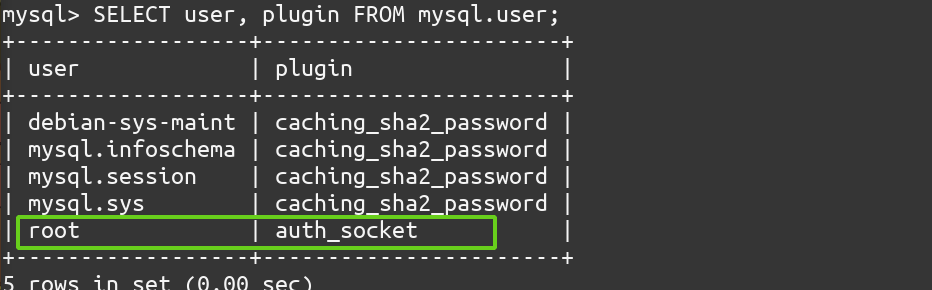
As can be seen in the above screenshot, root uses auth_socket which means any user with root privileges can log in to MySQL root user using their UNIX password rather than the password you set using the mysql_secure_installation.
This is actually more secure as only the users with root privileges are allowed to log in as MySQL root users. So, the MySQL root password has no practical use but setting it acts as a failsafe should the authentication method change to caching_sha2_password.
Now, MySQL is also set up. You can leave the console by typing exit.
mysql> exit
Step 3 – Install PHP
We have Nginx to serve webpages and MySQL as our database. We now need PHP to generate dynamic webpages. We also need a bridge between our web-server which is Nginx and PHP so that Nginx can pass the requests to the PHP interpreter. php-fpm (PHP FastCGI process manager) is that bridge.
To connect PHP and MySQL we need the php-mysql module. Installing php-mysql will automatically install the core PHP modules.
To install required PHP modules and php-fpm, type
sudo apt install php-fpm php-mysql

Step 4 – Nginx Configuration
We’ve covered the installation part of the LEMP stack. Now we need to configure Nginx to use PHP to serve the pages. The configuration file we need to edit is /etc/nginx/sites-available/default .
Open it in the editor of your choice. I’ll be using the nano text editor:
sudo nano /etc/nginx/sites-available/default
The changes made are in the highlighted in bold. Edit the file as follows:
server {
        listen 80 default_server;
        listen [::]:80 default_server;

        [...]

        root /var/www/html;

        # Add index.php to the list if you are using PHP
       index index.php index.html index.htm index.nginx-debian.html;

        server_name 192.168.1.66;

        location / {
                # First attempt to serve request as file, then
                # as directory, then fall back to displaying a 404.
                try_files $uri $uri/ =404;
        }

        # pass PHP scripts to FastCGI server

        location ~ \.php$ {
               include snippets/fastcgi-php.conf;

               # With php-fpm (or other unix sockets):
               fastcgi_pass unix:/var/run/php/php7.4-fpm.sock;
               # With php-cgi (or other tcp sockets):
               #fastcgi_pass 127.0.0.1:9000;
        }

        # deny access to .htaccess files, if Apache's document root
        # concurs with nginx's one
        #
        location ~ /\.ht {
               deny all;
        }
}
Here’s a breakdown of the above file:
- Nginx is listening on port
80for incoming connections. try_filestells Nginx to verify that a requested file or directory actually exists in the site’s root filesystem before further processing the request. If it does not, a404is returned.location ~* \.php$means that Nginx will apply this configuration to all .php files in your site’s root directory, including any subdirectories containing PHP files.include snippets/fastcgi-php.conftells Nginx to include the configuration file forfastcgi.fastcgi_passspecifies the UNIX socket where PHP listens for incoming connections from other local processes.
After saving and editing the file, test the configuration file by typing
sudo nginx -t

It should show that the test was successful.
Step 5 – Testing PHP with Nginx
Let’s create a simple PHP file to check whether Nginx is able to serve PHP pages or not.
Create a new file /var/www/html/info.php using your favorite editor.
sudo nano /var/www/html/info.php
Add the following lines to it:
<?php
phpinfo();
?>
Save and exit the editor.
The Nginx service needs to be reloaded for this. You can do that using the systemctl command.
sudo systemctl reload nginx
Go to a browser and point the address to <server_ip_addr>/info.php. You should see a page similar to the following one.
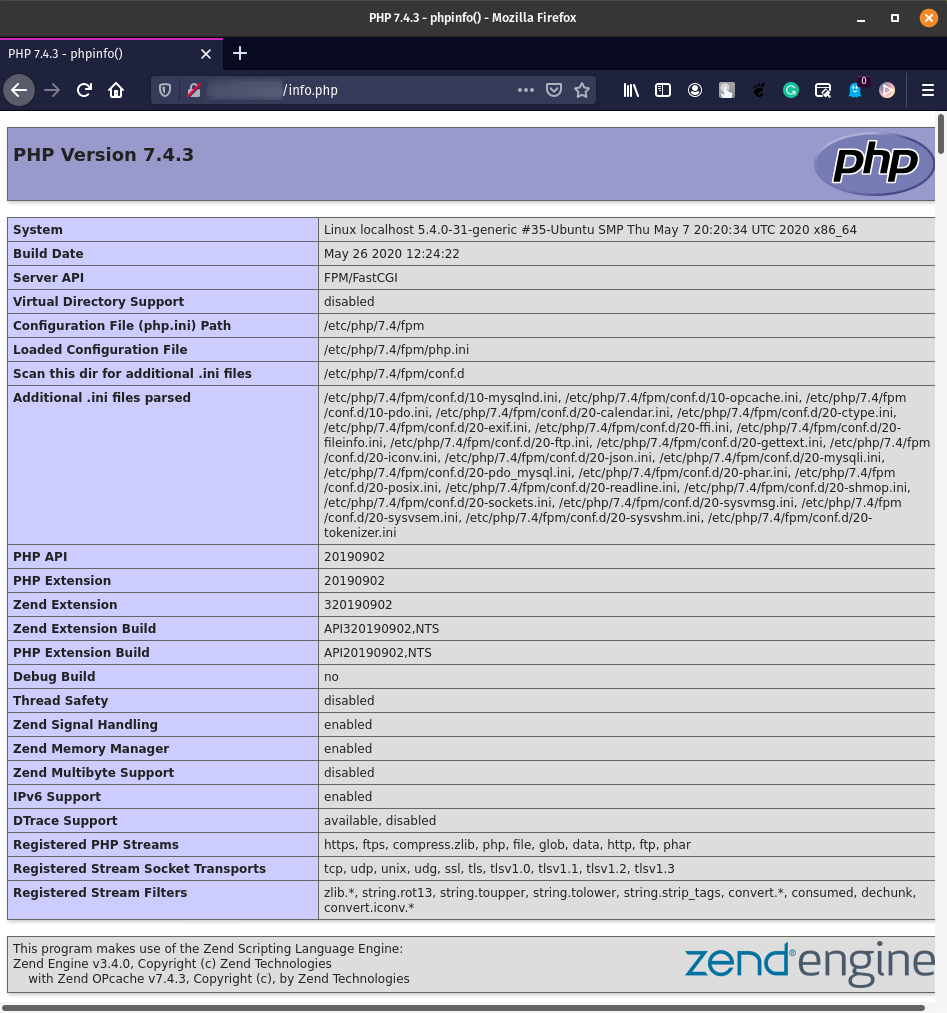
If this page is visible, it means that Nginx and PHP are correctly set up. This file has sensitive information about your environment so delete this file using the rm command.
sudo rm /var/www/html/info.php
Step 6 – Testing PHP with MySQL
To test PHP with MySQL we’ll create a dummy user and a dummy database:
First login to the MySQL console using the root user.
sudo mysql
Then to create a database, a user and also to give appropriate permissions to the user, type:
mysql> CREATE DATABASE testdb;
mysql> CREATE USER 'testuser' IDENTIFIED WITH mysql_native_password BY 'password';
mysql> GRANT ALL ON testdb.* TO 'testuser';
The above commands create a database named testdb, create a user testuser who has the password as password. The user is then granted all permissions on the database testdb.
Now exit the console using exit
mysql> exit
Login using the newly created testuser just to confirm that the new user has proper permissions
mysql -u testuser -p
The -p option prompts for the password (in this case literally password. You should use a more secure password and not just password)
Now let’s create a table named groceries.
mysql> CREATE TABLE testdb.groceries (
mysql>    item_id INT AUTO_INCREMENT,
mysql>    content VARCHAR(255),
mysql>    PRIMARY KEY(item_id)
mysql> );
Now insert some dummy values in the table like the one below:
mysql> INSERT INTO testdb.groceries (content) VALUES ("Banana");
Using MySQL in PHP
Now that we’ve set up our database, we will query it using PHP. Create a PHP file as /var/www/html/groceries.php using your favorite editor
nano /var/www/html/groceries.php
Then paste the following contents in the file:
<?php
$user = "testuser";
$password = "password";
$database = "testdb";
$table = "groceries";

try {
  $db = new PDO("mysql:host=localhost;dbname=$database", $user, $password);
  echo "<h2>Groceries</h2><ol>";
  foreach($db->query("SELECT content FROM $table") as $row) {
    echo "<li>" . $row['content'] . "</li>";
  }
  echo "</ol>";
} catch (PDOException $e) {
    print "Error!: " . $e->getMessage() . "<br/>";
    die();
}
?>
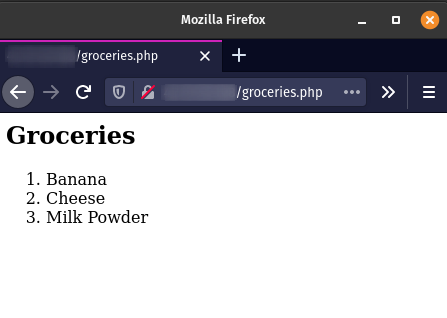
Save and exit the editor. Then go to a browser and point its address bar to <server_ip_addr>/groceries.php. You should get a page similar to the one shown below except the list items will be what you inserted in the MySQL database.
This concludes the installation and configuration of the LEMP Stack.
Conclusion
I hope this article got you started with the LEMP stack. Nginx is a very powerful Web-Server and has a ton of options. To know more about them check its documentation. PHP also has its own documentation. Particularly the section on MySQL in PHP could be a good read. MySQL’s documentation can be found here.