
Let’s have a look at a really simple to use firewall, the UFW firewall. As a system administrator, it is our duty to make sure that the systems we work on are secured from attackers. There are multiple methods to incorporate in terms of network security but the most fundamental one begins with a firewall. And Linux offers a very robust and customizable firewall for all its users.
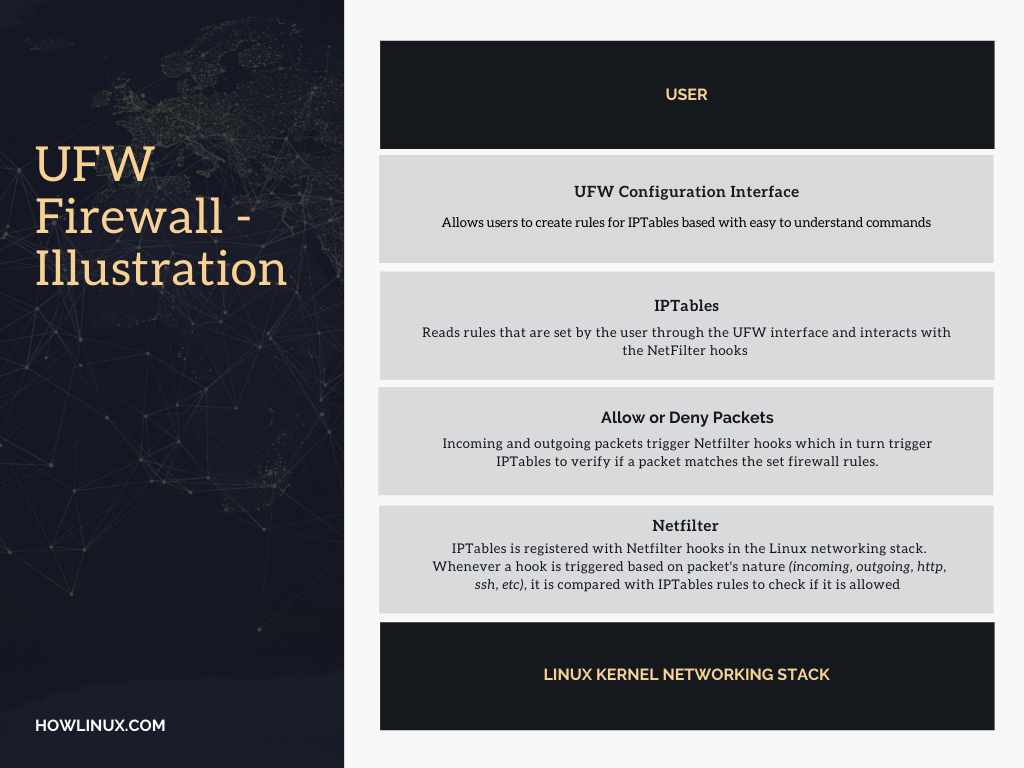
When working with networks on any Linux system, the most common method to manipulate or control data packets is with the use of the IPTables firewall interface. But for users who require basic configuration and do not want to go deep into their firewalls, IPTables can become really overwhelming and complicated.
UFW bridges this gap for the average users. Providing an interface for the IPTables, UFW simplifies firewall configuration and makes it accessible to even beginners. How does UFW firewall work? How to set up the UFW Firewall? How to configure the UFW firewall? We’ll answer all of these questions in this tutorial.
What is the UFW Firewall in Ubuntu/Debian?
UFW or UncomplicatedFireWall is exactly what the name suggests. It’s a firewall configuration utility that uncomplicates configuration for the common user. It interacts with IPTables and makes changes with the use of IPTables while offering really simple command usage.
Working With UFW Firewall in Ubuntu/Debian
With Ubuntu, UFW comes pre-installed, but in Debian, we need to install the package. Run apt install ufw to get started.
By default, UFW is disabled. We can confirm this by running the command ufw status. To enable the firewall, we’ll type in ufw enable.
root@ubuntu:~# ufw status
Status: inactive

root@ubuntu:~# ufw enable
Command may disrupt existing ssh connections. Proceed with operation (y|n)?

root@ubuntu:~# ufw status
Status: active

To                         Action      From
--                         ------      ----
22/tcp                     ALLOW       Anywhere
22/tcp (v6)                ALLOW       Anywhere (v6)
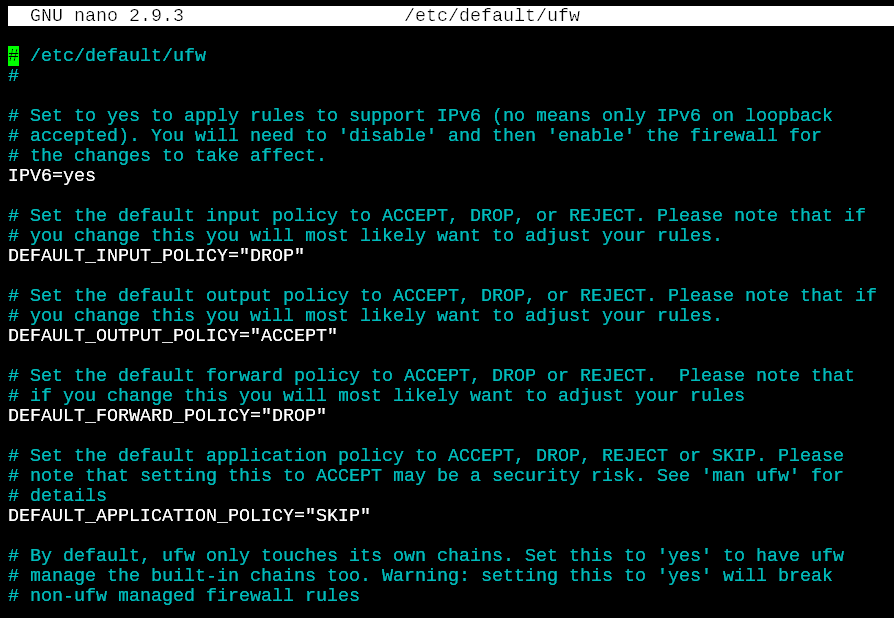
Where is UFW Configuration File Located?
The UFW configuration file is /etc/default/ufw which contains basic defaults for the UFW firewall. This file doesn’ allow you to set up firewall rules but default policies of how the firewall behaves with packets that have no rules specified.
Configuring UFW on Ubuntu
To configure the firewall, we will begin by setting up some fundamental rules. On a server, any port that is not explicitly opened should deny an incoming connection. Outgoing connections should all be allowed. We’ll activate both of these rules with the commands below.
root@ubuntu:~# ufw default deny incoming
Default incoming policy changed to 'deny'
(be sure to update your rules accordingly)

root@ubuntu:~# ufw default allow outgoing
Default outgoing policy changed to 'allow'
(be sure to update your rules accordingly)
Now that we’ve set up the defaults, we’ll configure specific rules for our purpose.
Allowing and Denying Connections on Specific Ports With UFW Firewall
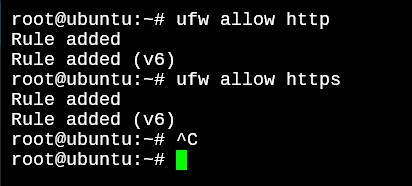
Now we know that UFW is going to deny everything that’s incoming, and allow everything that’s outgoing. Let’s narrow down further. We sure want to deny everything, but still want to allow a couple of ports for outside users to gain access to, for example, our web server and ssh server. We’ll first allow http and https access to our server.
root@ubuntu:~# ufw allow http
Rule added
Rule added (v6)

root@ubuntu:~# ufw allow https
Rule added
Rule added (v6)
root@ubuntu:~#
Similarly, let’s allow ssh traffic.
root@ubuntu:~# ufw allow ssh
Once done, we can verify all the rules that have been added to the UFW rule list by using the ufw status.
root@ubuntu:~# ufw status
Status: active

To                         Action      From
--                         ------      ----
22/tcp                     ALLOW       Anywhere
80/tcp                     ALLOW       Anywhere
443/tcp                    ALLOW       Anywhere
22/tcp (v6)                ALLOW       Anywhere (v6)
80/tcp (v6)                ALLOW       Anywhere (v6)
443/tcp (v6)               ALLOW       Anywhere (v6)

As you might have noticed, the rules have been added twice; Once for IPv4 and another time for IPv6. This is because the Linux kernel considers these types of IPs as different networks and the interfacing utilities like IPTables and UFW interact in a similar way by separating both the IP versions like different networks.
If you’d like to specify the port number instead of the protocol, we can so in a similar fashion as we did for the commands above.
root@ubuntu:~# ufw deny 2020
This will deny all traffic on port 2020.
Allowing or Denying Port Ranges With UFW Firewall
Allowing or denying ports with the UFW firewall individually is one thing. But when you’re working with a lot of ports that need to be open for an application to work, individually allowing ports is very inconvenient. Let’s see how we can allow multiple ports with the UFW firewall in Debian or Ubuntu.
We’ll use the following format to specify port ranges.
root@ubuntu:~# ufw allow 2020:2025
ERROR: Must specify 'tcp' or 'udp' with multiple ports

root@ubuntu:~# ufw allow 2020:2025/tcp
Rule added
Rule added (v6)

root@ubuntu:~# ufw deny 2020:2025/udp
Rule added
Rule added (v6)
When working with single ports, we don’t need to specify if it has to be TCP or UDP connections, but with multiple ports, it will give us an error if we do not explicitly mention what type of connection we’re accepting.
Allowing or Denying IP Addresses and IP Ranges
Depending on how you want your network to behave, you can make IP based rules to interact with data packets that hit your firewall. Let’s look at an example where I want to deny all the outgoing packets from my 10.1.1.151. Now, this is a local IP address but you can do the same for WAN IP addresses.
root@ubuntu:~# ufw deny out from 10.1.1.151 to any

root@ubuntu:~# ufw status
Anywhere                   DENY OUT    10.1.1.151
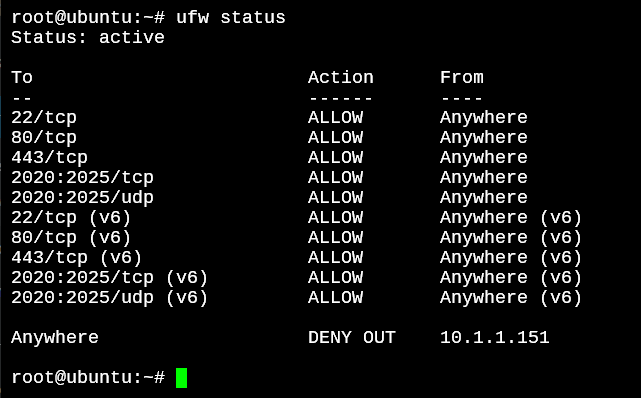
The last line confirms that all traffic coming FROM 10.1.1.151 and going TO ANY IP address is going to be DENIED. To use this command for incoming traffic, all we need to do is change the part where it says out to in.
To deny an IP range, you need to learn to use the subnet masks. Denying a specific group of IP addresses is not possible with the use of bitmasks. To learn how bitmasks work, and how to subnet the IP Addresses in your network, here’s the wiki page which explains this in great detail.
So for example, if I want to assign a rule to a subnet of 8 IP addresses, I’ll run the following command.
root@ubuntu:~# ufw allow out from 10.1.1.151/29 to any
WARN: Rule changed after normalization
Rule added
The above command will intelligently calculate the first IP address in the subnetwork, and add a rule that will include the desired IP address automatically. See the below screenshot as for what rule was added for the above command.
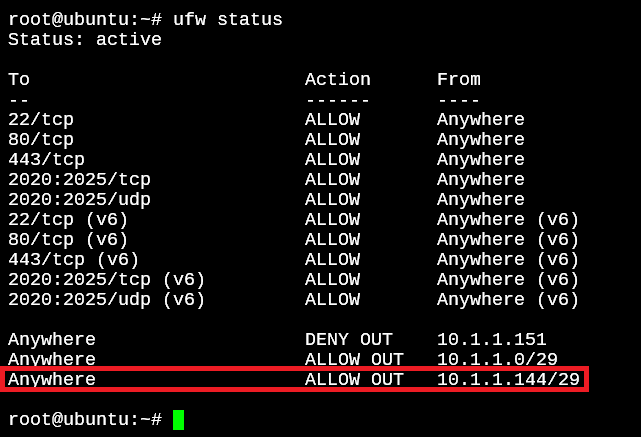
The first IP address in this subnet which includes the IP 10.1.1.151 is 10.1.1.144.
Allowing or Denying Connections on Specific Network Interfaces
With personal computers, the number of network interfaces is going to be limited. You would have one ethernet interface and one Wifi interface. With servers, the more likely situation is that you have a lot more ports. You probably also have virtual ports along with physical ports.
In this case, if you want an interface to be denied connections to and from the outer networks, it doesn’t make sense to specify IP address when we can simply specify the name of the network interface.
How can you find the network interfaces in your system? With the ifconfig command. If you type in the command by itself without any options, you will see all the active interfaces on your system. With the -a option, even the disabled ones are displayed.
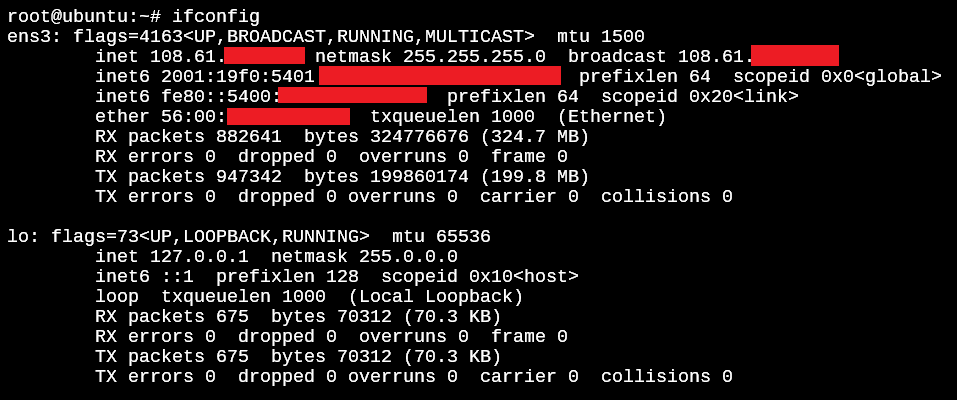
To work with one of the interfaces we’ll run the below command.
root@ubuntu:~# ufw allow in on ens3 to any
Rule added
Rule added (v6)

root@ubuntu:~# ufw status
To                         Action      From
Anywhere on ens3           ALLOW       Anywhere
Anywhere (v6) on ens3      ALLOW       Anywhere (v6)
Deleting Existing UFW Rules
We can easily delete rules with the use of the numbered option for the ufw status command.
root@ubuntu:~# ufw status numbered
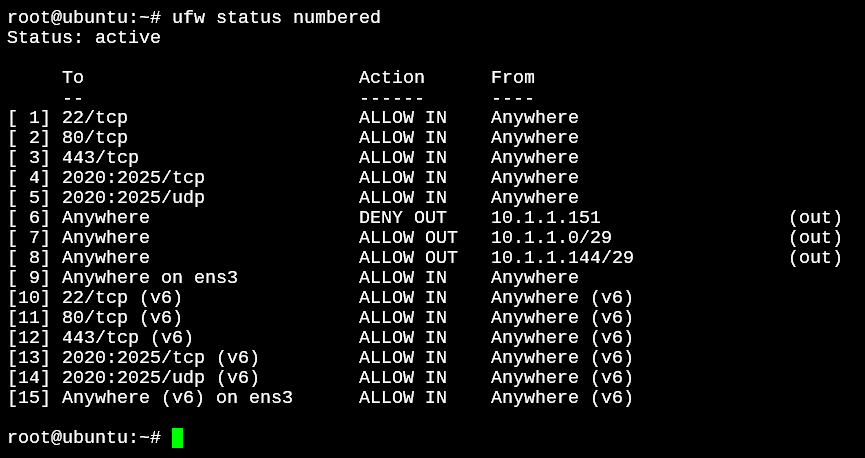
With the ufw delete command, we can specify the number on the left side to delete the adjacent rule.
root@ubuntu:~# ufw delete 15
Deleting:
 allow in on ens3
Proceed with operation (y|n)? y
Rule deleted (v6)
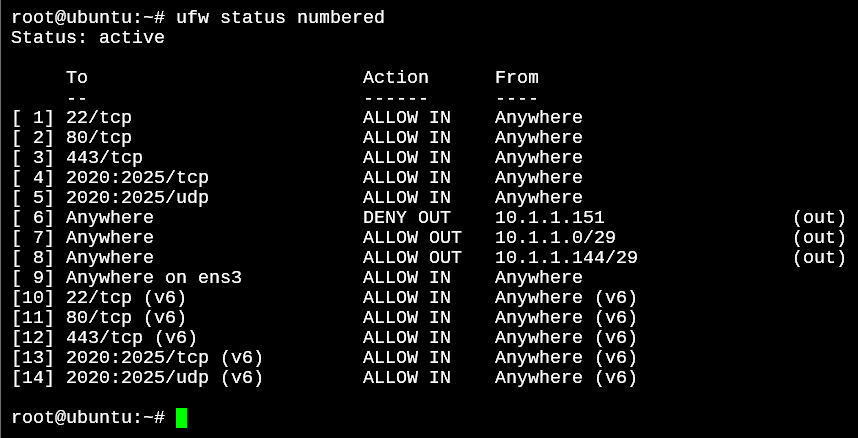
The above will remove the 15th rule from the list as you can see in the screenshot below.
Conclusion
A strong firewall configuration is the first and the most accessible security measure a server administrator should start with. Whether your setup includes just a single server, or multiple servers with a system dedicated to handling the firewall, learning to use UFW in Debian or UFW in Ubuntu is key to securing your systems.
The man pages for the UFW firewall cover more detailed functionality in-depth which you can read through when as required. We hope this tutorial has been useful to you.