

In this article, we’ll go over the complete steps to install gtop in Ubuntu.'gtop' is a Linux utility that displays the utilization of system’s resources in a graphical way. It involves reading of information related to memory and disk usage and presenting it on the terminal. Since 'gtop' is based on JavaScript, it requires multiple prerequisites for its installation.
Steps to Install gtop in Ubuntu
Before using the 'gtop' command, we will first go through its installation process. Since gtop is coded with node.js, we’ll first need to install Node and npm to get gtop on our systems.
1. Install Node.js
Node.js is an open-source JavaScript based runtime environment, that is responsible for executing JavaScript code in a system. It is fairly easy to install Node.js in Ubuntu. All we need to do is run the following command:
sudo apt install nodejs

Our system now contains the requirements to run any JavaScript-based code. Here’s a complete tutorial on installing Node.js on Ubuntu. Installing ‘gtop’ is still a few steps away because what our system does not have, is a connection with the remote 'gtop' package.
2. Install npm
npm is an acronym for Node Package Manager, which is responsible for downloading public JavaScript packages. It is installed by:
sudo apt install npm

3. Install gtop in Ubuntu
Having installed npm, we can now install gtop in Ubuntu.
sudo npm install -g gtop

The '-g' option is used to specify that the installed command can be accessed globally, that is across the system.
Note: It must be kept in mind that if we wish to uninstall a globally installed package, we need to add
'-g'flag in the'npm'uninstallation command.
This concludes the installation process for 'gtop' tool on Ubuntu.
Basics of the gtop command
After the installation is complete, we can run gtop on the terminal.

What we witness after running the command, is nothing short of an amazing display.
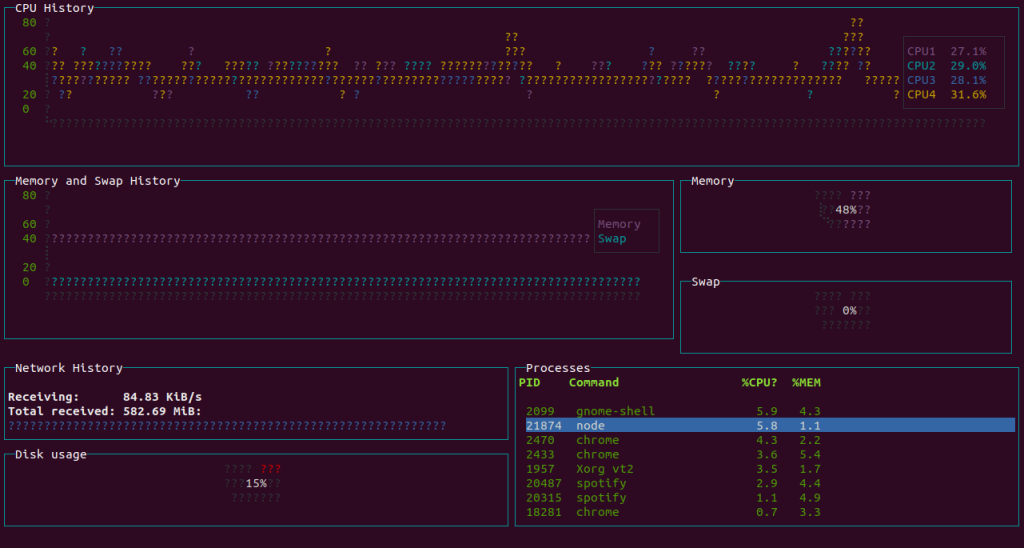
Understanding the output
The display has many panels. Let us discuss each one of them:
- CPU History: The topmost panel deals with the utilization of CPU in the context of the core number. Each core is represented by a specific color. Using the color scheme, the panel displays CPU usage in the form of a continuous graph. At the end of the panel, we can see the percentages for each CPU.
- Memory and Swap History: This panel deals with the memory consumption with respect to physical and swap memory. The graph represents the percentage consumed at each instant.
- Memory: This view displays the percentage of total physical memory occupied.
- Swap: This view displays the percentage of total swap memory occupied.
- Network History: It displays the network speed and the total amount of network data received since boot.
- Disk Usage: The percentage of disk used at an instant.
- Processes: Displays the process-related information
- PID – The process ID – – Press
'P'to sort the process list on the basis of PID. - Command – The name of the command.
- %CPU – The percentage of CPU used by the process – – Press
'C'to the list of processes by CPU%.
- %MEM – The percentage of memory occupied by the process- – Press
'M'to the list of processes by MEM%.
- PID – The process ID – – Press
Note: If we wish to quit the
gtopscreen, we can press'Q'key. It takes us back to the terminal.
Conclusion
Even though 'gtop' does not provide a wide range of information of the system’s resources, it still has a unique concept of graphically presenting the data. We have articles on top and htop commands, in case you want to quench your curiosity for system information.
We hope that this article was up your expectations. Feel free to comment below for queries related to gtop command.