

In this tutorial, we will learn how to install VNC server on Debian.
Let’s dive into what VNC is. VNC stands for Virtual Network Computer. If you want to access any remote computer or want your computer to be accessed by anyone working remotely, this can be done using the VNC server.
What is a VNC Server?
The VNC server is a desktop sharing system that allows us to share the desktop screen and handover the services like the keyboard or mouse access to a client computer. There are two devices for setting up the connection i.e. VNC Server and VNC Viewer.
Here, we will discuss how to set up the VNC Server in Debian. For this, you need to install the VNC viewer on your main operating system (in my case, it’s Windows). You have to install VNC Server on the remote computer, it will capture and transmit the screen of the remote computer that you want to control. I hope the concept is cleared.
For more details, check the RealVNC Official Documentation.
Let’s understand the steps to install VNC server on Debian.
Update the repositories
The first step is to update and upgrade the repositories. The user can update the repositories using update command i.e. it will generate the list of available packages with their versions whereas upgrading means to install the newer versions of the packages. The apt command is used to update and upgrade the packages from the apt package management system. Look at the difference between apt and apt-get command. The command for this is as follows:
sudo apt update && apt upgrade
Install VNC server on Debian
VNC server is available in other different versions such as the TightVNC server, Tiger VNC server, and x11vnc. The user can opt for any of the VNC servers. We will use the TigerVNC server. This package provides a standalone VNC server which is used to connect to the clients. Use the install command to download the package. To check the download details visit: TigerVNC Official Documentation.
For more details, check VNC Debian Official Documentation. Let’s have a look at the command below:
sudo apt install tigervnc-standalone-server tigervnc-common

You will be prompted for confirmation to continue the download. Respond Yes to it. Hence, the package will be downloaded. But Folks, this doesn’t complete the installation process. You need to configure it further.
The user needs to set the password for the VNC server i.e. View-only password. If the user wants to explain something to other users, then opt for a view-only password. Otherwise, respond it with NO, it’s because the user will not be able to interact with the VNC instance using mouse and Keyboard. So, it’s optional depends on you whether to chose or not. Let’s have a look at the command below:
vncserver
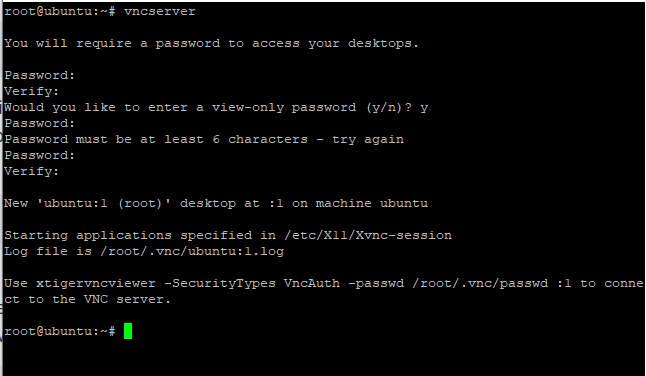
The user has entered the password as shown in the above image. We have entered the View-only password. It’s your choice to opt for it or not. This shows that the VNC Server has been started.
Note that, you can see the “:1” after the hostname. What is the significance of this? Earlier we discussed that the VNC server runs on port number 5901. Port 5901 refers to 5900+1. What if the user wants to create another instance of VNC Server. It will run on the port 5902 (5900+2).
VNC Server configurations
Once we install VNC server on Debian, the next step is to deal with the configurations. Create the systemd unit file located in /etc/systemd/system directory. Note that the user has to change the username in the file, group name, and location of the directory.
But before making any configurations, you need to kill the VNC service using the kill command. It is running on port number 5901 or (:1), therefore we have to mention the port number as well. We will use vncserver command with the -kill option. Let’s have a look at the command below:
vncserver -kill :1

The next step is to create the systemd unit file named [email protected] file as discussed earlier. We are using nano editor, the user can use vi editor as well. Just replace nano by vi command. Let’s have a look at the command below:
sudo nano /etc/systemd/system/[email protected]
OR
sudo vi /etc/systemd/system/[email protected]

Paste the following content as given below:
[Unit]
Description=Start TightVNC server at startup
After=syslog.target network.target

[Service]
Type=forking
User=root
Group=root
WorkingDirectory=/home/root

PIDFile=/root/.vnc/%H:%i.pid
ExecStartPre=-/usr/bin/vncserver -kill :%i > /dev/null 2>&1
ExecStart=/usr/bin/vncserver -depth 24 -geometry 1280x800 :%i
ExecStop=/usr/bin/vncserver -kill :%i

[Install]
WantedBy=multi-user.target
Don’t forget to change the user, group, and working directory information.
Use Ctrl + O key to saving the changes if you are using the nano editor. In case using vi editor, use “:wq” command to save and exit the changes. Note that ExecStartPre will automatically kill the vncserver service if it is already running. Use vncserver command to kill the service as discussed earlier.
Reload the VNC service
Whenever we make changes in any of the configuration files, the services need to be reloaded again. The user can use the reload command to reload the vnc service. Let’s have a look at the command below:
sudo systemctl daemon-reload
Daemons are the services or the programs running internally in the system. The next step is to enable the unit file. We will use the enable command to enable the unit file. Let’s have a look at the command below:
sudo systemctl enable [email protected]
The next step is to start the services. Use start command to start the services. You can also check the status of the service using the status command. Let’s have a look at the command below:
sudo systemctl start [email protected]
sudo systemctl status [email protected]
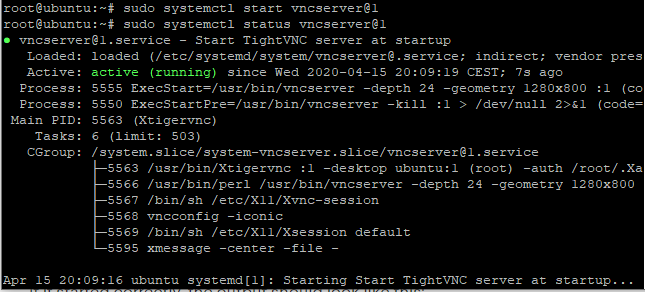
You can see the status of the service as active highlighted above.
Setup the connection to VNC server
The user needs to set the ssh tunnel. There are two ways to set the ssh tunnel. If you are using the Linux, macOS or any other UNIX operating system, you need to create the ssh tunnel using ssh command.
If you are using putty, then you need to set the ssh tunneling. Don’t worry, we will discuss it in the further section. Let’s have a look at the command below to enable the ssh tunneling in Linux:
ssh -L 5901:127.0.0.1:5901 -C -N -l username your_server_ip
If you are using a putty server on windows, select the ssh tunneling option in the ssh dropdown list.
- Add the port 5901 and the host IP address followed by the port number in the destination block.
- Click on the Add button.
- Go back to the session option and initiate the connection.
Let’s have a look at the image below:
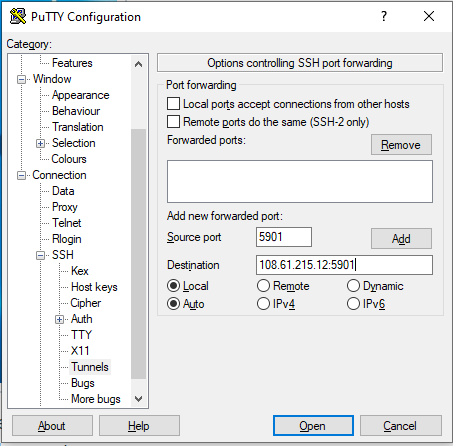
As given in the above figure, add the details as described earlier. After successfully creating the ssh tunnel we’ll connect to the localhost using our VNC viewer.
Begin with the VNC server
The last step to install VNC server on Debian is to connect to the VNC server. You are required to download the VNC viewer if you’re on Windows. After successfully downloading the VNC viewer, initiate a connection with the localhost and port 5901.
The reason why we are connecting to the localhost on 5901 port instead of the remote IP is because we’ve already established the SSH tunnel in the previous step. This step will simply request VNC packets from the server through the already established tunnel without needing to know the destination IP address.
Look at the command given below:
LOCALHOST:5901
You have successfully set up the VNC Server.
Conclusion
That’s it. We have discussed all the necessary steps to install VNC Server on Debian. If you face any issues, do let us know in the comment section.