

In this tutorial, we will learn how to install Squid proxy on Debian.
Before we begin with the installation process, we should be aware of what is a proxy, proxy server and so on. Let’s understand the basic terminologies.
What is Squid Proxy ?
A proxy is an intermediate unit that relays the information to and from the source to the destination while hiding the identity of the source. Now, what is the Squid proxy caching server? It’s an open-source utility that allows you to set up HTTP relay and turn your web server into a web proxy. With in-built caching, the Squid proxy caching server also allows you to optimally use the bandwidth by caching repeated requests for users.
For more details, check the Squid Official Documentation.
Let’s understand how to install squid proxy on Debian.
Update the repositories
The first step is to update the repositories. Always remember to update the installed packages before installing any new package. The packages installed should be of the latest version. The user will first update the packages followed by upgrading them.
Updating the packages means to download the list of available packages with their version in the system whereas upgrading means to install the latest version of available packages. Use apt command to do. Check the difference between apt and apt-get command. Let’s have a look at the command below:
sudo apt update && apt upgrade
Install Squid Proxy on Debian
The next step is to install Squid proxy on Debian using the apt install command. To do so, type the following on the terminal,
sudo apt install squid
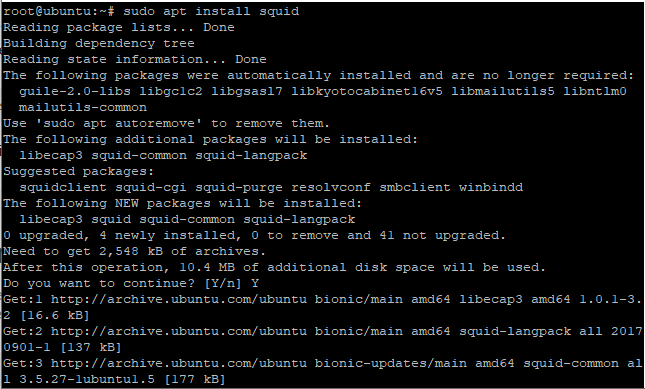
You will be prompted for the confirmation of installing the package. Respond to it with Y to continue the installation process. You have successfully installed the package.
Basic configuration
Once we install Squid proxy on Debian, there are some of the basic configurations that are required to be set.
The user has to make the changes in squid.conf file located in /etc/squid3 or /etc/squid depending on the version of the squid.
Here, we have to change the status of http_access from denying all to allow. By default, the Squid proxy server doesn’t allow access to any site. You can use either nano editor or vi editor. We are using vi editor. Let’s have a look at the command below:
vi /etc/squid3/squid.conf
OR
vi /etc/squid/squid.conf
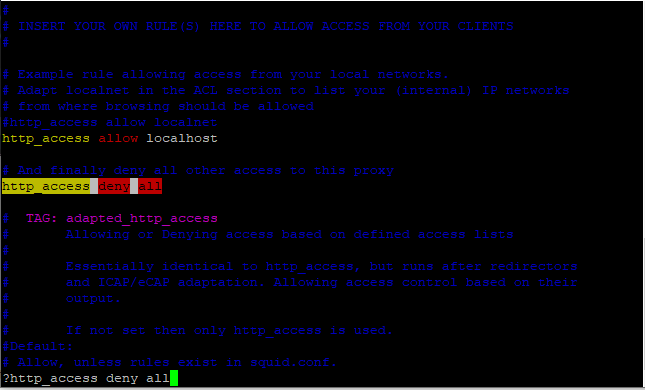
You might want to search for specific lines within a file on the vi editor. To do so, press the Esc key followed by the “?” and the keyword to be searched. As in the above image, We have used ?http_access deny all i.e. it will search for this keyword in the file. Set the status from deny all to allow. Save and exit the changes using “:wq”.
If you are using nano editor, use Ctrl + O to save the changes.
The next step is to find the visible_hostname. Search for this keyword using the steps described above, and set the name you want.
Block the specific websites
What if, the user wants to block the specific websites. This is not the mandatory step, but an additional configuration.
We will also learn how to block specific keywords in the further section. There are two ways to do so, either to add the list of domains in the configuration file or to make a separate file followed by adding the domain names and mention the file name in squid.conf file. Let’s try the first method.
Add the following block in the squid.conf file before any allow all rules. Let’s have a look at the command below:
vi /etc/squid3/squid.conf
Or
vi /etc/squid/squid.conf
Either use nano editor or vi editor. Add the following code in the file.
acl blocksite1 dstdomain yahoo.com
acl blocksite2 dstdomain www.rediff.com
http_access deny blocksite1
http_access deny blocksite2
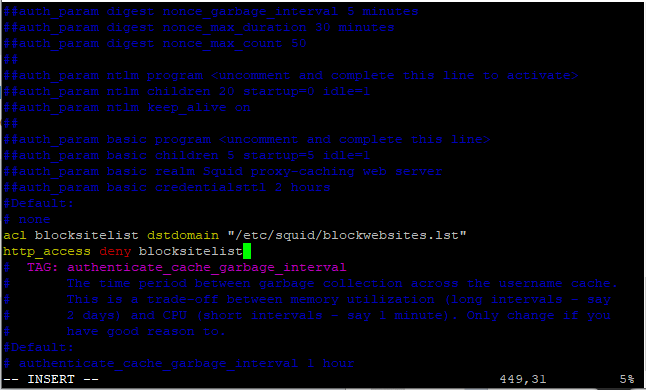
The particular sites will be blocked. The alternative method is to create a file named blockwebsites.lst located in /etc/squid/ directory and add the list of domains.
When you have a long list of domains, this method is useful. Create the file using touch command and add the list of domains. Further, add the file name in squid.conf file. Let’s have a look at the command below:
touch /etc/squid/blockwebsites.lst
sudo nano /etc/squid/blockwebsites.lst
vi /etc/squid/squid.conf
In the squid.conf file, add the following code given below:
acl blocksitelist dstdomain "/etc/squid/blockwebsites.lst"
http_access deny blocksitelist
The user can also check for the domain names using cat command. To do so, type the following in the terminal:
cat /etc/squid/blockwebsites.lst

Block specific Keywords through squid
Earlier we learned how to block the specific sites through squid. Here, we will block some keywords with squid. The process will be the same as we did earlier. There are two methods as discussed above. Let’s discuss the first method to block the specific keywords.
We will add the block of code in squid.conf file located in /etc/squid directory. To do so type the following in the terminal:
vi /etc/squid3/squid.conf
Or
vi /etc/squid/squid.conf
Add the following code given below:
acl blockkeyword1 url_regex yahoo
acl blockkeyword2 url_regex gmail
http_access deny blockkeyword1
http_access deny blockkeyword2
The alternative method is to create the file and add the list of keywords. Create the file named blockkeywords.lst in /etc/squid directory. The file name will be mentioned in the squid.conf file. Let’s have a look at the command below:
touch /etc/squid/blockkeywords.lst
sudo nano /etc/squid/blockkeywords.lst
vi /etc/squid/squid.conf
Add the following code:
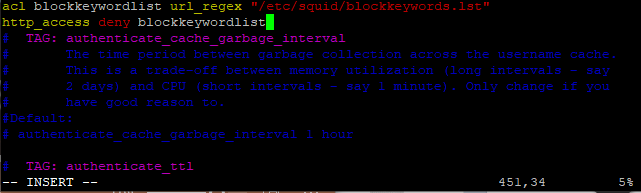
acl blockkeywordlist url_regex "/etc/squid/blockkeywords.lst"
http_access deny blockkeywordlist
The user can also view the content of the file using cat command. Let’s have a look at the command below:
cat /etc/squid/blockkeywords.lst

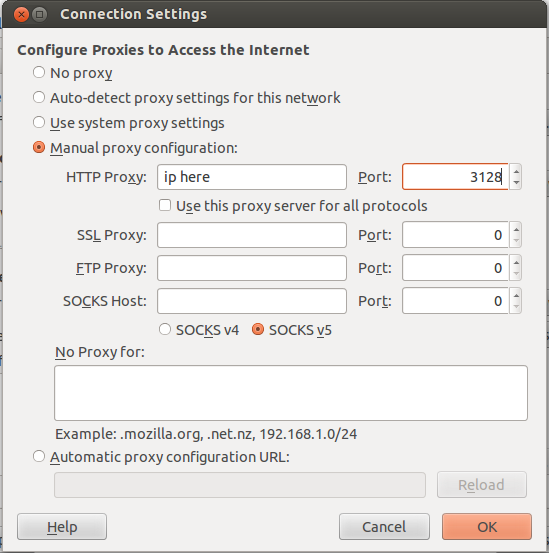
Client side configurations
The last step is to figure out the client-side configurations. If you are using the firefox, Go to the edit menu, opt for the preferences.
- Select Advanced > Network >>Settings.
- A dialog box will appear.
- Select Manual Proxy configuration.
- Mention the IP address of the server and port.
- The default port of Squid Proxy is 3128.
Have a look at the image below:
You are done!
Conclusion
That’s it. We have learned how to install Squid Proxy on Debian and convert our system into a web proxy. We have learned how to make the necessary configurations. If you face any issues, do let us know in the comment section.