
In this tutorial, we will be looking at the steps to install and set up a VNC Server on a CentOS 8 machine. VNC or Virtual Network Computing is a platform-independent protocol that enables users to connect to and control a remote computer system graphically. It follows a server-client architecture.
Steps to Install VNC Server on CentOS 8
Almost all the commands in this tutorial would require superuser privileges. So, either switch to the root user using su or prepend every command with sudo.
1. Install GUI Packages
Chances are that you are running a non-GUI CentOS server. To use VNC you need to have a GUI as VNC’s purpose is to remotely view the desktop. If you are already on a GUI, you can skip this step.
GUI related packages can be installed using the dnf command:
dnf groupinstall "Server with GUI"
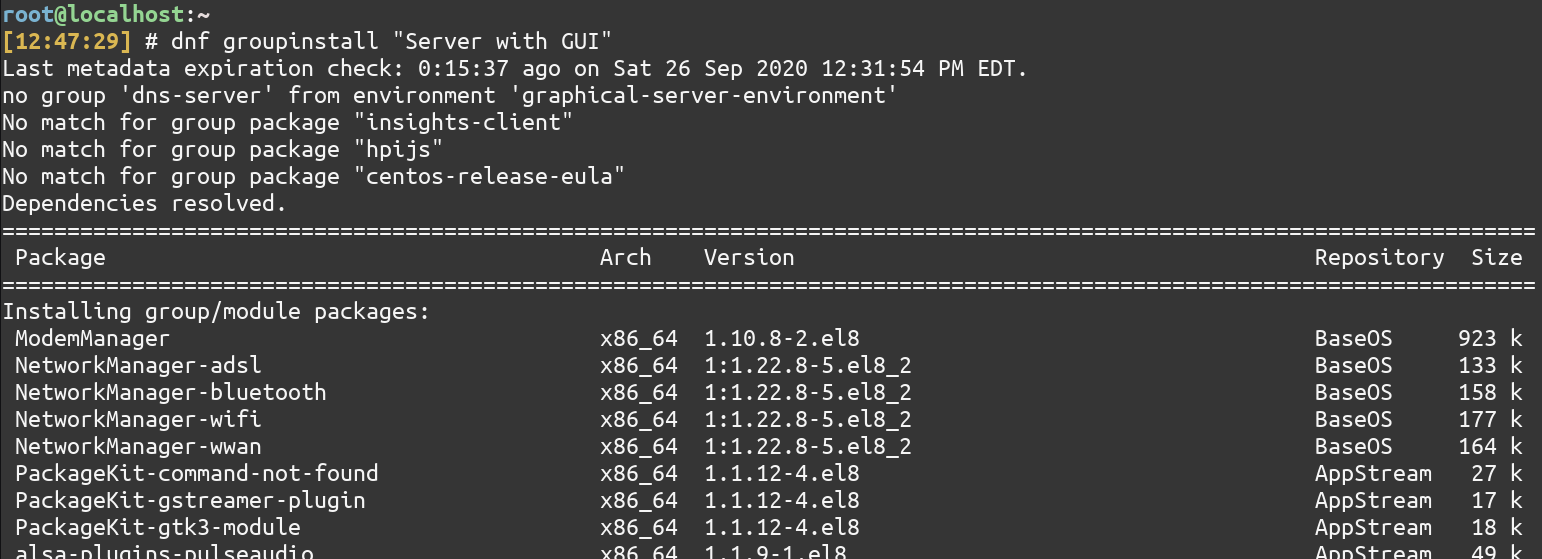
The above command installs the GNOME Desktop Environment. This is a big install. So, sit back and have a coffee as it will take a while.
The GUI related packages are now installed but the system is still in a non-GUI mode ( multi-user mode or runlevel 3). If you reboot, you would still be in this non-GUI mode. To permanently switch to GUI mode ( runlevel 5 ), type.
systemctl set-default graphical

It will require a reboot. Type:
reboot
To temporarily change to runlevel 5 without rebooting, type:
systemctl isolate graphical
2. Install VNC Server
There are many VNC Servers available for CentOS 8. We will be installing the Tiger VNC Server. It is a popular VNC Server and can be installed using the dnf command:
dnf install tigervnc-server
3. Add user(s) for VNC
Generally, server installations only have the root user. If you already have another user, you can skip this step.
To add a user you can use the useradd command. For the purpose of this tutorial, I’ll create a user named juniordev.
useradd juniordev
passwd juniordev

4. Create a VNC Password
You also need to set up a VNC password for the user. It can be the same or different as the login password of that user. First, you need to change into the user. To do that and to add a password, type:
su - <USER>
vncpasswd

A View Only Password will be required when you want the user to not interact through mice and keyboard with the desktop.
Change back to the root user by typing:
exit
5. Edit VNC Server’s Unit file
While installing the package, dnf also installs a generic VNC service unit file in /lib/systemd/system directory. Copy that file to the /etc/systemd/system directory using the cp command:
cp /lib/systemd/system/[email protected] /etc/systemd/system/vncserver@:1.service
Note the ‘:1‘ in the name of the service unit file. VNC by itself runs on port 5900. Also, each user has to run their own VNC Server. So, each user will have to connect via a separate port. The number in the file name tells VNC to run that service on a sub-port of 5900.
:n translates to port number 5900+n. So, :1 translates to port number 5901.
Now open the /etc/systemd/system/vncserver@:1.service with any text editor. I’ll use the nano text editor:
nano /etc/systemd/system/vncserver@:1.service
Replace <USER> with the user you want to run the VNC Server for. Since I want to run it for the user juniordev, I will replace <USER> with juniordev.
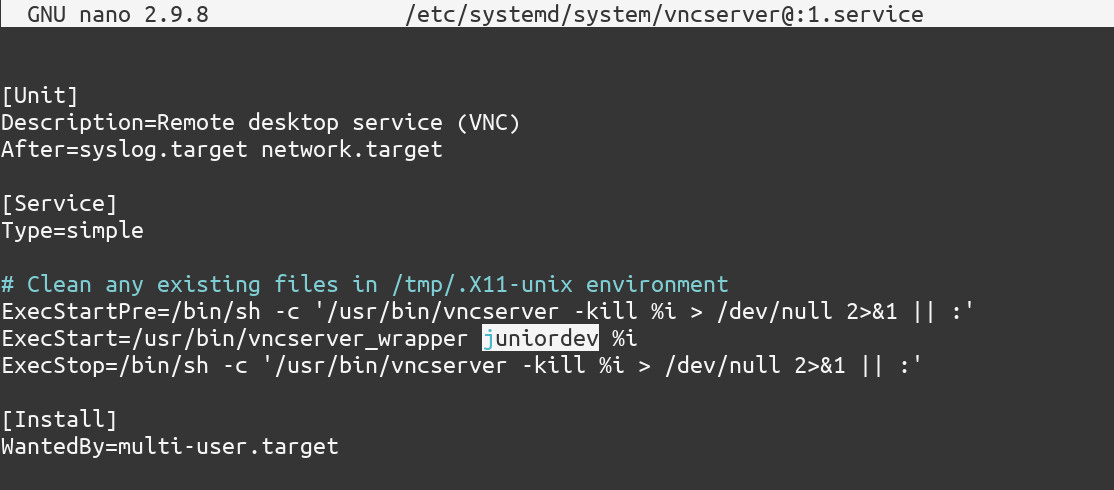
Save and exit the editor.
6. Reload Systemd Daemon
To inform systemctl about the changes in the unit file or a new unit file, you need to reload the systemd daemon by typing:
systemctl daemon-reload
7. Start the VNC Server
After daemon reloading, you need to start the service using the systemctl command:
systemctl start vncserver@:1.service
To automatically start it at boot, type
systemctl enable vncserver@:1.service
8. Check the status of VNC Server
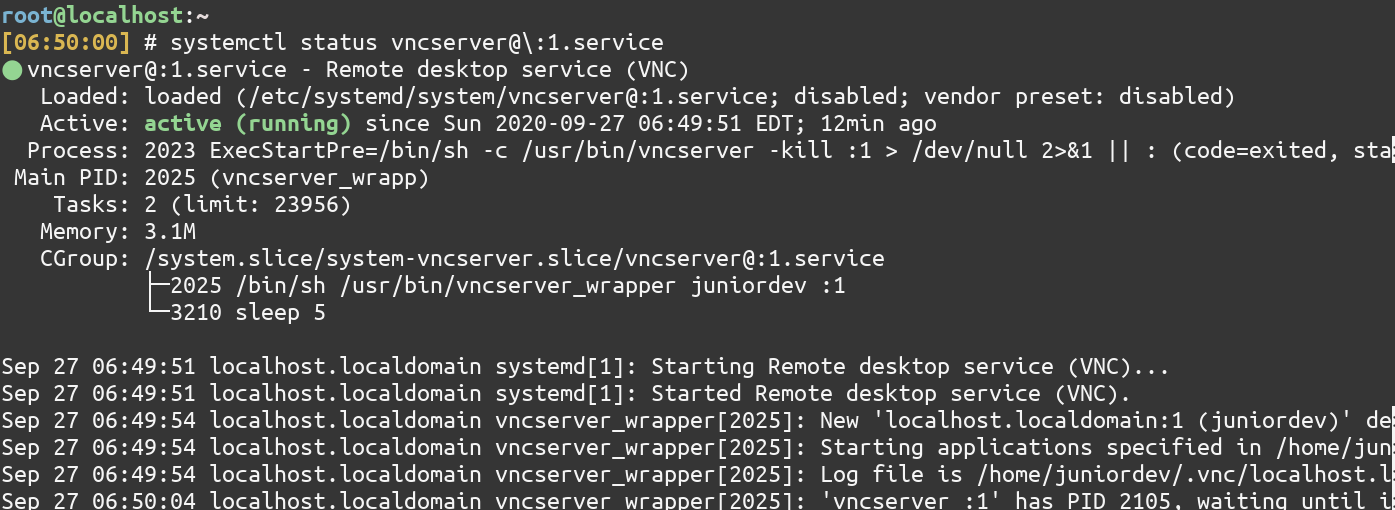
This can again be done using the systemctl command :
systemctl status vncserver@:1.service
9. Configure the firewall to open the port used by VNC
You need to open the port used by the VNC Server using the firewall-cmd command:
firewall-cmd --zone=public --permanent --add-service=vnc-server
firewall-cmd --reload
Adding More Users
You’ll need to repeat steps 3-8 for other users. Each user will have its own service unit file.
For example, to add another user named seniordev replace every occurrence of juniordev with seniordev and :1 with :2 in the steps.
Connecting to VNC Server
You need to install a VNC Viewer to connect to a VNC Server from the client system. I’ll be connecting from an Ubuntu machine using the Tiger VNC Viewer. To install it, type:
sudo apt install tigervnc-viewer
For other distros, you can install them using their respective package managers.
To connect to a VNC Server on IP Address 192.168.1.66 and port number 5901, type:
vncviewer 192.168.1.66:5901
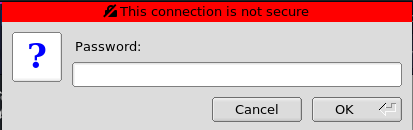
It’ll open a window that asks your password. Here you’ll need to enter the password set using the vncpasswd command.
After entering the right password, you can now control your desktop remotely.
Connecting over an SSH Tunnel
You might notice the warning given by VNC Viewer that the Connection is not Secure. This is because VNC traffic is not encrypted and is susceptible to sniffing. To connect to a VNC Server securely, you can connect over an SSH tunnel. SSH is a protocol that provides a secure way of operating network related service securely.
You need to create a tunnel from your client using the ssh command. Run the following command on the client:
ssh -L 5901:192.168.1.66:5901 -N -f [email protected]
The -L option specifies the local port to forward. The syntax for local port forwarding is local_port:remote_host:remote_port. The -N option instructs SSH to not present a shell after login like it normally would. -f option tells SSH to go in the background and to not ‘hog’ the terminal. The last argument is user@remote_host.
The above command forwards my local machine’s port 5901 to the remote machine’s port 5901.
If you don’t have SSH keys set up it will ask you for the remote user’s password. This will be the login password and not the VNC password.
Then to connect to the server type on the client:
vncviewer localhost:5901
Enter you VNC password as you would for a normal VNC Session.
You’ll notice that the viewer still warns you as it isn’t aware that traffic is being passed over an SSH tunnel but the connection is secure.
Troubleshooting
It might be possible that SELinux (Security-Enhanced Linux) keeps denying permission to VNC Server. To know whether SELinux is the culprit, check the output of the status of the service. SELinux is a security mechanism that provides context-based labeling of files. You can try disabling it for the purpose of trying out VNC but be careful as disabling SELinux is a workaround and may compromise security.
To disable it anyway, type:
setenforce 0
sed -i --follow-symlinks 's/SELINUX=enforcing/SELINUX=disabled/g' /etc/sysconfig/selinux
It might also be possible that you can’t run VNC Server because the directory /tmp/.X11-unix is not empty. Try removing all the files using the rm command:
rm -rf /tmp/.X11-unix/*
Conclusion
VNC offers a powerful way of controlling a remote desktop. It is a viable alternative to proprietary software like TeamViewer but it requires some configuration. Additionally, connecting over an SSH tunnel provides a secure way of connecting to the VNC Server.