

When you use the sudo command for the first time, you see the message “With great power, comes great responsibility.”
And rightly so. “Sudo” is short for Superuser Do. With this command, any user who has been granted permissions has access to root-like privileges without having to be a super user.
Also read: Shell Scripting 101: Variables in Shell Scripts
The top benefits of using the sudo -s command
Here are the top three benefits of using the sudo -s command:
1. Use root shell without logging out
Sudo -s command helps users to transition smoothly to a root shell without the need to log out and log back in.
This feature is one of the top benefits because it streamlines administrative tasks, and provides users, including the root user or Admin, quick and secure tool to access to root privileges within the existing user’s environment. It cuts the need for a separate login session, which will save time and enhance workflow efficiency.
2. Retain the env variables through sessions
When using sudo -s, the current user’s environment variables, such as $PATH and custom configurations, remain intact.
By preserving the environment variables, users can maintain their personalized settings even while operating with elevated privileges. This ensures consistency and allows users to work with the same configurations as their regular user session.
3. Execute commands without re-entering passwords
The sudo -s command facilitates the execution of multiple commands with root privileges in a single session.
Users can perform a series of administrative tasks without repeatedly entering the root password for each command. This efficiency is particularly valuable when executing a sequence of commands requiring elevated privileges, as it minimizes interruptions and enhances overall productivity.
Working with sudo Command in Linux
Using the sudo command is very straightforward, but before a user can use it, we need to configure the right permissions.
1. Introduction to Granting sudo access to users (sudoers) for Root Privileges
To grant access to a superuser, an existing superuser needs to be cautious and avoid potential security risks when adding an entry in the /etc/sudoers file in Linux. This file in Linux contains the entire list of users, including the admin, who have sudo access, along with what level of access is granted to secure the machine. You can follow a similar format of adding users as listed in the file, or modify the permissions as required. A sample entry would be something like the one below.
username ALL=(ALL:ALL) ALL
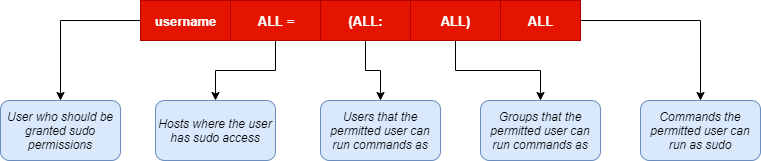
- The “username” will be the name of the user who has the permissions
- The ALL at the beginning specifies which hosts the user has sudo access on
- The second ALL specifies which users the user can run commands as
- The third ALL specifies which groups the user can run commands as
- The ALL at the end specifies which commands the user is allowed to run.
2. sudo command usage
Once the access is granted, you can run the permitted commands as a superuser. To do so, you need to enter “sudo <command>”.
root@shell# sudo apt update
Enter password:
By default, you’ll be required to enter your password to gain access but this can be skipped by adding a “NOPASSWD” attribute when granting permissions in the sudoers file. However this is NOT recommended.
3. Running a Command Line as Another User (A Sudo Guide)
In certain situations, all you want is to be able to run a command that someone else in your organization has access to. We don’t mean this as a hack but as a user switch.
In Windows, if you had to copy files from another user “document’s folder, you would just switch users, log in to the other account and finish the work, then log back into the original account.
But how do you do the same in Linux? We make use of the -u option like the example below.
root@shell# sudo -u otherusername (command)
Enter otheruser password:
The -u option allows you to run any command as another user, so long as you have the password.
4. Allowing limited commands for another user’s tasks and Enhancing Security with Sudo
When offering escalated privileges, we need to make sure only the users who require specific access should have it. If you add “ALL” in the permitted commands section for a user in the sudoers file, you could open yourself up to potential breaches
Let’s say you want to only allow the users to power off their systems when they’re done. But the user needs sudo access to do so. You can edit the sudoers file to permit only the poweroff command without asking for a password.
username ALL=NOPASSWD: /sbin/poweroff
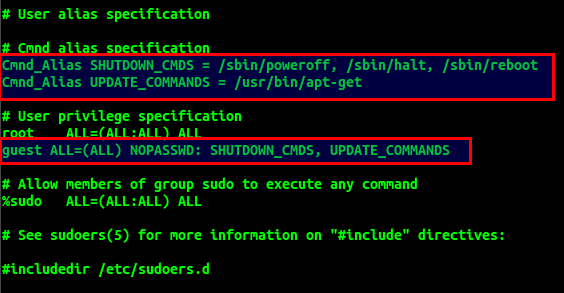
Notice how we have added the full path instead of just the command. Now if you want to add multiple commands to multiple users, it can be tedious to keep a tab of the right commands to assign to users. In such a case, you can create command aliases, and simply add those in place of the “/sbin/poweroff” above. See the image below for reference.
5. Other common options with the sudo command for Command Line Efficiency
The options that we listed above are some very frequently used options. Below are a few more common options that will come in handy for you.
- -l stands for “list” and it allows a user to list the commands that they are permitted to run on the particular host
- -p allows a user to specify a custom terminal prompt while overriding the one that’s already in use
- -k Whenever a user runs sudo, a timestamp is recorded and the timestamp lets the user use sudo without a password until the timeout specified in sudoers (usually 5 minutes). With this option, a user can invalidate the timestamp so the next usage of sudo will require a password again
- -K is similar to the lowercase -k option, but this one allows the user to entirely remove the timestamp.
- -h get all the available options as a list with their explanation and usage
Bonus – Shortcut to run shell as root – sudo -s
Sudo -s runs your current shell as superuser/root. You can also specify another user using -su.
This is useful if you want to run a command as superuser/root without having to log out and back in again. Just remember that your current environment variables (e.g. $PATH) will still be set, so if you need to override them, you’ll have to do so explicitly.
[username@host] sudo -s

[root@host]
You may need to enter the password for root depending on your sudoers configuration. But sudo -s is a shortcut to running the existing shell as a superuser.
Difference between sudo and su Commands
So, these are two completely different commands but the one feature that is similar between the two is superuser access to regular users. Now, this does make people think that both the commands are the same or do the same thing, but that’s not the case.
With sudo, you can work as a superuser and get further access while being logged into your own user account, but with su you have to log in as a different user to gain access to their privileges.
Summary
You have seen how powerful the sudo command can be by bestowing root-like permissions in the hands of the users in the sudoers file. Always make sure to recheck the permissions that are being granted and the user they’re being granted to. Hope this tutorial helps you understand the sudo command, its usage, and the risks of granting sudo better.