

Most of the Linux Distributions don’t allow ‘root’ user also known as superuser by default as a security measure to prevent accidental or intentional changes that could harm the system. Especially in an enterprise setup, this would mean disaster.
Instead, it uses a feature called sudo, which allows authorized users to perform administrative tasks without logging in as root (you will have to enter the password everytime you type sudo). This way, users can still perform system-level tasks without the risks associated with being logged in as the root user. In this article, we will explore how to grant a user sudo privileges or a group of users.
What is a Sudoers file?
The sudoers file is a configuration file in Unix-based operating systems, including Ubuntu, that determines which users or groups have the permission to use the sudo command to perform privileged tasks. The sudoers file defines a list of rules that specify what commands a user can run and as what user, and also controls the level of access they have to the system. The sudoers file is typically located at ‘/etc/sudoers‘.
Adding user to the Sudoers file on Linux, either done by manually editing the sudoers file or with the use of the usermod command. Either of the methods is fine, the latter being more “clean”. In this tutorial, we’ll go over both the methods of granting the sudo access to a user or users and create a new user if needed in a step-by-step manner.
Note: To add a user to the sudoers file or sudo group, you need a user with elevated privileges.
Steps for Adding New Users to the Sudoers file
Let’s go over the first method, which is manually adding the user to the sudoers file. For this, you’ll need a text editor and a user with sudo or root privileges.
If a user you’re working with isn’t added to the sudoers file, you’ll see this message. I’ve created a user for demonstrating within the entire tutorial.

Adding Users to the sudo group Manually
Adding the user to the sudoers file is very easy. All you do is open the /etc/sudoers file and add the username to the list. If you haven’t already, read through our tutorial explaining the sudo command and the sudoers file in detail.
Let’s first open the file:
sudo visudo
We use the visudo command, since it performs sanity checks before the file is saved to avoid breaking the sudoers file. Traditionally, the visudo command uses the vi editor. If you are a user on Ubuntu, the default editor is changed to nano.
You should still be good if you use any other editor of your choice, as long as you don’t go overboard and change a lot of things that you do not know the formatting for, otherwise you’ll get a syntax error. You’ll see contents within the file similar to the screenshot below.
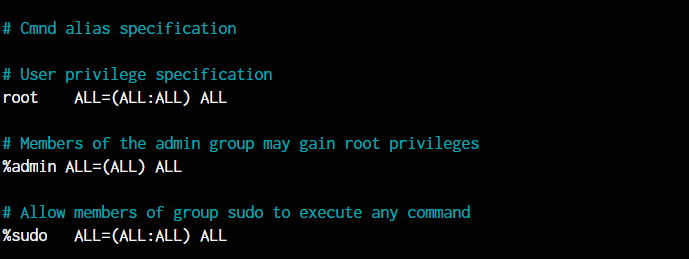
The place where you see root ALL=(ALL:ALL) ALL, that’s where we’ll be amending our username. In my case, I want to add the user “lfd” to the sudoers. I’ll add the following line just below the root line.
lfd ALL=(ALL:ALL) ALL
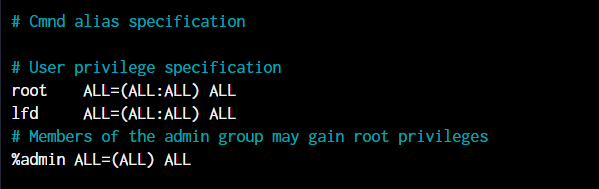
As you can see in the below image, we have granted sudo privileges to a user LFD! Awesome!

Adding a Group to sudo group Manually
Now that we have figured out how to add users to the sudoers file manually, let’s go ahead and add an entire group to sudoers file. Adding each individual user to the group one by one would be quite time-consuming and inefficient at best. Hence, we add groups directly in place of the individual users.
We can use visudo to edit the file as detailed above to open /etc/sudoers directory using the sudo command.
Scroll down to the line that starts with %sudo. This line grants sudo privileges to the sudo group. Alternatively, you can create a new line to add a new group. For example, if you want to grant sudo privileges to the lfdusrs group, add the following line:
%lfdusrs ALL=(ALL) ALL
This line grants all members of this group the ability to execute any command with administrative privileges. Finally, Save and close the file.
In visudo, you can save and close the file by pressing Ctrl+X, then Y, then Enter. If the
Now let’s move on to the cleaner method of using usermod.
Adding Users to Sudoers using usermod Command
Editing the sudoers file is not the “cleanest” way of doing things when we have a utility created for helping us perform those actions. The usermod command allows us to add/edit groups that a user is in.
Before we start
For adding users to sudoers with the usermod command, we simply need to add the user to the sudo group. Let’s see how we can perform the same.
Syntax:
sudo usermod -a -G sudo <username>
- -a Amend the changes to the existing configuration
- -G The name of the group the user should be added to
- <username> The username of the user that needs to be modified
For this demonstration, I deleted the line from the sudoers file, so our user is back to non-sudo. In the below image, I’ve added the user to the sudo group. You can also use the adduser command, however, we will discuss adduser some other time.

Adding User to Sudoers in Ubuntu or Debian
Here are the steps to add a user to sudoers using usermod command in Ubuntu or Debian:
- Log in as a sudo user In Ubuntu or Debian and enter your password when needed.
- Open a terminal window.
- Execute commands listed below to add the user to the sudo group.
sudo usermod -aG sudo username
- Replace username with the actual username of the user you want to add to the sudo group.
For example, If you want to add a user named ‘Roger’ to the sudoers, run the following command as root (su):
sudo usermod -aG sudo Roger
Adding user to sudoers list in CentOS or Fedora
The steps involved for adding a user to the sudoers file in CentOS or Fedora is just the same, except for the ‘wheel’ group. In CentOS and Fedora, the wheel group grants sudo privileges, instead of the sudo group used on Ubuntu.
Here are the steps to add a user to sudoers using usermod command in CentOS or Fedora:
- Log in as a user with sudo privileges and enter your password when asked.
- Open a terminal window
- Use the following command to add the user to the wheel group:
sudo usermod -aG wheel username
- Replace
usernamewith the actual username of the user you want to add to the wheel
Adding Linux users to sudoers via GUI
To add users to sudoers via GUI on Ubuntu, you can follow these steps:
- Click on the “Applications” icon in the Ubuntu taskbar and select “Settings” from the menu.
- In the “Settings” window, click on “Users” on the left-hand side menu.
- Click on the user that you want to add to the sudoers group.
- Click on the “Account Type” dropdown menu and select “Administrator”.
- Enter the root password if asked and then close the “Settings” window.
Checking whether adding the users to sudoers was successful
Using ‘whoami’ command to check if the user has been added to the sudoers
- Log in as the user you added to the sudoers group.
- Open a terminal window.
- Run the following command:
sudo whoami
The whoami command requires administrative privileges to run. If the user is successfully added to the sudoers group, the output should be root, which is the username of the superuser account. If the output is the username of the regular user account, then the user is not added to the sudoers group or the group membership has not taken effect yet.
Checking the user’s group membership using ‘groups’ command
groups username
Replace username with the actual username of the user you want to check. This command lists all the groups that the user is a member of, including the sudo or wheel group if the user has been added to the sudoers group.
Note – If the user is not able to execute administrative commands using sudo or their group membership doesn’t show the sudo or wheel group, you may need to log out and log back in or restart the system for the changes to take effect.
Now, when the user logs in for the first time after this new group is added, they’ll get a message like the one below notifying them of the change in privileges. You now know both the ways of adding users to sudoers! Great job.

Why Do We Need sudo privilege?
This is a common question among new users who’ve been using Windows and have recently switched to Linux. On Windows, we’re used to logging into the administrator account and using things directly as an administrator.
User Access Control (UAC) was introduced on Windows because staying logged in as an Administrator posed a very obvious security risk. The fact that any software running under the user has full privileges to perform any action on the system. With UAC, most applications run with limited access and only when a system file needs to be modified, Windows prompts the user asking for permission.
This is exactly why we need sudo and root users to be different. If you use root as your user regularly, you’ll be exposing yourself to the risk of giving a malicious application full access to your system. As a root user, you can perform rm -rf / and delete the entire system without any obstacles. And that’s more than enough to give you an idea of how devastating root access in the wrong hands can be.
So unless you really need to, there’s no point in using the root account. UAC is like sudo, where you only escalate privileges when you need to, and at other times, you stay put with limited access.
Conclusion
We hope that this tutorial has helped you learn how to add any user to the sudoers list on Linux via the command line and through the GUI and if you’ve followed through, you probably have added your user to the sudo group as well.
References
Sudoers file man page on ArchWiki