
In this article, we’ll learn how to install VeraCrypt. This is a FOSS disk encryption tool to create a virtual encrypted disk or encrypt an entire partition, storage device, or even a complete drive in Windows. It is available for Windows, Linux, and macOS. It is a fork of Truecrypt, a project that was discontinued in 2014. VeraCrypt is an easy-to-use disk encryption software with a user-friendly graphical user interface.
Veracrypt has fixed a lot of the inherent security vulnerabilities that were found in Truecrypt. There have been multiple new developments in brute-force attacks since the discontinuation of Truecrypt, which have been addressed with the development of Veracrypt.
It is necessary to prevent others from accessing your data, especially if the data is stored on a portable disk. If the disk is stolen, all your data can be accessed easily. To prevent this, VeraCrypt can be used to encrypt the entire disk, making it impossible to access. The encryption keys are stored in the RAM itself, so access to data is impossible until these keys are extracted. In this article, we will discuss how to install VeraCrypt on Linux.
Also read: Linux Kodachi: Get Supreme Level of Privacy
Steps to Install VeraCrypt on Ubuntu
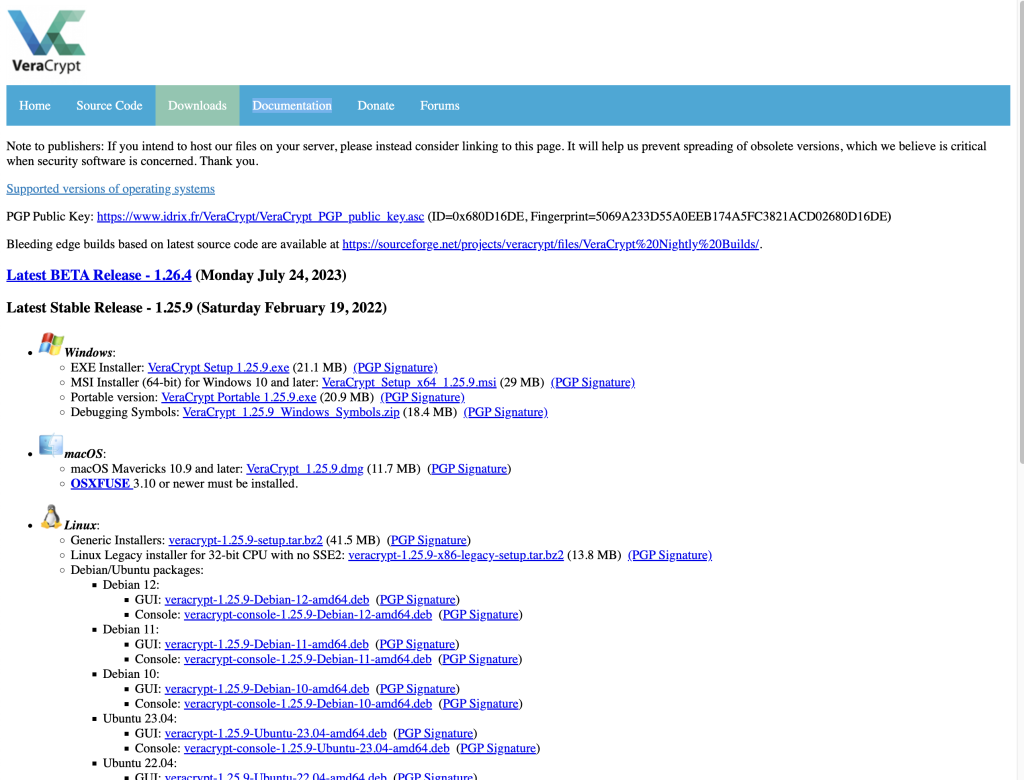
VeraCrypt can be installed in two modes: either through the GUI or through the console. The files for both methods are available to download from the official website.
Installing GUI Veracrypt
To install GUI VeraCrypt, download the .deb package from the official website or directly by clicking here.
However, you can follow the following tutorial to properly install Veracrypt:
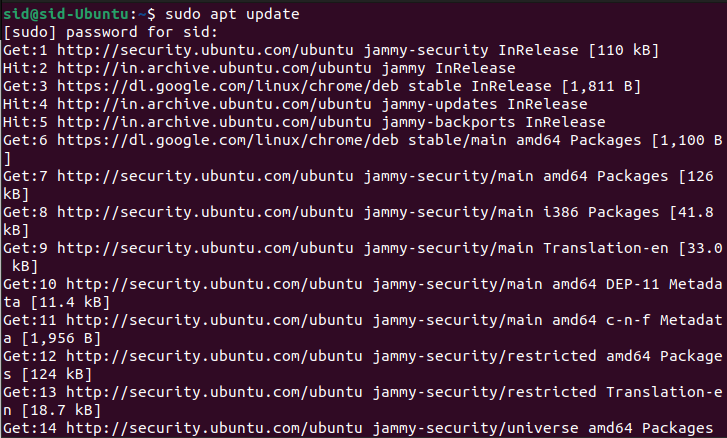
First, we will start with updating the system repositories by running the following command:
sudo apt update
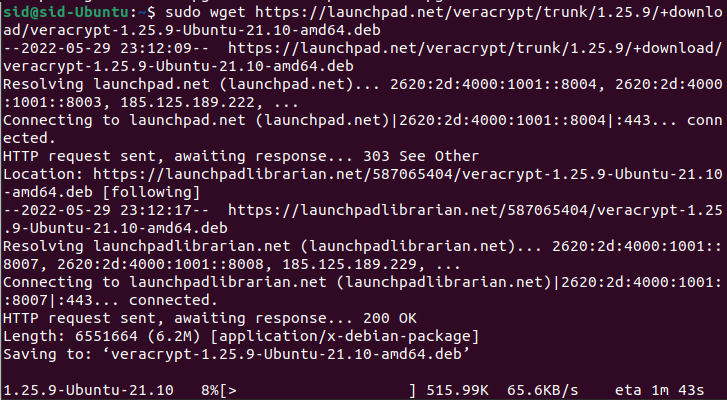
We will be running the ‘wget‘ command to download the Veracrypt GUI installer package:
sudo wget https://launchpad.net/veracrypt/trunk/1.25.9/+download/veracrypt-1.25.9-Debian-12-amd64.deb
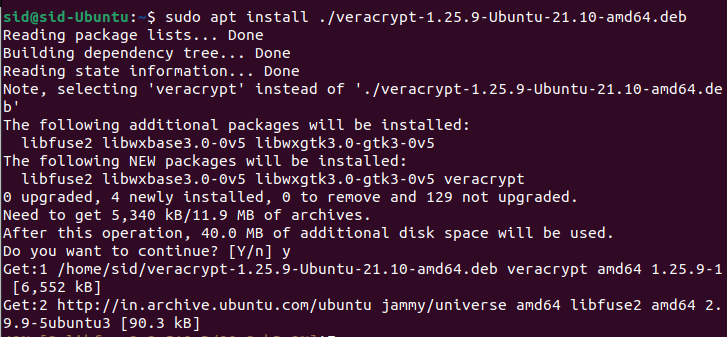
Now that we have downloaded the Veracrypt GUI installer, We will install the package by executing the following command:
sudo apt install ./veracrypt-1.25.9-Debian-12-amd64.deb
You may have to enter ‘y’ while the installation is taking place. Once through, the package is successfully installed. Now, all we have to do is go to the activities menu, type veracrypt in the search box, and hit Enter.
Installing Console VeraCrypt
To install VeraCrypt Console, download the ‘.deb package’ for the Console installer from the official website or directly by clicking here.
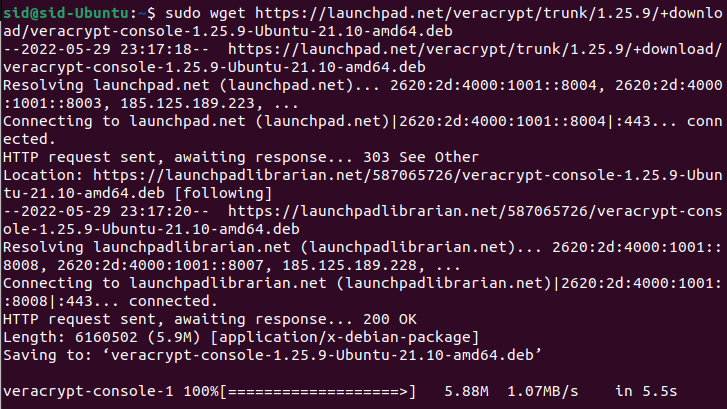
You can also download the package by executing the wget command in a terminal window:
sudo wget https://launchpad.net/veracrypt/trunk/1.25.9/+download/veracrypt-console-1.25.9-Debian-12-amd64.deb
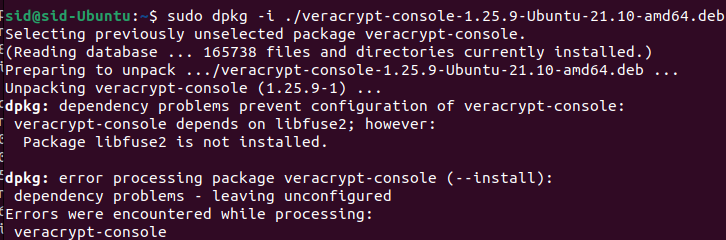
Now, execute the dpkg command to install the downloaded package:
sudo dpkg -i ./veracrypt-console-1.25.9-Debian-12-amd64.deb

That’s all! VeraCrypt has been installed successfully.
Overcoming The Errors During Installation
Sometimes, while installing the package, errors may be encountered. Here, the libfuse2 package is not installed on the system.
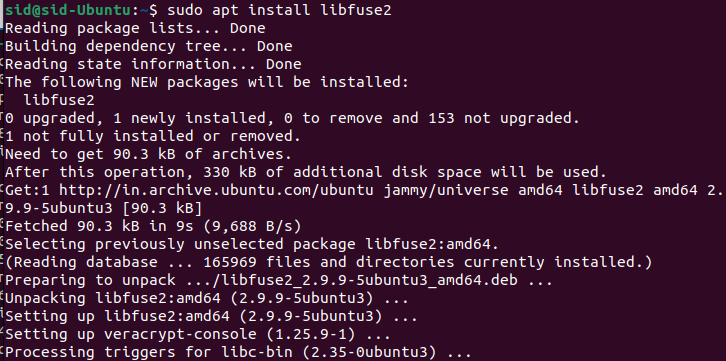
This package can be installed by executing the following command:
sudo apt install libfuse2
Launching Veracrypt
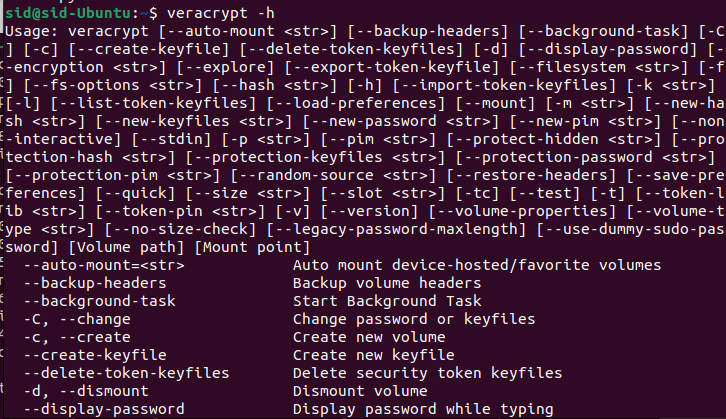
We have learned how to install GUI-based Veracrypt as well as console-based Veracrypt. To learn about the options and usage information about VeraCrypt, Run the following command in a terminal window:
veracrypt -h
Why Should We Encrypt Data?
We are increasingly living in a digitally enabled, data-centric world. Even a small portion of our data could cause a lot of harm in unfathomable ways: Mental, Physical, Financial, National Security, Law, etc.
I will compress the most important one’s into top 3 reasons:
1. Privacy: Encryption ensures that your personal or sensitive information remains confidential, accessible only to those with the correct decryption key.
2. Security: It protects data from unauthorized access, making it a vital tool for safeguarding information in the digital age.
3. Compliance: Many regulations require the encryption of sensitive data, especially in industries like healthcare and finance.
Veracrypt ensures we are protected against at least easy access to our data by encrypting it with a strong encryption algorithm. Now, Let’s Explore how to Encrypt data using Veracrypt. Before we do that, let us understand what a Veracrypt volume is!
What is a Veracrypt Volume?
A VeraCrypt volume is a container or space where encrypted data is stored. It can be thought of as a virtual disk that is accessible only through VeraCrypt using the correct password and/or keyfile.
The Veracrypt volume is not just limited to a virtual disk; it can also be
File Container: A VeraCrypt volume can be a file on your system that acts as a virtual encrypted disk. Once mounted with VeraCrypt, you can interact with it like any other drive, but all data within is encrypted.
Partition/Drive Encryption: A VeraCrypt volume can also refer to an entire partition or physical drive that has been encrypted. This includes everything on the drive, from files to the operating system itself, if it’s the system drive.
The major features of Veracrypt that make it versatile are:
On-the-Fly Encryption/Decryption: VeraCrypt volumes provide real-time (on-the-fly) encryption and decryption, meaning files are automatically encrypted when you save them to the volume and decrypted when you read them, provided the volume is mounted.
Security: The contents of a VeraCrypt volume are entirely encrypted using strong encryption algorithms. The volume appears scrambled and unreadable without the correct authentication.
Flexibility: You can create a VeraCrypt volume on various storage devices, including hard drives, USB drives, or even cloud storage. The volume can be moved, backed up, or hidden as needed.
How Can You Use Veracrypt on Linux?
Step 1. Launch Veracrypt
To do so, we will start the Veracrypt program by searching for Veracrypt in the Activities Menu.
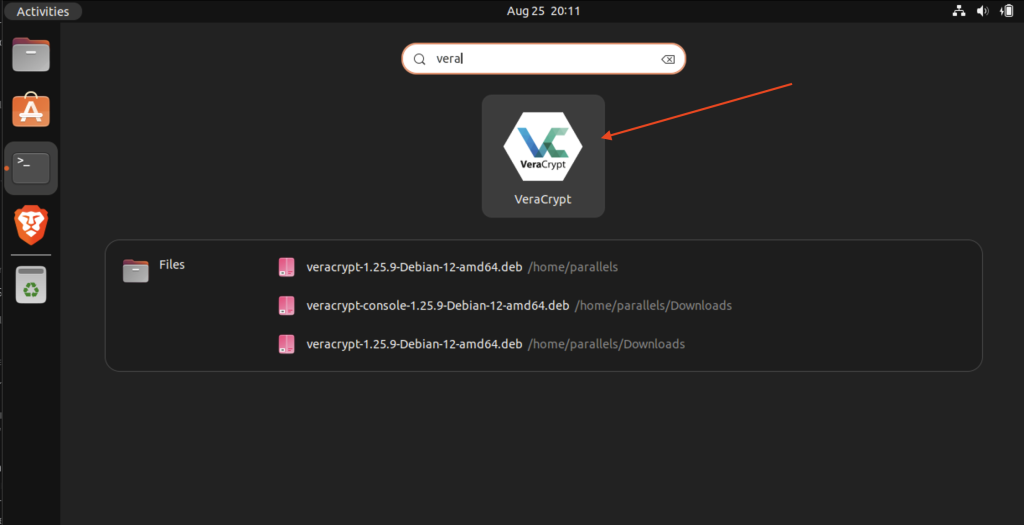
Once launched, We will be greeted by their main screen.
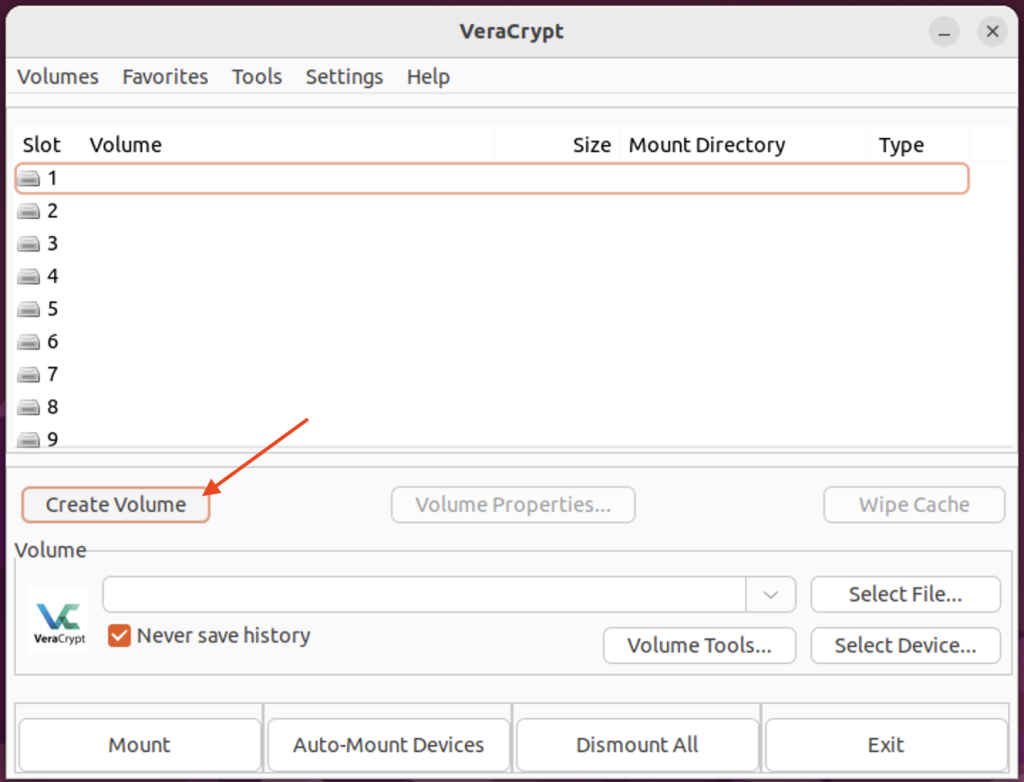
Step 2. Create New Volume
Here we will be Creating a new volume by clicking on the Create Volume button.
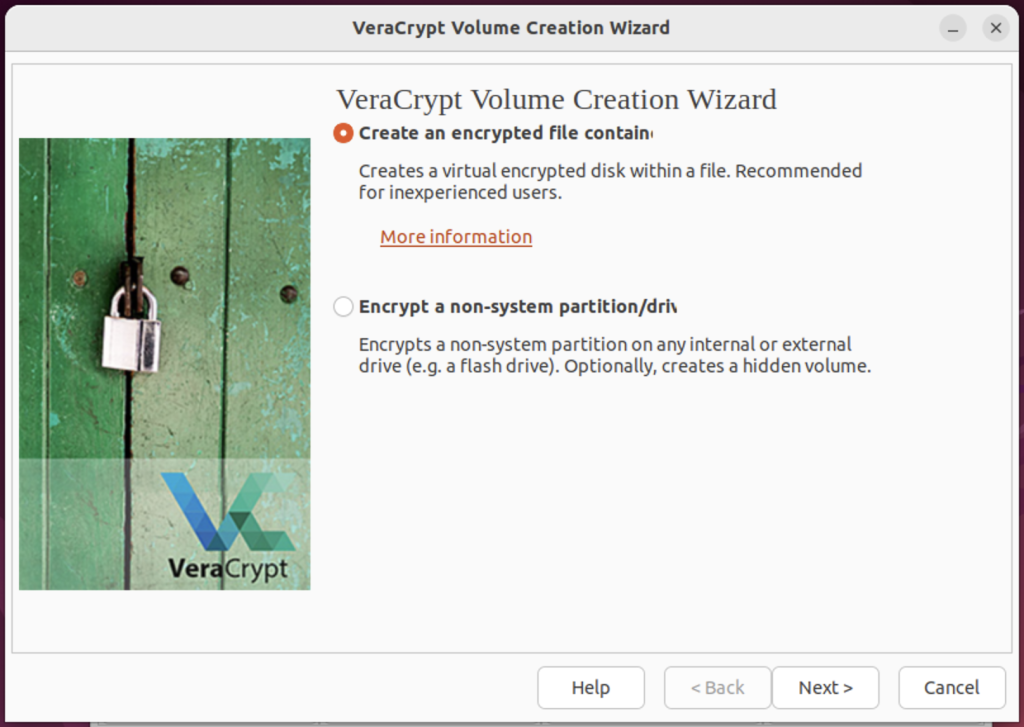
Step 3. Create an Ecrypted File Container
Now Volume Creation Wizard will appear, where we will select the ‘Create an encrypted file container‘ button and go ahead by pressing next.
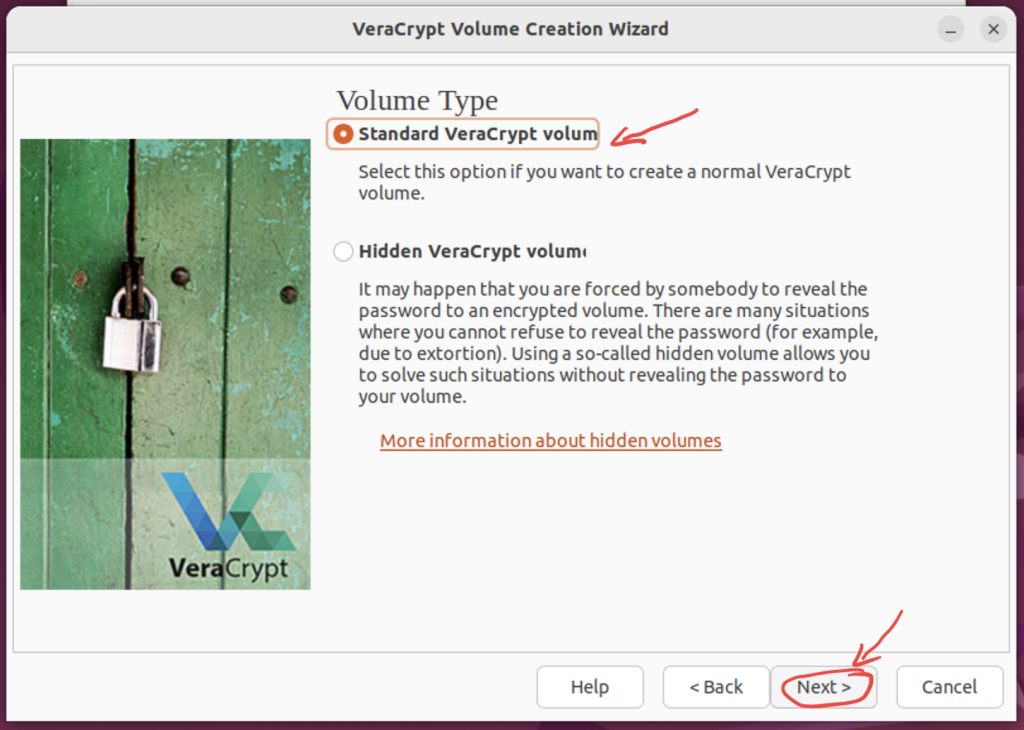
Step 4. Setting the Volume Type
We will set the volume type as ‘Standard Veracrypt Volume’, The ‘e’ is missing, if not too much inconvenience to you.
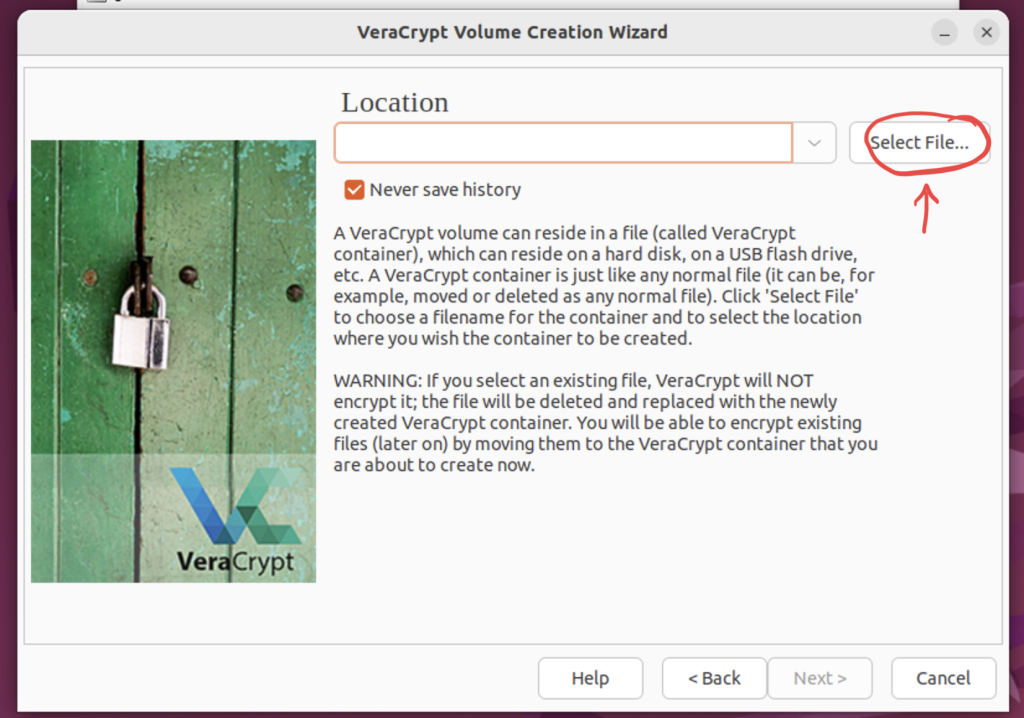
Step 5. Select the file that needs to be encrypted
Press the Select File button, for the file selection window to appear.
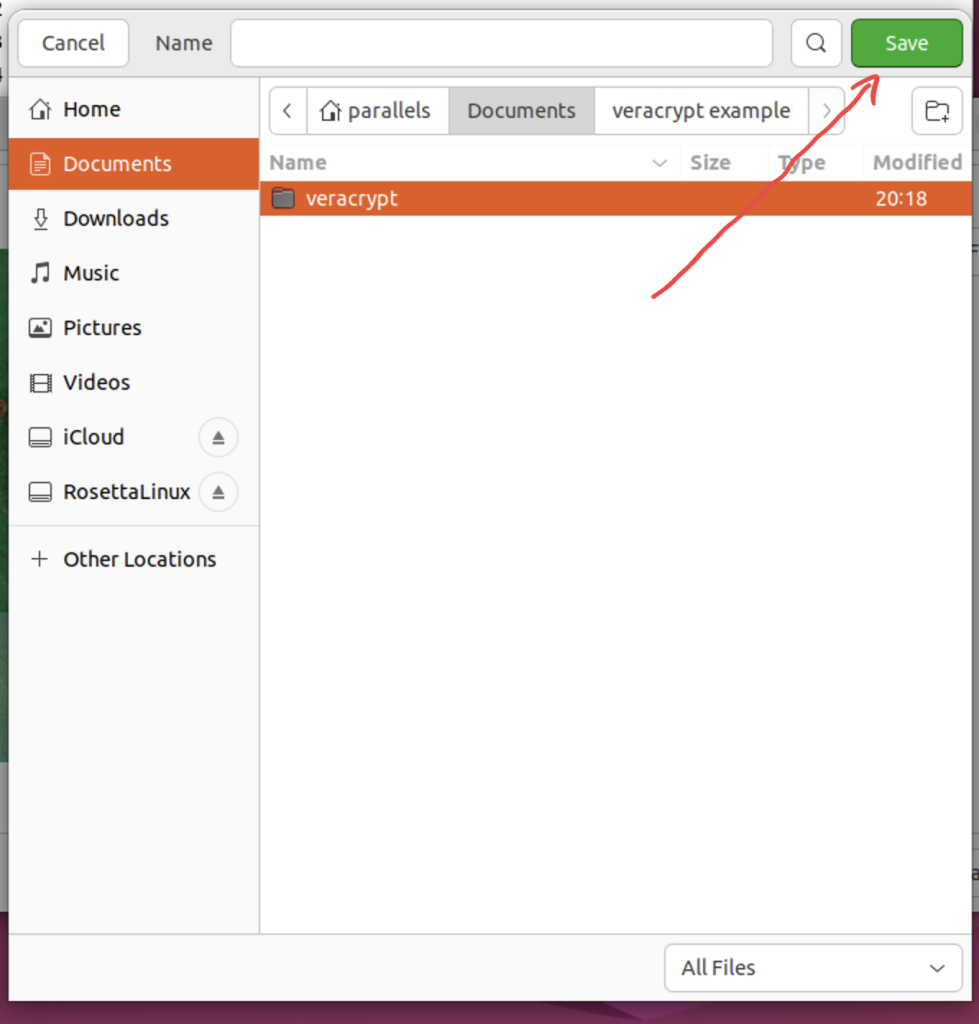
Step 6. Choose the file from the Selection Window
Choose the file or folder that needs to be encrypted and hit save.
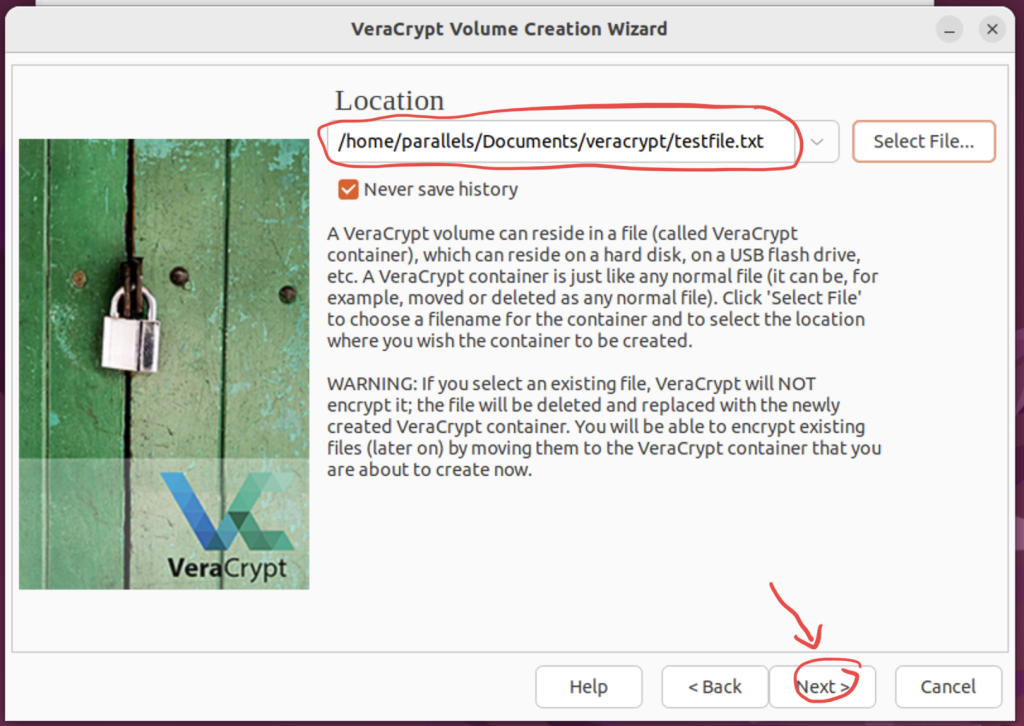
Step 7. Confirm The Selected Path
Verify if the path is correct, then press next.
Step 8. Encryption Option Screen
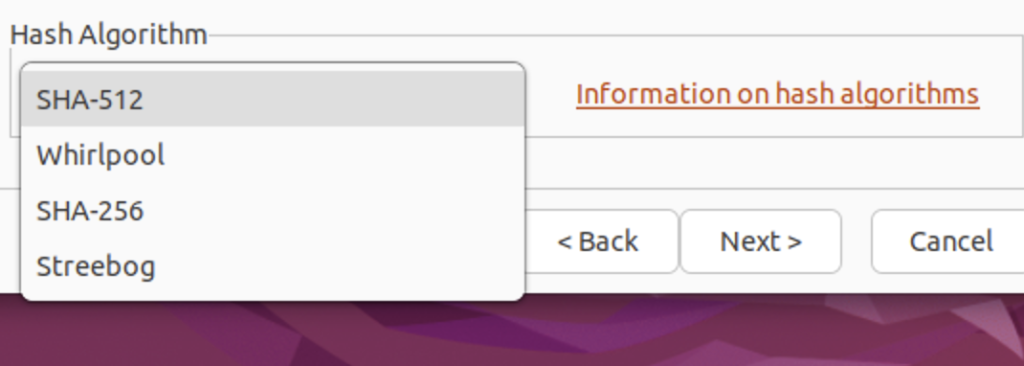
In this Screen, We will be selecting the type of Encryption and Hash Algorithm that we would like to use.
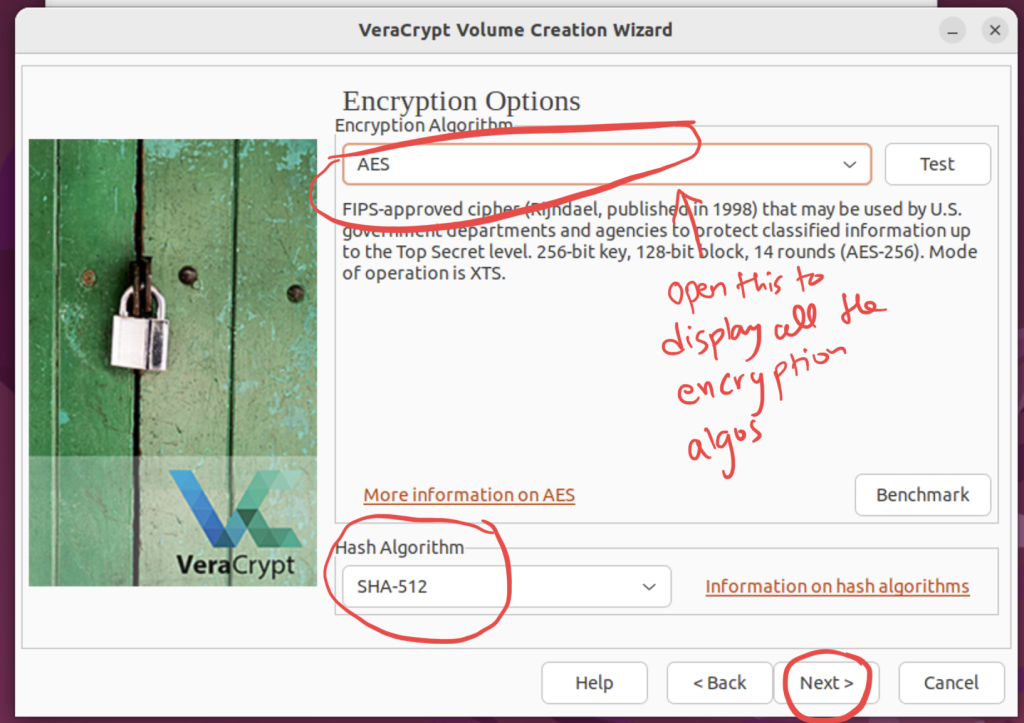
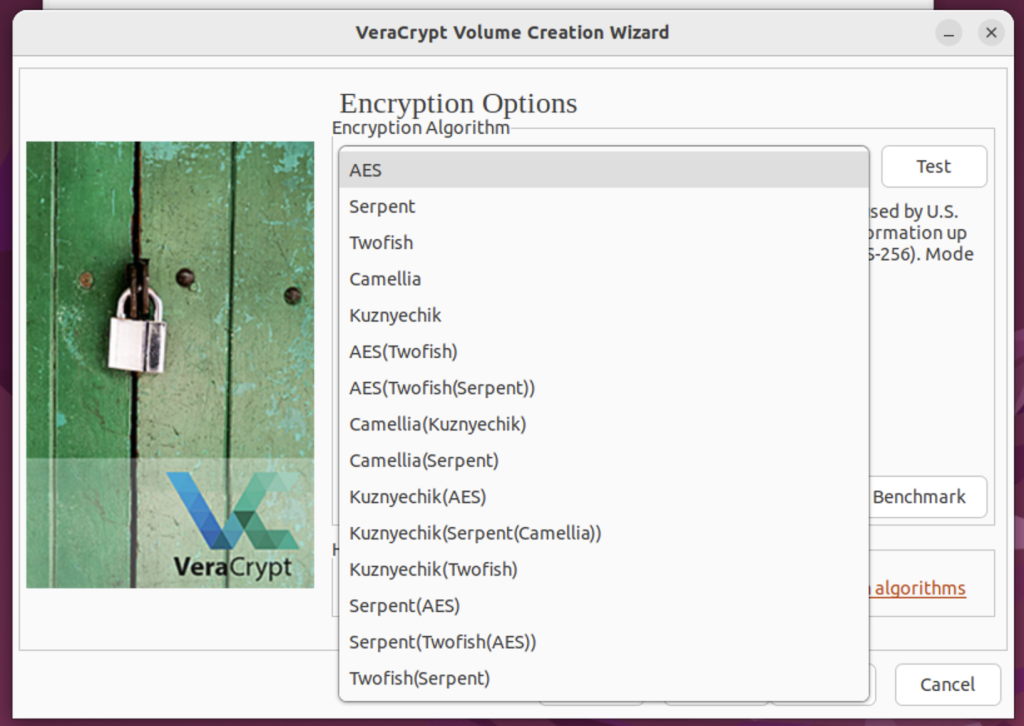
Let’s Understand Veracrypt’s Various Encryption and Hashing Algorithms
Understanding these options can help you make an informed decision on how to best protect your sensitive information.
Each of these options comes with its own set of trade-offs between security and performance. By understanding your specific needs and the capabilities of these encryption options, you can tailor your VeraCrypt setup for optimal security and usability.
Let’s dive into the different types of encryption options available in VeraCrypt:
Symmetric Encryption Algorithms
- AES (Advanced Encryption Standard)
- Strength: High
- Speed: Fast
- Use Case: General-purpose encryption, widely accepted.
- Serpent
- Strength: Very High
- Speed: Moderate
- Use Case: When you need an extra layer of security and don’t mind a slight performance hit.
- Twofish
- Strength: High
- Speed: Fast
- Use Case: Similar to AES but less commonly used.
- Camellia
- Strength: High
- Speed: Fast
- Use Case: An alternative to AES, mostly used in Japan.
- Kuznyechik
- Strength: Moderate
- Speed: Fast
- Use Case: Mostly used in Russia, less common elsewhere.
Hash Algorithms
- SHA-256 (Secure Hash Algorithm 256-bit)
- Strength: High
- Speed: Moderate
- Use Case: General-purpose hashing, widely accepted.
- SHA-512
- Strength: Very High
- Speed: Slow
- Use Case: When you need the highest level of integrity checking.
- Whirlpool
- Strength: High
- Speed: Moderate
- Use Case: An alternative to SHA algorithms, less commonly used.
- Streebog
- Strength: Moderate
- Speed: Fast
- Use Case: Mostly used in Russia, less common elsewhere.
Cascades
VeraCrypt also allows you to use a combination of multiple encryption algorithms in a cascade, such as AES-Twofish or Serpent-AES.
- Strength: Extremely High
- Speed: Slow
- Use Case: When you need the utmost security and are willing to sacrifice performance.
Back to the Volume Creation Wizard
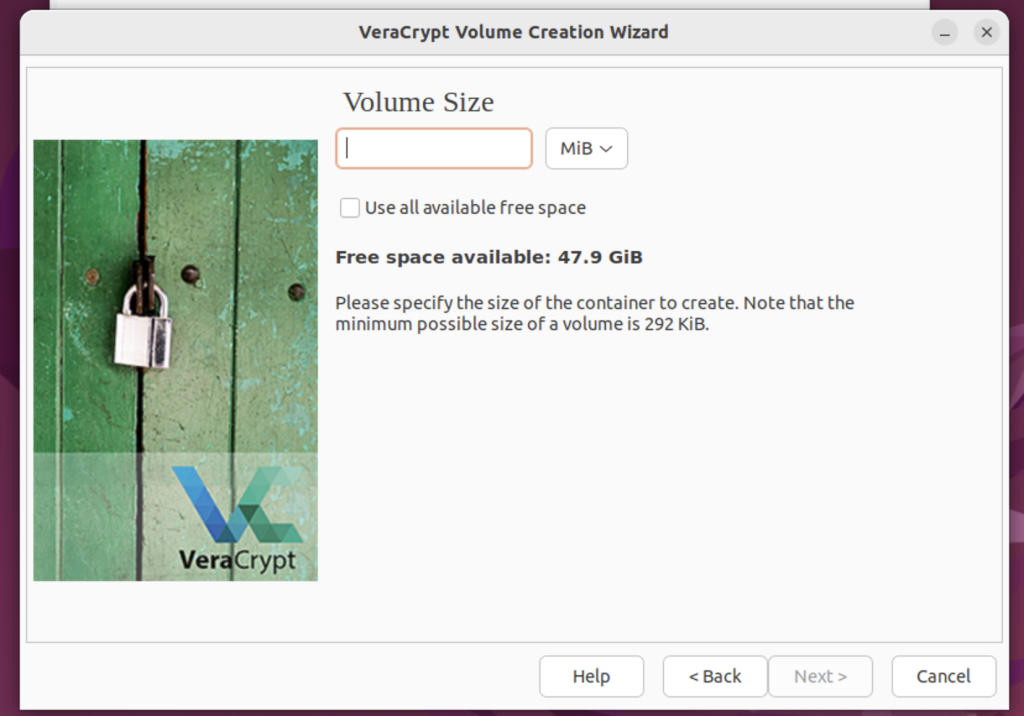
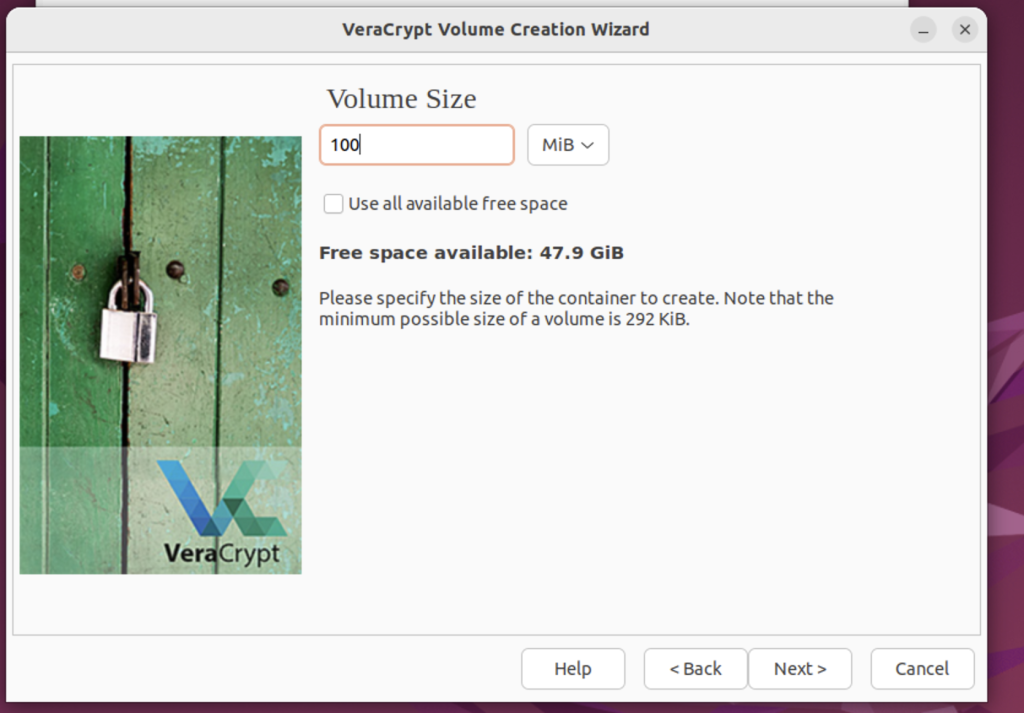
Step 9. Select the Volume Size
We have the option to select the volume in KB, MB, GB, & TB. Ensure that you select appropriately. You also have the option to take all the available free space for the volume, but I would recommend leaving some space for your OS, so you’ve got to go the custom way. Another useful piece of information that is displayed is the free space available, which helps us make an informed decision on the size of the volume we need to create.
Step 10. Set Password for the Volume
There’s not much to write about; ensure you choose a strong password. There is detailed information on how to choose a strong password given on this screen. I would recommend you follow that. If you notice, there are two options below Use PIM and keyfiles. Let’s understand what they are.
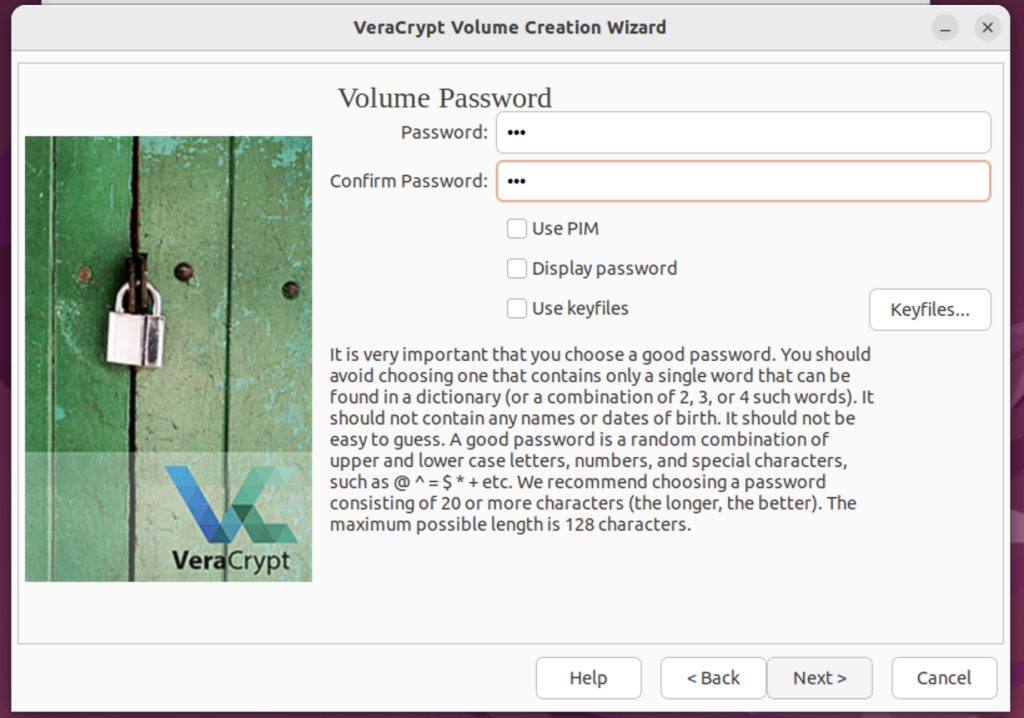
Keyfiles
VeraCrypt allows the use of keyfiles in addition to passwords for an extra layer of security.
- Strength: Depends on the keyfile
- Speed: N/A
- Use Case: When you want to add an additional authentication mechanism.
PIM (Personal Iterations Multiplier)
This is an advanced feature that allows you to set the number of iterations for the PBKDF2 algorithm.
- Strength: Customizable
- Speed: Depends on the setting
- Use Case: Fine-tuning the balance between security and performance
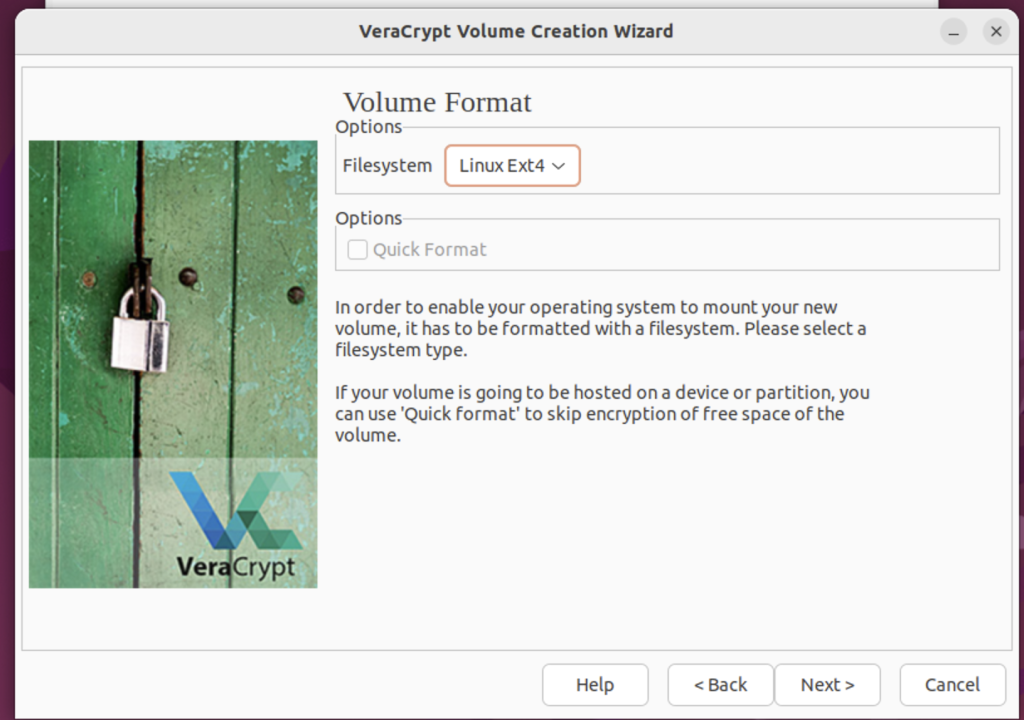
Step 11. Formatting the Volume
Choose the filesystem according to your preference. If you are unsure, read this article on different filesystems in detail.
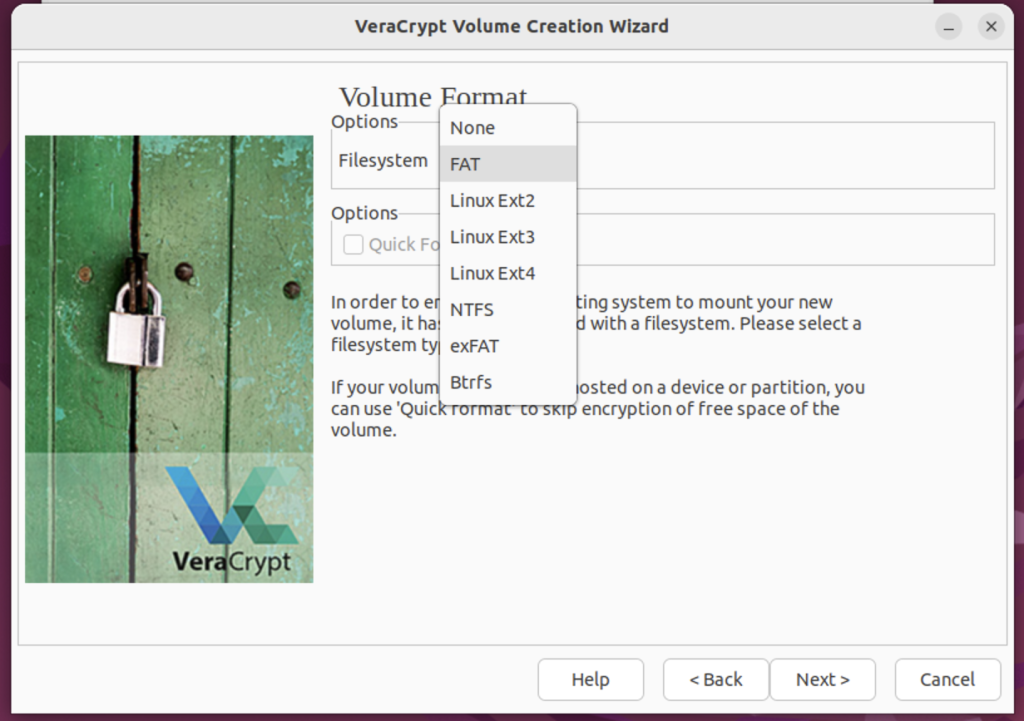
I will be going with Linux Ext4 for my volume. Hit next.
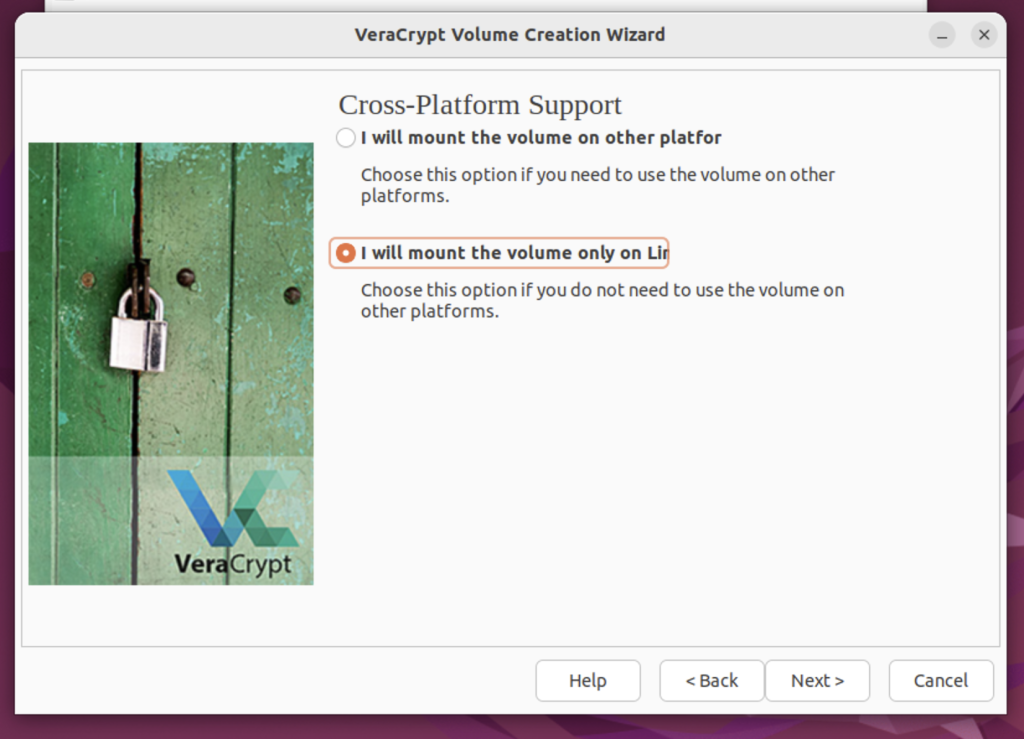
Step 12. Cross-Platform Support
Depending on whether you will be using this volume on other operating Systems or just sticking to Linux, Make a decision. I won’t be moving this volume out of Linux, so I’m going with the second option.
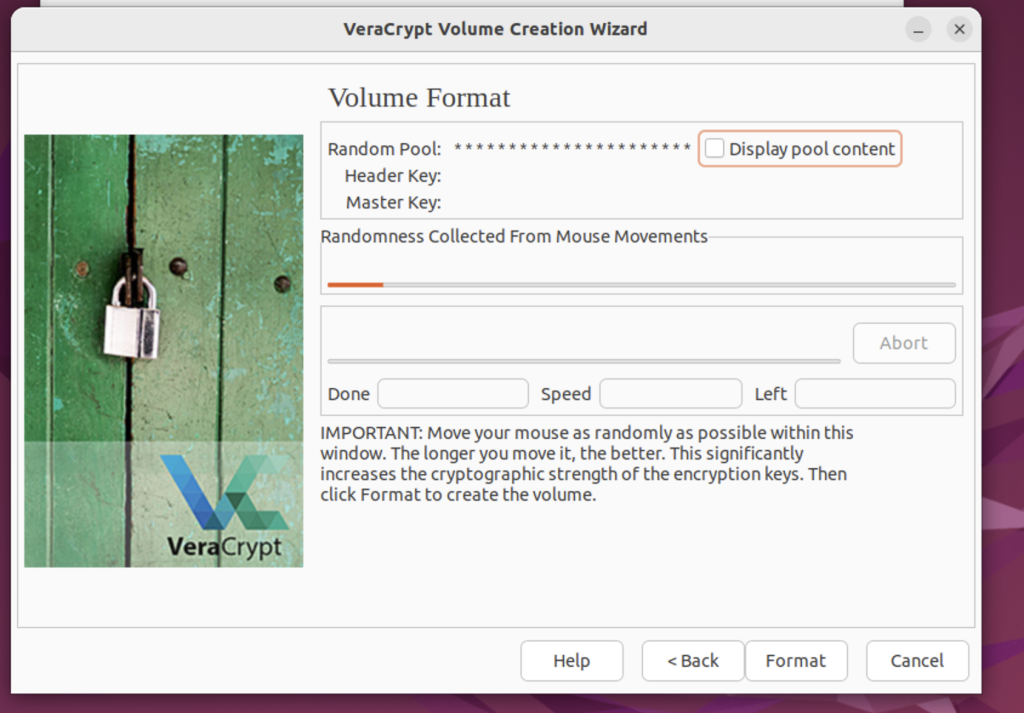
Step 13. Move the Mouse Vigorously
This screen creates cryptographic keys for randomness. So the program tracks the mouse movement to do this. Ensure you make your mouse movement as random as possible, then click on ‘Format’.
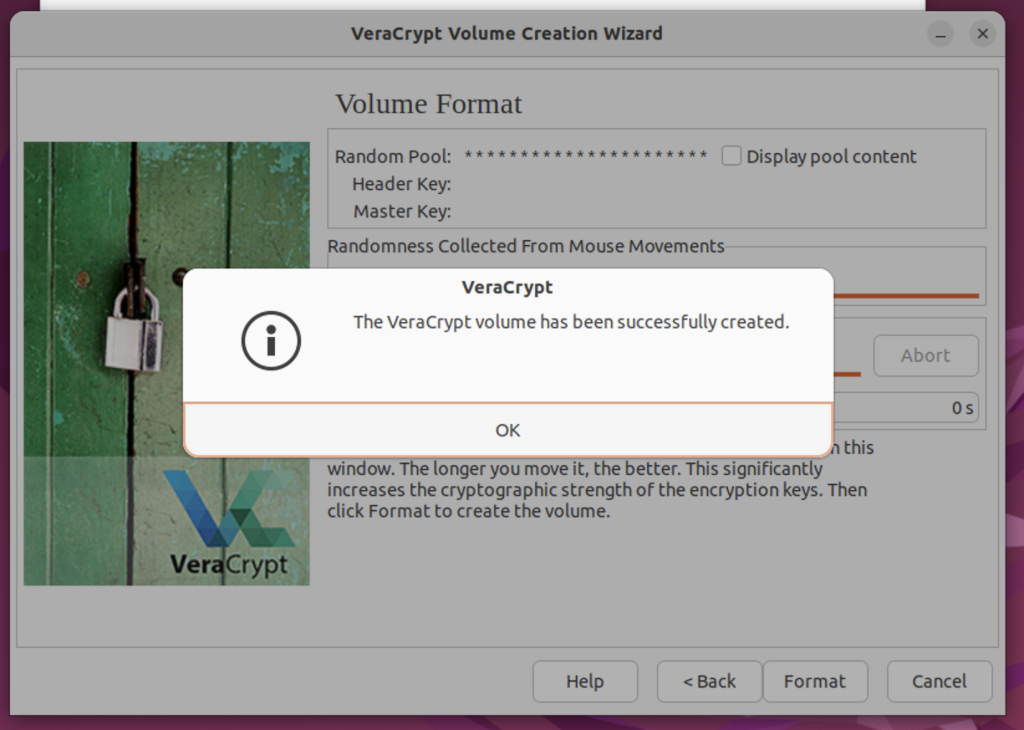
Step 14. Volume Creation is Successful
We have successfully created the volume; we will then be guided to the next screen after clicking OK.
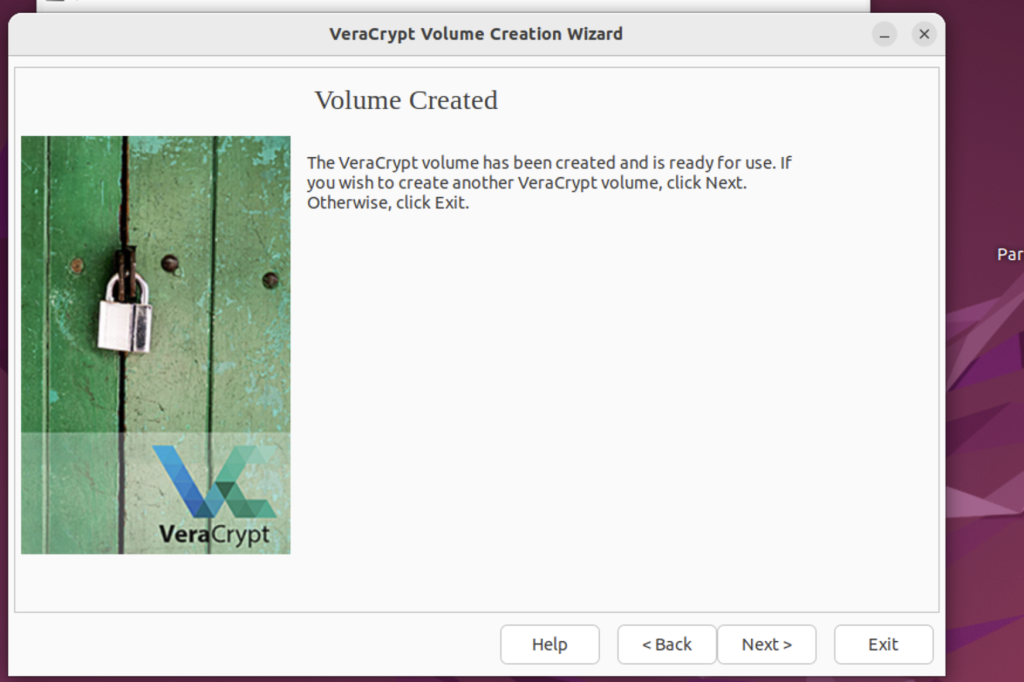
Step 15. Exit Veracrypt Volume Creation Wizard
There is nothing more to do here. Just Click Exit.
Mounting Veracrypt Volume
We previously saw how to create a Veracrypt volume; now we will explore how to mount it. It’s quite simple: launch Veracrypt again and go to the main home screen.
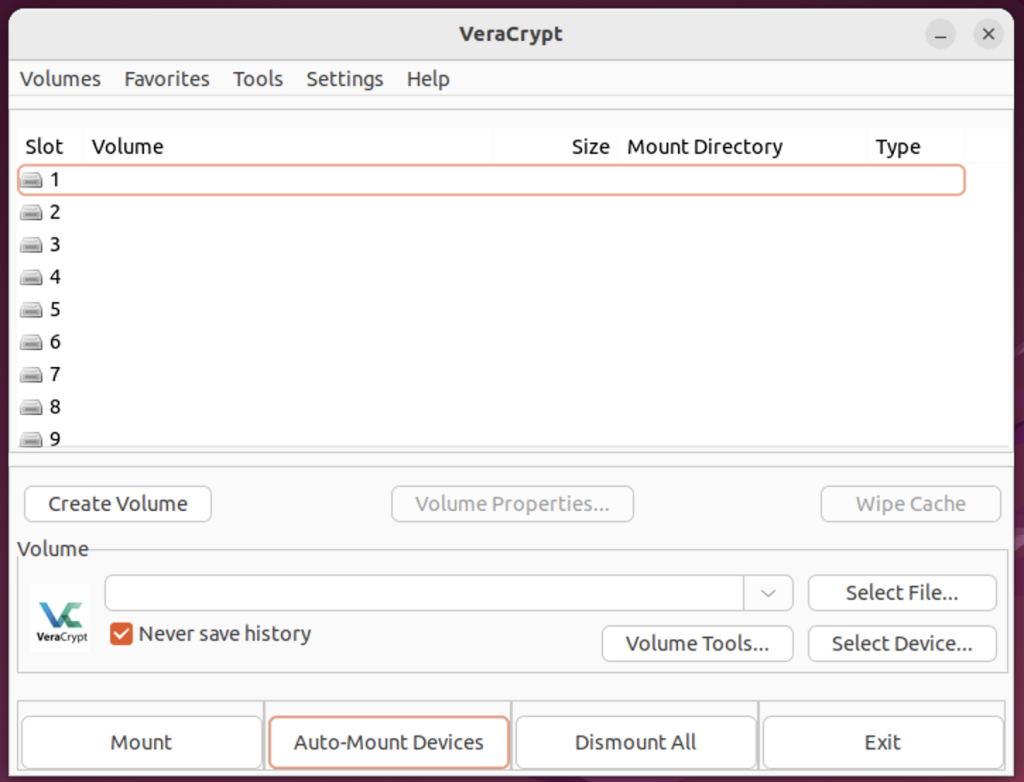
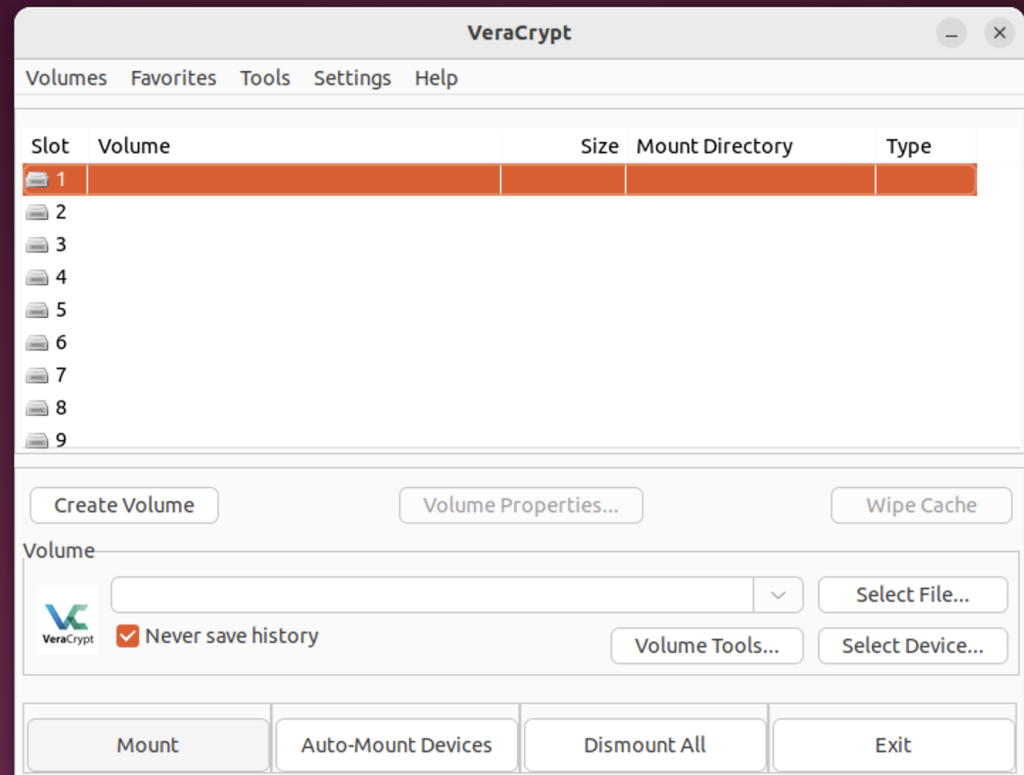
On the main screen, we will select the Slot we want to mount on. If you have multiple volumes, you can assign different slots to different volumes.
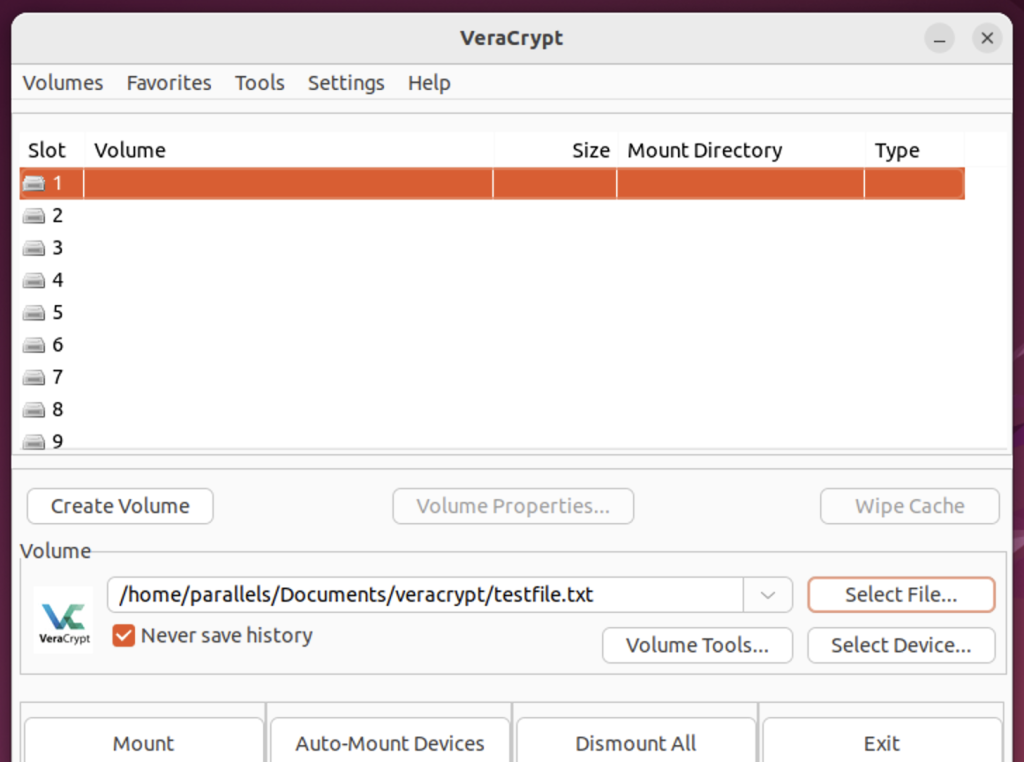
Once the Slot is selected, we have to locate the volume that we created by clicking on the ‘select file’ button. After the selection is done just press the ‘mount’ button in the bottom left of the screen.
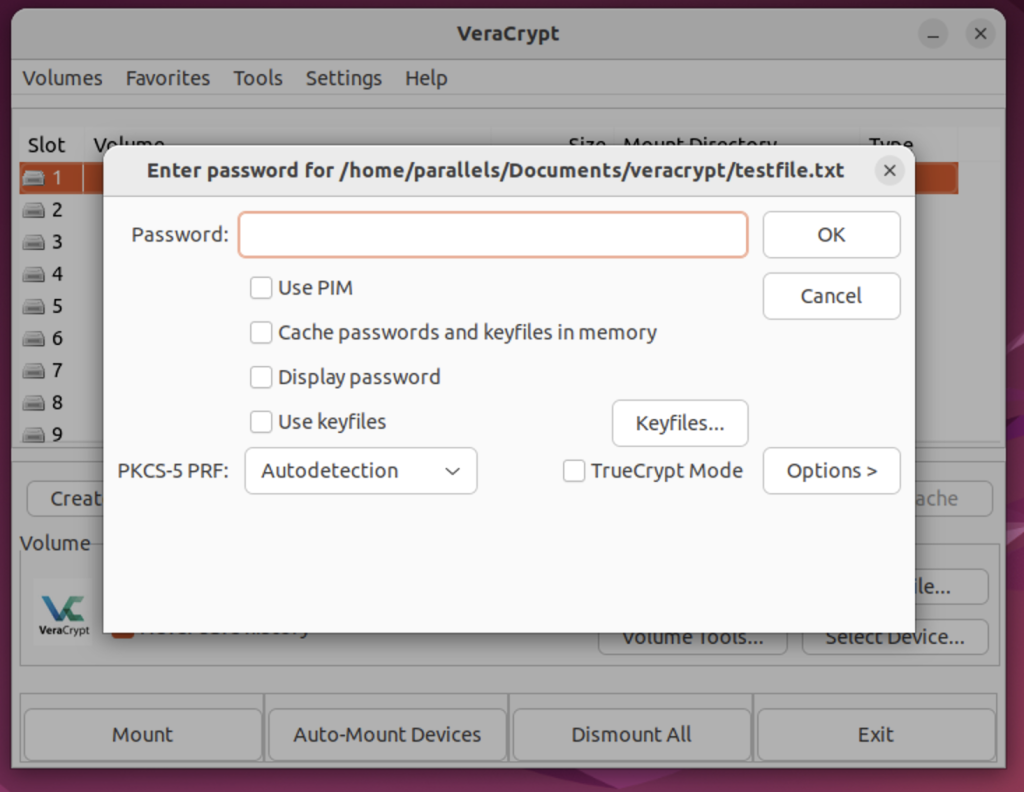
The program will prompt us to enter the password we previously set during volume creation. Enter that and press the ‘OK’ button.
Great! Now we have successfully mounted the encrypted Veracrypt volume.
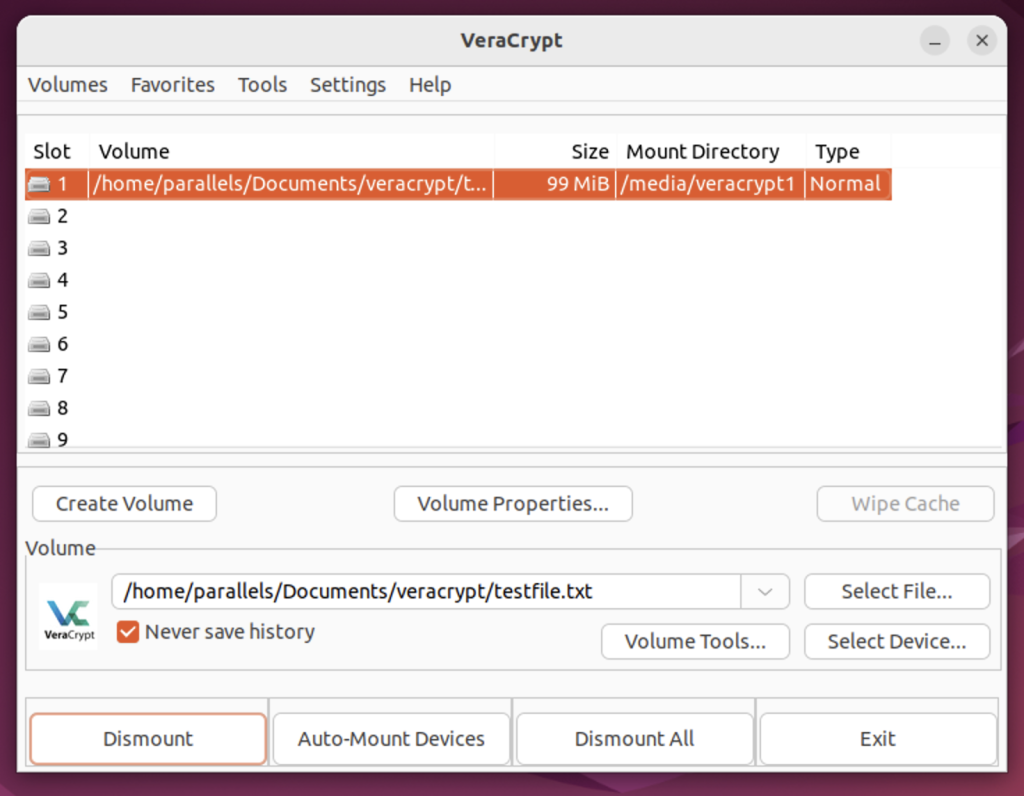
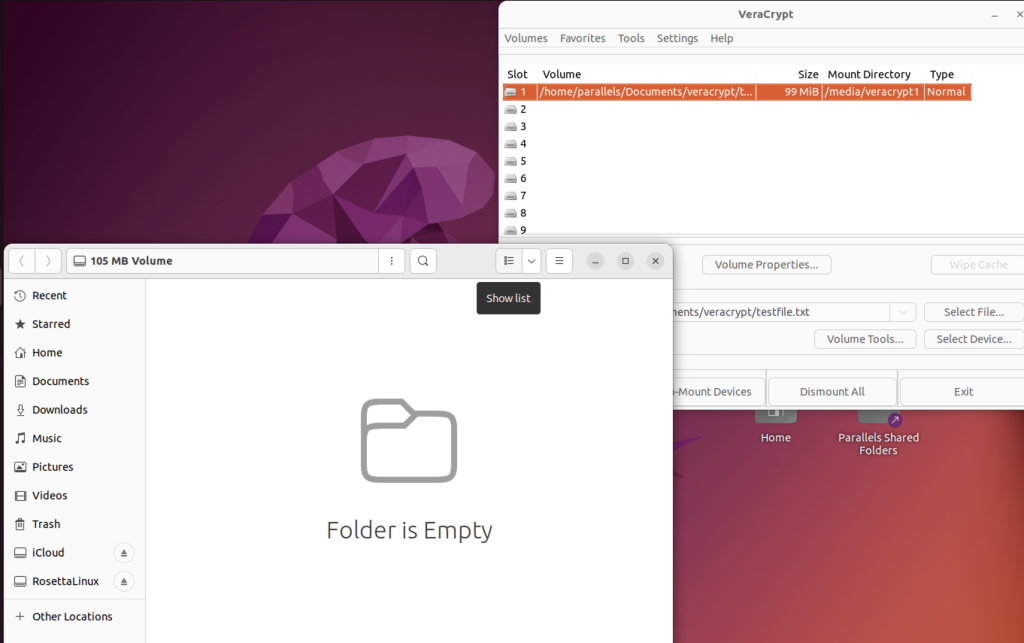
Double-Click on the mounted slot; it will directly open our encrypted Volume.
Uninstalling Veracrypt from Ubuntu 22.04 LTS?
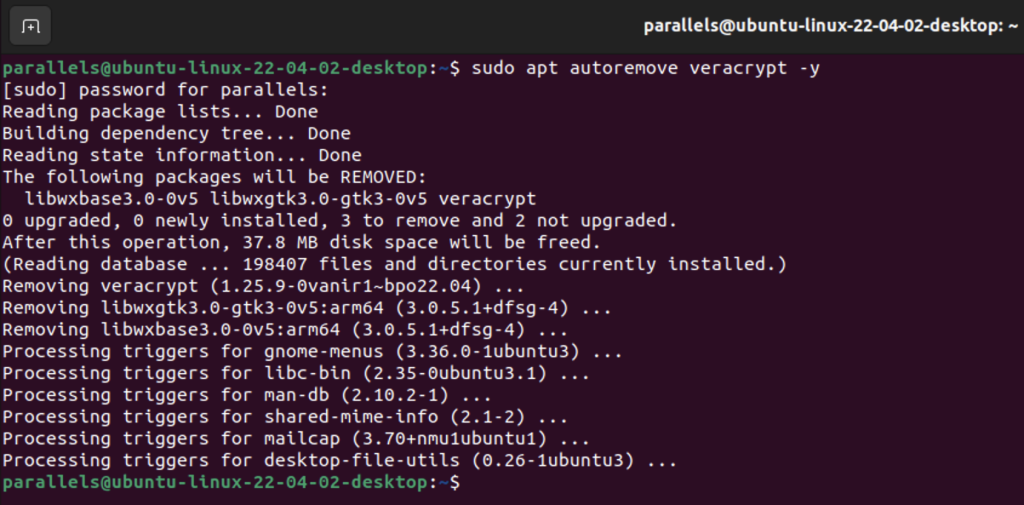
To uninstall Veracrypt on Ubuntu 22.04 LTS, just enter the following command in the terminal.
sudo apt autoremove veracrypt -y
That’s it We have successfully uninstalled Veracrypt.
Summary
In this comprehensive guide, we’ve walked you through the step-by-step process of installing VeraCrypt on Ubuntu 22.04 LTS, a robust disk encryption tool that’s essential for safeguarding your data. From downloading the installer package to overcoming installation errors and finally mounting an encrypted volume, we’ve covered it all. We also delved into the importance of data encryption and explored VeraCrypt’s advanced features, like various encryption and hashing algorithms, making it a versatile choice for both beginners and seasoned users.
Whether you’re concerned about privacy, security, or compliance, VeraCrypt offers a robust solution that adapts to your needs. It’s not just about installing the software; it’s about understanding its capabilities and leveraging them for optimal data protection. With this guide, you’re now equipped to take control of your digital security.
So go ahead, encrypt those drives, and sleep a little easier tonight, knowing that your data is well protected.