
Shell scripting is a powerful tool in the Linux ecosystem. It can help automate repetitive tasks, manipulate data, interact with system APIs, and more. One of the many applications of shell scripting is SSL certificate verification.
SSL (Secure Sockets Layer) is a protocol that encrypts data sent between a web server and a browser, so any information transferred remains private and secure.
In this article, we’ll delve into how shell scripting can be used for SSL certificate verification. We’ll cover the basics of shell scripting, how it can be applied to SSL verification, and provide some practical examples.
What are SSL Certificates, and Why Verify them?
SSL certificates are a key component of SSL encryption. They contain the public key and the identity of the owner, and they are issued by a trusted Certificate Authority (CA). Days are gone when SSL cert was costly. Today, many CAs and resellers offer low-cost or cheap SSL certificates targeting every SMB. Such certificates offer higher encryption along with other features and benefits.
For instance, OpenSSL, a robust toolkit for SSL and TLS protocols, can be used to generate a Certificate Signing Request (CSR) and to identify certificate information.
This can be done non-interactively, making it suitable for inclusion in shell scripts.
Here’s a basic example of how to create a new private key and generate a CSR from it using OpenSSL:
openssl req –new –newkey rsa:2048 –nodes –keyout server.key –out server.csr
To fully grasp the power of shell scripting, you need to understand its fundamental concepts.
For instance, knowing how to use variables in shell scripts or understanding how to use functions in shell scripts can help you create more modular and reusable scripts.
In the context of SSL verification, you might find yourself using while loops to handle repetitive tasks, such as processing a list of certificates.
With that out of the way, let’s get right into the basics of SSL verification.
SSL Certificate Verification: The Basics
The SSL certificate verification process involves several steps:
- Your web browser downloads the web server’s certificate, which contains the public key of the web server. This certificate is signed with the private key of a trusted certificate authority (CA).
- Your web browser comes installed with the public keys of all of the major certificate authorities. It uses this public key to verify that the web server’s certificate was indeed signed by the trusted certificate authority.
- The certificate contains the domain name and/or IP address of the web server. Your web browser confirms with the certificate authority that the address listed in the certificate is the one to which it has an open connection.
- Your web browser generates a shared symmetric key which will be used to encrypt the HTTP traffic on this connection. This is much more efficient than using public/private key encryption for everything. Your browser encrypts the symmetric key with the public key of the web server then sends it back, thus ensuring that only the web server can decrypt it since only the web server has its private key.
Creating an SSL Certificate with Shell Scripts
Creating a shell script to verify SSL certificates will involve the same steps the browser takes. Here’s a step-by-step guide:
- Generate a Private Key: The first step in creating an SSL certificate is to generate a private key. This can be done using the
openssl genrsacommand. The-outflag is used to specify the name of the file to which the private key should be written.
openssl genrsa -out server.key 4096
- Generate a Certificate Signing Request (CSR): Once you have a private key, you can generate a CSR. This is done using the
openssl reqcommand. The-newflag indicates that a new CSR is being created. The-keyflag is used to specify the private key that was generated in the previous step. The-outflag is used to specify the name of the file to which the CSR should be written.
openssl req -new -key server.key -out server.csr
- Generate a Self-Signed Certificate: After generating a CSR, you can create a self-signed certificate using the
openssl x509command. The-reqflag indicates that a CSR is being used. The-daysflag is used to specify the number of days for which the certificate should be valid. The-inflag is used to specify the CSR. The-signkeyflag is used to specify the private key. The-outflag is used to specify the name of the file to which the certificate should be written.
openssl x509 -req -days 365 -in server.csr -signkey server.key -out server.crt
Complete Shell Script for Verifying SSL Certificates
These commands can be combined into a shell script that automates the process of generating a private key, creating a CSR, and generating a self-signed certificate. Here’s an example of what that script might look like:
#!/bin/bash

# Generate a private key
openssl genrsa -out server.key 4096

# Generate a CSR
openssl req -new -key server.key -out server.csr

# Generate a self-signed certificate
openssl x509 -req -days 365 -in server.csr -signkey server.key -out server.crt
This script can be run from the command line to generate a private key, CSR, and self-signed certificate with a single command.
Verifying the SSL Certificate
Validating the SSL certificate is also very easy as Python’s openssl module itself gives us the command to verify newly created or pre-existing certificates. Additionally, we can also use openssl module to verify the certificate of sites online.
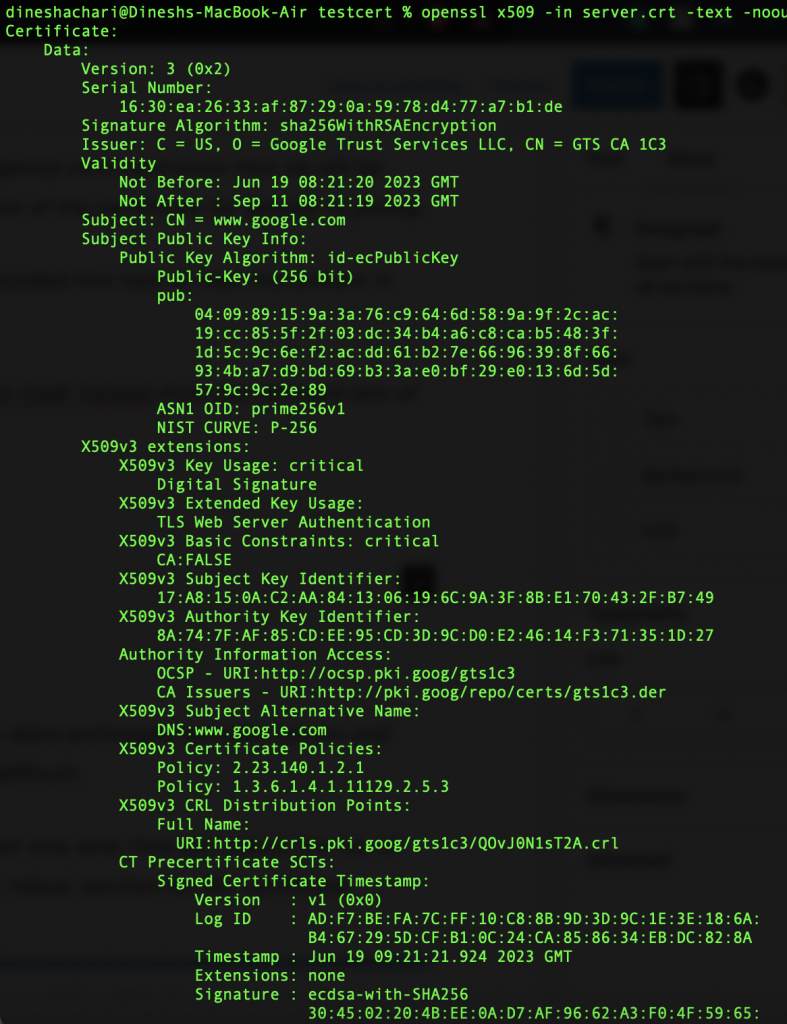
I. Verifying the server.crt certificate
To verify the server.crt we run the following command,
openssl x509 -in server.crt -text -noout
Now, let us break down the above command.
We are, of course, using the openssl command, but the subcommand x509 lets the openssl command know that we will be dealing with only x509-type certificates. The -in server.crt part specifies the location of the certificate for openssl to pickup.
By default, the openssl command doesn’t just display the text data; it has to be decoded into text to view the content in the human-readable format we specify using the -text flag.
Lastly, the -noout flag instructs the openssl command to not display the raw output itself but instead show the decoded text of the certificate.
Here’s how it looks,
II. Verifying the Online Website Certificates
We can also verify any online website’s SSL certificate without leaving the comfort of the terminal. For E.g., to check the SSL certificate of google.com we can use the following command,
openssl s_client -connect www.google.com:443
This is the output we get,
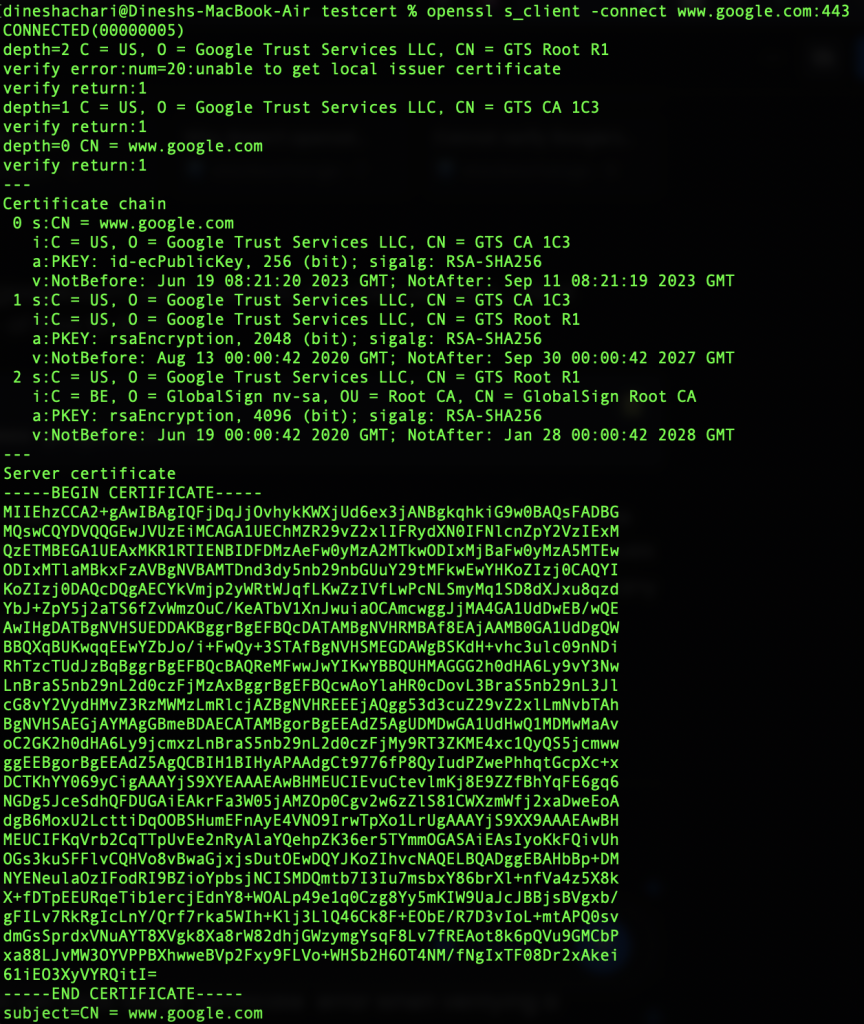
Here the openssl command will try connecting to the HTTPS server on google.com and print the “certificate chain” to standard text format.
Summary
SSL certificates are critical in securing our digital worlds – ensuring that the data exchanged between servers and clients remains confidential and integral. But, managing these certificates can be difficult.
But automating the process of SSL certificate verification using shell scripts, you not only save time but reduce the risk of human error. And when combined with powerful tools like OpenSSL, they provide a robust solution for SSL certificate management.
In this guide, we’ve only scratched the surface of what’s possible with shell scripting and OpenSSL. As you continue to explore these tools, you’ll discover new ways to streamline your workflows and enhance your system’s security. So keep experimenting, keep learning, and most importantly, keep scripting!
References: