

If you’re having a problem connecting to your Wi-Fi network on your Linux device or your device is not showing any Wi-Fi network, you will need to use a wireless USB adapter. If you have a TP-Link Wi-Fi adapter, you can install the driver and get it working by following our instructions.
Also check: No Wi-Fi Adapter Found error in Ubuntu [Fixed]
Prerequisites
- Before installing the driver make sure your adapter is compatible with Linux devices. You can check this by going to the TP-Link website and searching for the model number of your adapter. As an example, we will be using the R8188EU model.
- You will need an internet connection to install your suitable driver, connect a cable directly to your machine or use your mobile hotspot to access the internet.
How to install the TP Link Wifi driver on Ubuntu
1. Go to the application menu, search for Terminal, and run it.
Now the first thing to do is update all the packages using the command below:
sudo apt update
2. To install all the packages write the command:
sudo apt upgrade
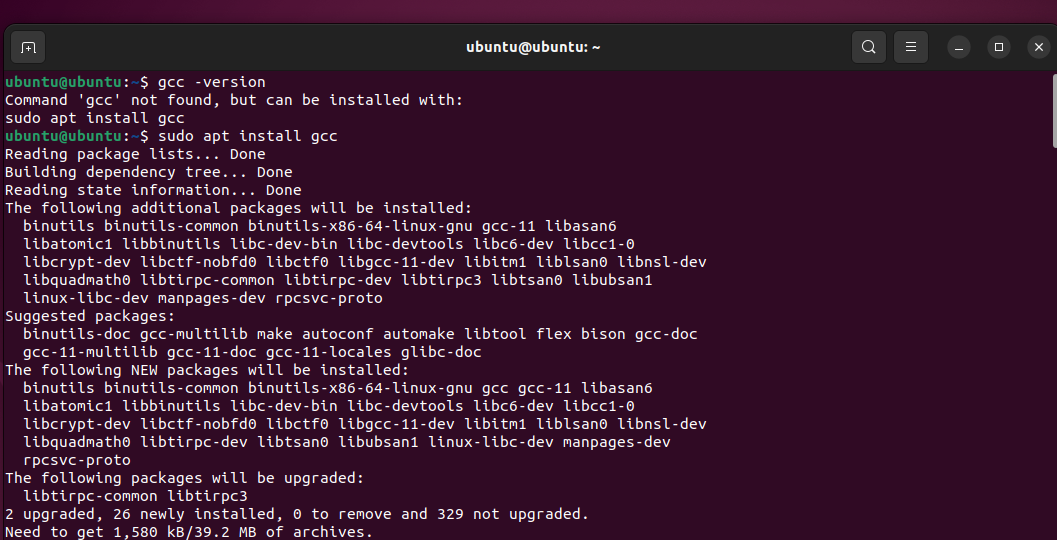
3. After you have installed all the packages, reboot the device. Next, you will need to install GCC if you don’t have it.
You can verify it by executing the command:
gcc --version
To install GCC:
sudo apt install gcc
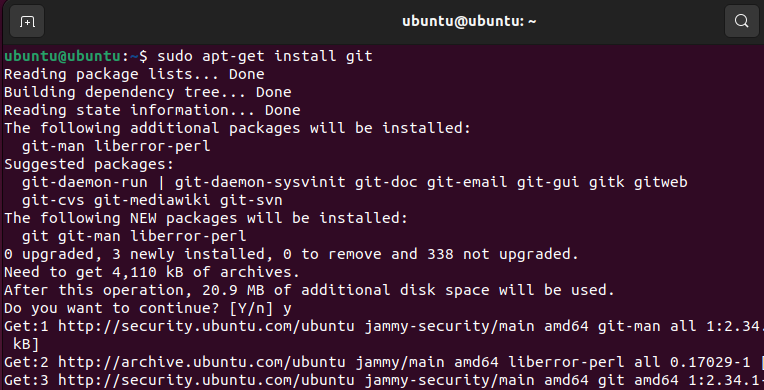
4. Now to download the driver from the GitHub repository, we will need to install git on our device:
sudo apt install git
5. After installing git, search for the relevant driver on GitHub. I will be using this driver. But you can get a suitable driver from lwfinger’s repository.
6. Now return to your desktop folder where we will start downloading the driver using the below command: (Please note that the GitHub link that you should use after the git clone command varies with your driver.)
git clone https://github.com/lwfinger/rtl8188eu
7. The above command will clone the git repository in a directory named rtl8188eu (Name of your driver) locally. Now, cd into the directory:
cd rtl8188eu/
8. For the next step, we need to have ‘make‘ installed. To verify, execute the command:
make --version
If it’s not found, install it by using the command:
sudo apt install make
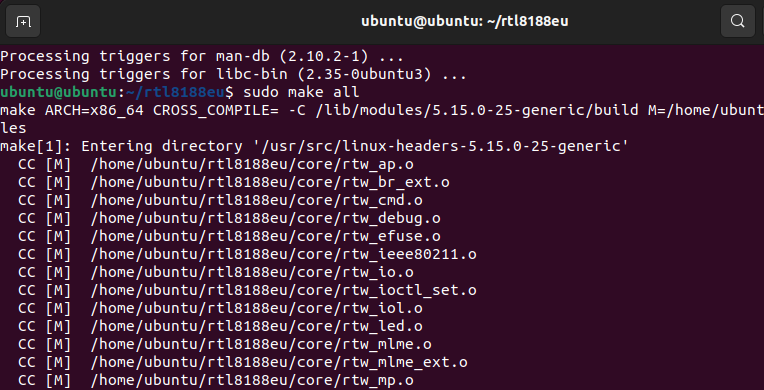
9. For compiling the driver use command:
sudo make all
10. To install the compiled files, use the command:
sudo make install
make to install the filesNow reboot the system, and connect the Wi-Fi adapter to a USB port. Open a terminal to use ifconfig to check if the adapter is listed.
Go to Settings then the Wi-Fi tab there should be a new option of Wi-Fi adapter, connect to it. Now you are ready to use the adapter to access the internet.
How to install the driver in Kali Linux
Compared to other Debian-based distros like Ubuntu, Kali Linux has a bit different process for installing the drivers. Here’s the process for Kali Linux users:
1. Open a terminal window and update all the packages using the command below:
sudo apt update
sudo apt upgrade
2. Now reboot your device. After rebooting, open a terminal window and use the command below to install build-essential:
sudo apt install build-essential
3. Try either one of these commands, and see which works for you:
sudo apt install linux-headers-`uname -r`
or, this:
sudo apt install linux-headers-5.10.0-kali6-amd64
4. Now, we will install DKMS:
sudo apt install dkms
5. After that, use the below command (Note that I am using the command for the ‘r8188eu‘ adapter, and it might differ for your adapter):
sudo rmmod r8188eu.ko
6. Now to download the driver from the GitHub repository, we will need to install git on our device:
sudo apt install git
7. After installing git, search for the suitable driver on GitHub. I will be using the following driver:
https://github.com/aircrack-ng/rtl8188eus
8. Now return to the terminal where we will start downloading the driver using the below command: (Note that the link used after the git clone command might differ for your system depending on the TP-Link device you own.)
git clone https://github.com/aircrack-ng/rtl8188eus
The above command will clone the git repository in a directory named rtl8188eu locally.
9. Use ls to show all directories, then cd into the directory:
cd rtl8188eus/
10. Now move to root using the command:
sudo -i
11. After this, echo into the Realtek (or similar adapter brand) configuration file:
echo "blacklist r8188eu" > "/etc/modprobe.d/realtek.conf"
Now exit out of the root.
12. We need to reboot it again, and after that, use cd to go back into the driver directory:
cd rtl8188eus/
13. Check whether ‘make’ is installed on your system or not:
make --version
If it’s not found, install it by using the command:
sudo apt-get install make
14. For compiling the driver files, use the command:
sudo make
sudo make install
15. And use the below command to configure the driver:
sudo modprobe r8188eu
16. Now reboot the system and connect the Wi-Fi adapter to your device. Open a terminal window and use ifconfig to check if the adapter is listed.
If you can connect to the internet using Wi-Fi, congratulations, you have successfully installed the TP-Link Wi-Fi adapter driver on your Kali Linux machine.
Summary
Installing wireless adapter driver files manually is not that easy in any operating system. This is why most hardware devices are installed automatically when we boot up our system for the first time. Regardless of the reason you wanted to install the drivers manually, I hope you were able to accomplish your goals.