

Regarding operating systems, Ubuntu Linux is the one to take the top spot. This is likely due to the care canonical the company behind develops and maintains Ubuntu has put in making it user-friendly and robust in terms of features that appeal to broader audiences.
However, issues with the wireless adapter are a frequent problem in many operating systems, and the same on Ubuntu is no exception. When we encounter this error, it simply means that Ubuntu cannot detect the Wi-fi adapter that is physically connected. This is the error that prevents users from getting access to the internet. Given the increasing reliance on the internet for almost anything, resolving this issue as early as possible is crucial.
Indeed, this is a critical problem as it prevents you from connecting to the internet wirelessly on your device, but at the same time, fixing it is rather easy and quick.
This guide will provide a comprehensive overview of the error No WiFi Adapter Found in Ubuntu system, its potential causes, and effective troubleshooting steps. By the end of this guide, we hope you’ll be able to navigate and resolve this issue confidently, ensuring your Ubuntu experience remains as seamless and efficient as possible.
What is a Wi-Fi adapter?
Wi-Fi adapters provide your computer with a wireless connection facility, hence letting you connect to nearby Wi-Fi networks. Modern laptops, office computers, and high-end personal desktops are equipped with inbuilt Wi-Fi adapters. There is a high chance that your device is running a Wi-Fi adapter from some of the major wireless adapters brands like Intel, Broadcom, or Realtek.
Any prerequisites?
You will need a working internet connection to install the additional drivers for the network adapter. You can use your iPhone or Android as a wired connection using USB tethering or an Ethernet cable to access the internet. If you are using your phone, don’t worry; it will just cost a few megabytes of data.
How to fix the “No Wi-Fi Adapter Found” error?
First, we must check whether your PC can recognize the Wi-Fi Adapter. To perform this diagnosis, follow the steps below:
Identifying the wireless adapter
1. Open the terminal by pressing CTRL+ALT+T
2. Enter the following command:
lshw -C network
The hardware lister (lshw) can provide a detailed description of your network device using the above command. Note down the product name.

lshw commandIf the details of the wireless adapter are not listed as shown in the image above, follow the steps below.
Identifying an internal wireless adapter
If you are using a laptop, there is a high probability that it is equipped with an internal(PCI) wireless adapter. To list all the PCI devices, enter the following command in the terminal:
lspci
Look for the network controller in the list of PCI devices, it should look like this:
04:00.0 Network controller: Realtek Semiconductor Co., Ltd. RTL8822CE 802.11ac PCIe Wireless Network Adapter
Identifying a USB wireless adapter
If you are using an external wireless adapter via USB, enter the following code:
lsusb
Your network adapter might show up like this:
Bus 001 Device 003: ID 0bda:8179 Realtek Semiconductor Corp. RTL8188EUS 802.11n Wireless Network Adapter
Once you have identified the build/model of the wireless adapter, you can proceed to the next steps.
Installing New drivers for the wireless adapter
Before proceeding to install the driver, update the apt repositories using:
sudo apt-get update && sudo apt-get upgrade
Below are the steps to install the wireless adapter drivers from different manufacturers.
Realtek Driver
1. Download the latest Realtek rtlwifi codes repository from this GitHub link
2. Extract the downloaded ZIP file and go to the newly created folder called rtw88-master
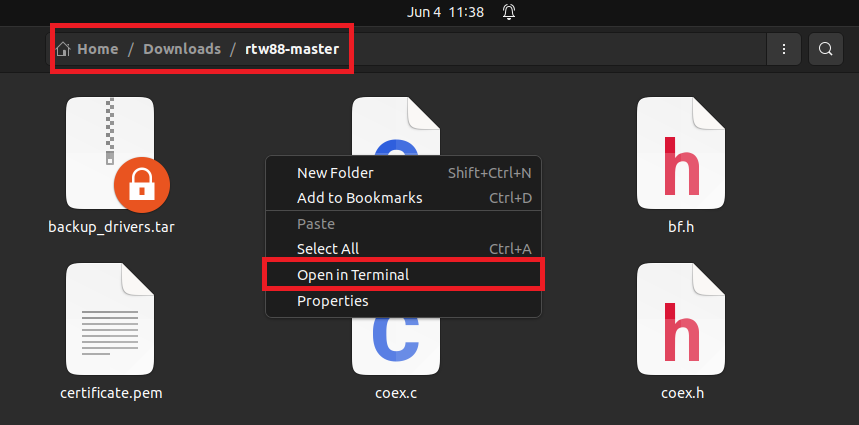
3. Open the terminal in the current directory and enter the following commands one by one:
make
sudo make install
4. Reboot your device. If the Wi-Fi adapter is still not detected, run the following command (Please replace <your-wifi-module-name> with the appropriate module name):
sudo modprobe -r <your-wifi-module-name> && sudo modprobe <your-wifi-module-name>
Broadcom Driver
For Broadcom devices, you just need to enter the following code and then reboot your device:
sudo apt-get install --reinstall bcmwl-kernel-source
Intel Driver
1. Download the suitable Intel wireless adapter firmware from this official link
2. Extract the contents of the downloaded file and open the terminal in the extracted folder
3. Enter the following code:
sudo cp *.ucode /lib/firmware
This code will copy the files to the firmware directory, hence installing the required Intel drivers.
And If the error is still not fixed?
There can be other possibilities if the issue is still not fixed on your device, such as:
- Your Wi-Fi adapter is malfunctioning
- Your Wi-Fi adapter is not supported by the current version of the Linux kernel
- Your device is experiencing hardware problems
In this case, you can always explore the inexpensive option of using an external USB Wi-Fi adapter. Most of the newer models are compatible with Linux and work just as well as the internal ones.
Conclusion
Configuring hardware devices on Linux-based systems is a daunting task when needed to be done manually. The plethora of network interface components in the market has also made the installation more complex, but we have tried to make this guide inclusive for almost all possible modules. Nevertheless, we hope this guide can walk you through the solution easily.
Also Read
How to install a Jellyfin server on Debian based distributions
How to Install AMD PRO Drivers on Ubuntu-based Distributions