

In this tutorial, we will install and configure a DHCP Server on Ubuntu Linux. Dynamic Host Configuration Protocol (DHCP) is a network service for automatically assigning IP Addresses to clients on a network without having to manually configure it on every device. It follows a server-client architecture, where the client requests a DHCP Server to get an IP Address. Most routers have a DHCP server built-in, but we can use our own DHCP Server too.
How does DHCP work?
When the computer boots up, it doesn’t have an IP Address (Assuming it doesn’t have static IP Addressing configured, which most machines don’t have). It sends a broadcast (on the MAC Address with all F’s) called a DHCP Discover. DHCP Servers are designed to respond to such broadcasts.
They then send unicast traffic, known as the DHCP Offer, back to the requesting client. This DHCP Offer typically contains the Assigned IP Address, the Default Gateway’s IP Address, and the DNS Server’s IP Address.
The client, on receiving the Offer, sends a DHCP Request to the DHCP Server, acknowledging that it has accepted the information given to it by the server.
DHCP Servers record the assigned IP Addresses to prevent double assignments or IP Address Collisions.
Since DHCP Servers respond to broadcast, they must be present on the local network, and there shouldn’t be more than 1 DHCP Server on a local network.
Allocation Methods for DHCP
The following are the two allocation methods for a DHCP Server:
- Manual: In this method, the IP Address is given on the basis of the MAC Address. This ensures that a particular machine gets a fixed IP Address as its IP Address is then tied to its MAC Address. The DHCP Server sends a constant configuration to the client depending on its MAC Address in this type of allocation.
- Automatic: In this method, the IP Addresses are assigned automatically by the DHCP Server on a first-come, first-served basis from a pool of addresses. It can be further divided into two categories based on the Lease Time – The time for which an IP Address is assigned to a client.
- Fixed Lease Time: When a DHCP client is no longer on the network for a specified period, the configuration is expired and released back to the address pool for use by other DHCP Clients. The client has to renegotiate to keep the previous IP Address.
- Infinite Lease Time: This has the effect of permanently assigning an IP Address to a client.
Steps to Configure DHCP Server on Ubuntu Linux
Now we’ll look at how to set up a DHCP Server on Ubuntu.
1. Install DHCP Server
You can install the isc-dhcp-server package using the apt command as follows:
sudo apt install isc-dhcp-server

Note: You can install a DHCP Server even on a Desktop edition rather than the server edition of Ubuntu. See this StackOverflow answer for how desktop and server editions are different/similar.
2. Configure the DHCP Server
The main configuration file of the ISC DHCP server is /etc/dhcp/dhcpd.conf.
Backup Original Configuration file
It’s always a good idea to back up original configuration files. In case something goes wrong, the original configuration can quickly be restored. You can use the cp command or mv command to create a backup.
sudo mv /etc/dhcp/dhcpd.conf{,.backup}
#Expands to sudo mv /etc/dhcp/dhcpd.conf /etc/dhcp/dhcpd.conf.backup
The above command creates a dhcpd.conf.backup file using the {} expansion feature of bash.
Create and edit the new configuration file
You can use the editor of your choice. I’ll be using the nano editor:
sudo nano /etc/dhcp/dhcpd.conf
The options in the configuration file depending on the complexity of the network.
Assigning Random IP Addresses from a pool
The most common thing done by a DHCP server is to assign addresses randomly. The settings for the same would be as follows:
# a simple /etc/dhcp/dhcpd.conf
default-lease-time 600;
max-lease-time 7200;
authoritative;

subnet 192.168.1.0 netmask 255.255.255.0 {
 range 192.168.1.100 192.168.1.200;
 option routers 192.168.1.254;
 option domain-name-servers 192.168.1.1, 192.168.1.2;
#option domain-name "mydomain.example";
}
According to this configuration:
- The default lease time for a client is 10 mins (600 seconds), and the maximum lease time is 2 hrs (7200 seconds).
- This DHCP Server is the official server for the local network. (indicated by
authoritative). - The Server will hand over the IP Address in the range 192.168.1.100 to 192.168.1.200.
- The server will also “advise” the client to use 192.168.1.254 as the default gateway and 192.168.1.1 and 192.168.1.2 as its DNS servers.
You may also include a domain name.
Assigning Static IP Address to a client
To guarantee that a particular client will always get the same IP Address, the DHCP Server will need the MAC Address of that client. This would be the Manual Allocation mode talked about earlier in this article.
To get the MAC Address of a client, we can use the ip command on the client machine:
ip a
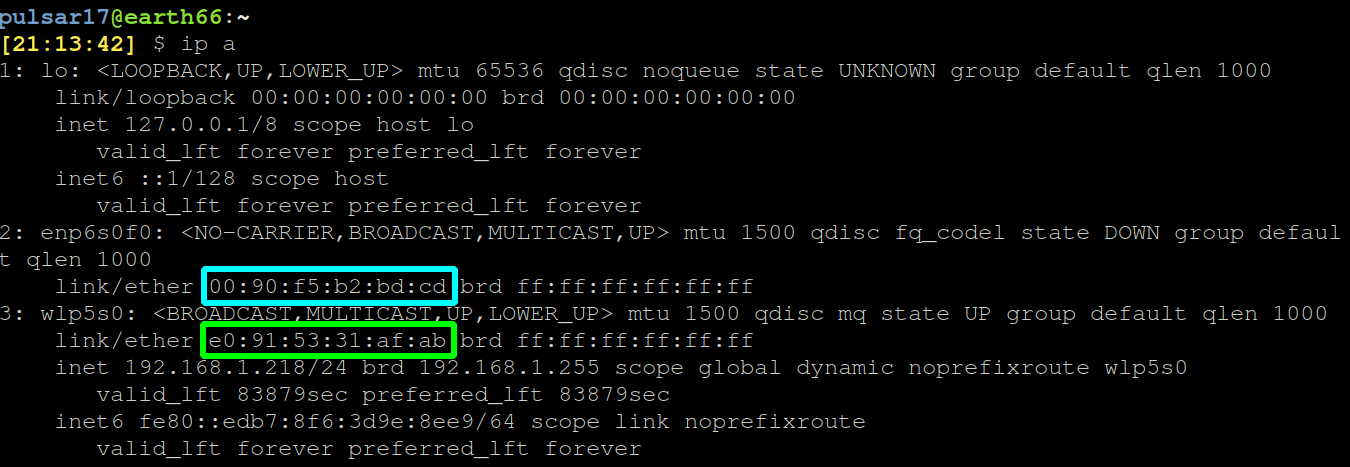
(You’ll need to select the MAC Address of the interface you plan to connect to the network. I’ve chosen the Wireless one.)
Now that we have the MAC Address, we can put it in the configuration file:
host archmachine {
hardware ethernet e0:91:53:31:af:ab;
fixed-address 192.168.1.20;
}
This will reserve the IP Address 192.168.1.20 for the client with the MAC Address e0:91:53:31:af:ab.
Finally, the configuration file looks like this:
You may omit the Static IP Configuration part to assign addresses automatically.
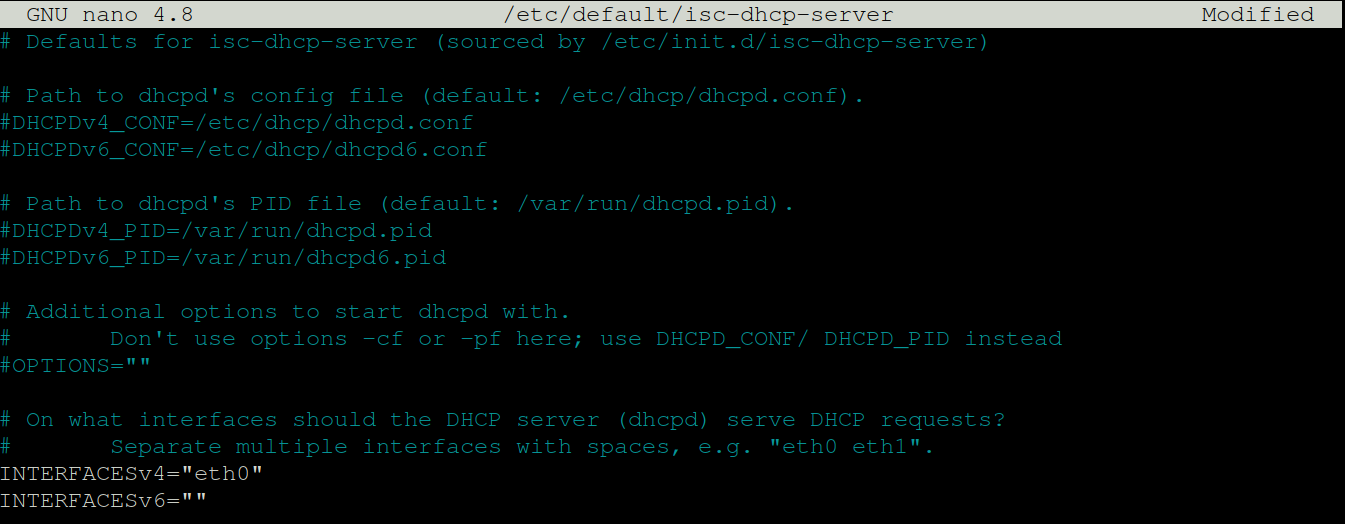
3. Bind the DHCP Server to an interface
The DHCP Server can have many interfaces. You need to define the interface it should listen to. You can view the interfaces on the server using ip a just like the client.
The interface to bind with is defined in the /etc/default/isc-dhcp-server file. Open it using the editor of your choice. The interface for my server is eth0. It may be different for your server. Edit the file as:
INTERFACESv4="eth0"
4. Restart the DHCP Server
Now that changes to the configuration are made, we need to restart the service on our Linux server to enable those changes. To do that, we will use the systemctl command:
sudo systemctl restart isc-dhcp-server.service
5. Check the status of the DHCP Server
This can again be done using the systemctl command :
sudo systemctl status isc-dhcp-server.service
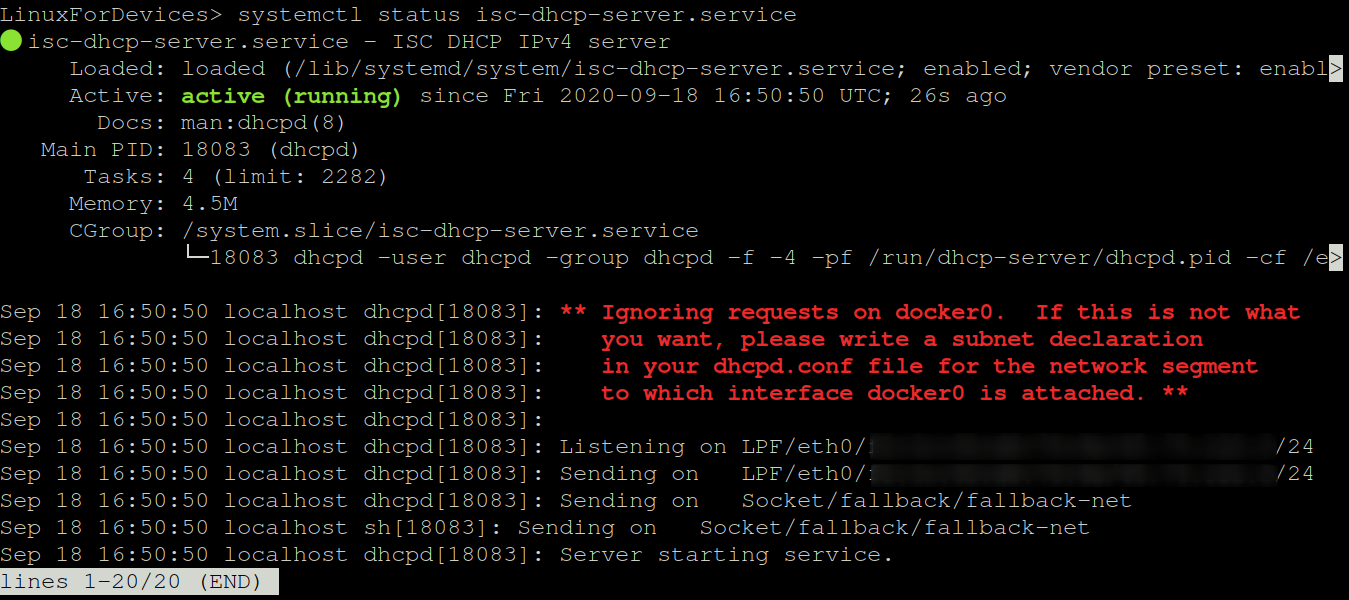
Active status indicates that the DHCP Server has successfully picked up the configuration and is ready to hand out IP Addresses.
Troubleshooting
The DHCP Server writes its logs to the Syslog. If you find that the service status is inactive, you should look into /var/log/syslog the file. From there on, you can search for the specific problem mentioned in the Syslog on the internet.
Conclusion
Following the steps provided in this guide will allow you to set up a DHCP server on Ubuntu easily. DHCP is a critical network service that distributes IP addresses automatically to network clients. With the ability to assign IP Addresses automatically or manually, DHCP Servers offer flexibility in IP Address assignment. Network managers may ensure a smooth and efficient experience by correctly setting and binding the DHCP Server to the relevant interface. Using the troubleshooting advice in this article, any problems that may develop can be easily fixed. Following this guide, you can successfully install a DHCP server on Ubuntu and gain network control.