

The tcpdump command is a Linux utility that allows users to capture network packets that are transmitted to and from the system. In this article, we will learn how to extract and examine network packets using tcpdump command.
Although very unlikely, but it may happen that a system may not have tcpdump installed. In that case, any Ubuntu/Debian user can enter the following command:
sudo apt install tcpdump
Other Linux users can install it, using their standard installation commands, followed by tcpdump. Moreover, network data sometimes contains confidential information, therefore, to access packets, we require root permission. It can be done by 'sudo -s' or 'sudo su'. Here’s an article if you want to learn more about sudo.
tcpdump command use cases
Let’s get right down to understanding the different use cases and practicality.
1. Using tcpdump to find all network interfaces
It must be noted that any packet entering or exiting the system, needs to go through a network interface. To fetch the list of all available network interfaces, we use the command:
tcpdump -D
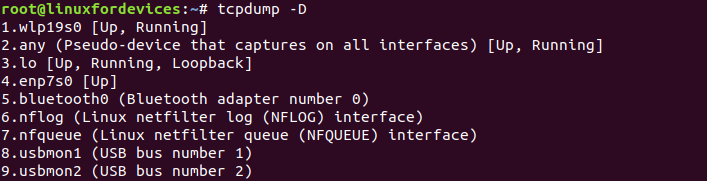
Along with the name of the network interfaces, the command provides the status as well.
2. Capture all network packets using the tcpdump command
As mentioned in the above output, 'any' can be used to capture data packets that go through all network interfaces. This can be done by using the interface option '-i'.
tcpdump -i any
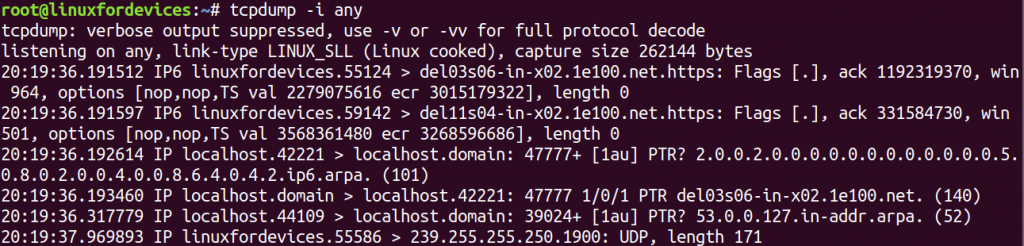
The output displayed above, lacks details for each data packet. To understand each packet in detail we can use '-v'option.
'tcpdump'is a never-ending command. We may come across a time, where we need to force stop the output, which can be done by pressing'CTRL + C'.
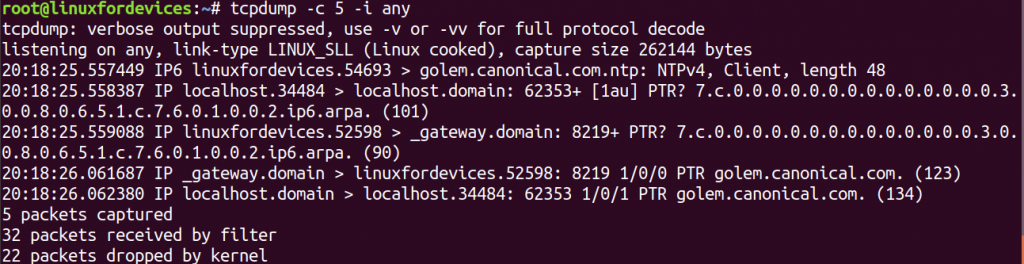
After ceasing the printing of the packets, we are provided with some statistics related to the current tcpdump session. It looks like this:

The information provided is:
- The number of packets captured and processed during the current
tcpdumpsession. - The number of packets received by the filter, but not captured. It mainly depends on the configuration of the OS.
- The number of packets dropped by the kernel. This generally happens, when too many packets are saved in the buffer. This leads to overflowing of buffer and thereby dropping of packets.
3. Capture a specific number of packets
tcpdump provides the provision to capture only a specific number of packets before ending the packet-capture session. It can be done using '-c' option.
tcpdump -c 5 -i any
4. Capture protocol-specific packets using tcpdump
To capture packets belonging to a particular network protocol, we append the name of the protocol at the end.
tcpdump -c 5 -i any tcp
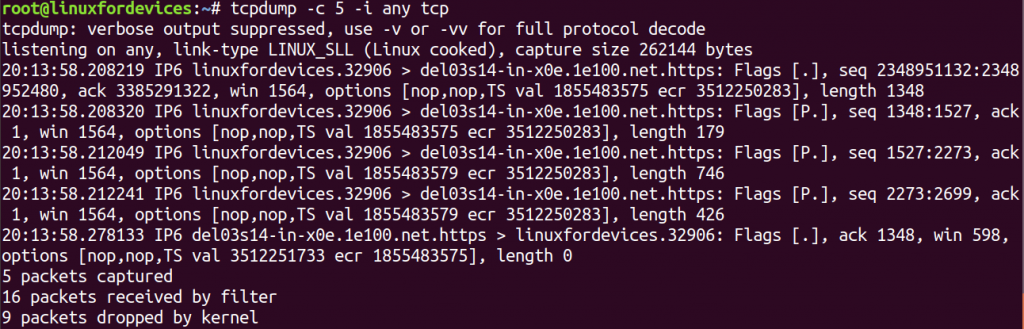
The output displayed by the command might not be comprehended by every Linux user. Let us try to throw some light on the following packet.
20:13:58.208219 IP6 linuxfordevices.32906 > del03s14-in-x0e.1e100.net.https:
Flags [.], seq 2348951132:2348952480, ack 3385291322, win 1564,
options [nop,nop,TS val 1855483575 ecr 3512250283], length 1348
- 20:13:58.208219 – The timestamp stored in the packet datagram.
- IP6 – The IP Version in use. Here, it’s IPv6.
- linuxfordevices.32906 – The source address name of the packet followed by port number. (Our system)
- del03s14-in-x0e.1e100.net.https – The destination address name of the packet.
- Flags [.] – The flag defines the type of packet. In the example
[.]refers to an Acknowledgment packet. - seq 2348951132:2348952480 – The sequence number determines the index of the packet bytes. The above packet starts at 2348951132 and ends at 2348952480.
- ack 3385291322 – The acknowledgment number. It is used to manage multiple packets that are exchanged in a single connection.
- win 1564 – The window size tells the available bytes in the receiving buffer.
- options [nop,nop,TS val 1855483575 ecr 3512250283] – Protocol-related options
- length 1348 – The length of data packet in bytes.
5. Capture host-specific packets
Using the 'host' keyword along with 'tcpdump', we can filter all the packets that are exchanged with a particular host system.
tcpdump -nn -c 5 -i any host 45.79.77.230
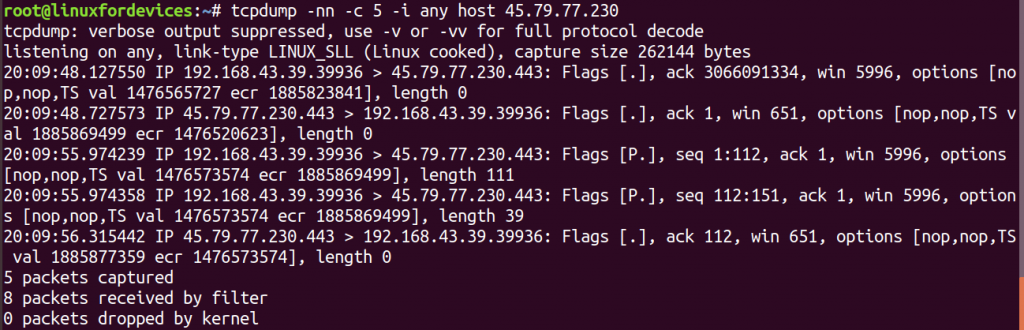
The use of '-nn', translates the hostnames to their numeric Internet addresses. The Internet address passed in the command is of www.linuxfordevices.com.
Note: The packets appear only if there is an actual network connection with the specific IP address.
In case we wish to capture only those packages which originate from a particular host, then we use 'src' (source) followed by an address.
tcpdump -nn -c 5 -i any src 45.79.77.230
For destination-specific query, 'dst' is used.
tcpdump -nn -c 5 -i any dst 45.79.77.230
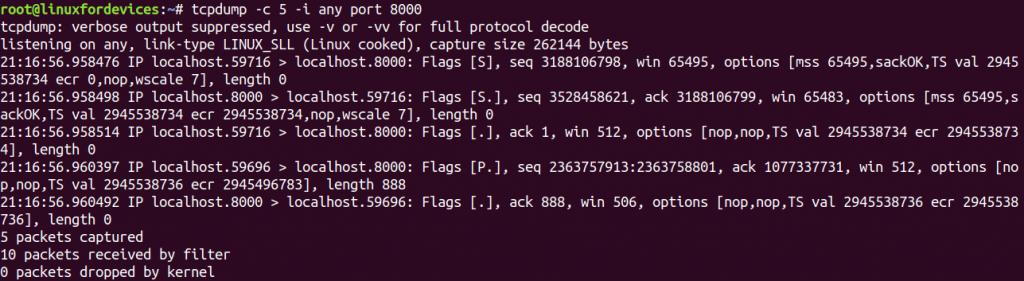
6. Capture packets on a specific port using tcpdump command
Every network connection is maintained through a specific port of a computer system. On receiving a network packet, there port numbers specify which computer application is supposed to get it.
In order to capture packets, filtered by a certain port number, we use 'port' keyword.
tcpdump -i any port 8000
If we are not certain about the exact port number, we can always use a range of port numbers by:
tcpdump -i any portrange 8000-9000
7. Reading and writing packets to a file using tcpdump command
Let’s say, we wish to capture current network traffic but analyze it sometime later. This task can be achieved if we save packets into a file. This can be done by using '-w' option which stands for “write”:
tcpdump -c 5 -w network_file.pcap -i any

The extension for a packet capturing file is .pcap. It can be accessed later by using '-r' option that stands for “read”.
tcpdump -r network_file.pcap

8. Check connection to a website
In case we require to check whether we are connected to a domain name, then we can use the following command:
tcpdump -XX -i any | grep journaldev.com

The '-XX' option converts the values in the data-packet into ASCII and Hex values. This may not work for every URL, due to domain name differences.
The pipe ('|') symbol following the tcpdump command is used to pass the output packets into grep command. 'grep' is a searching utility in Linux, which is here used to search ‘journaldev.com’ in the packets. More information on grep.
Conclusion
As we have seen, tcpdump command comes in handy when we intend to debug network related issues. To learn more about the command, we can access the manual pages by running 'man tcpdump' in the terminal. We hope this article was up to the reader’s standards. Feel free to comment below for any queries or criticisms.