

The rsync command in Linux is mainly used to synchronize the files on your machine locally or with a remote machine. When your work is being carried out from multiple locations or on more than just a single machine, synchronizing files will be a extremely useful.
Thankfully, we have the rsync command in Linux to help us out by automating our tasks. This is a versatile and fast Linux file copying utility. It makes use of remote shells such as ssh and rsh. Alternatively, it can even sync files over TCP with help of the rsync daemon.
Breaking down the rsync command
The rsync command in Linux makes use of a special ‘delta-transfer algorithm’ which copies only the files which don’t match between the source and the destination. Now, the best way to learn any command best through understanding it’s syntax. Here is how the syntax for the rsync command in Linux looks like.
rsync [options] [source_address] [destination_address]
The rsync command provides a long list of options to customize the data we receive while analyzing our network. Here is a list of some of the most popular rsync options.
| Option | Function |
| -4 / -6 | This is used to specify the IPv4 (for -4) or IPv6 (for -6) resolution of IP address for bridging a connection to the remote machine. |
| -a | This makes the rsync utility to work in archive mode. Here, all the directories are synced in a recursive manner. All block and special devices are transferred and all meta-data like symbolic links, ownerships and permissions are preserved. |
| -z | This option is used for forcing the rsync utility to compress data before the transfer. It is helpful in case the sync is taking place over a weak network connection. |
| -P | Display a progress bar when a data transfer is underway. Further, it retains files that have been transferred only partially. This is an important function in the event of transferring large files over an unstable or slow connection. |
| -q | This makes the rsync utility to work in archive mode. Here, all the messages, which aren’t an error message, are not displayed on the output screen. |
| –delete | This option tells the rsync command to delete all irrelevant files at the destination location while syncing it with the source. This is useful to make the destination ‘mirror’ the source. |
| –help | This is used to display the help page for the rsync command and exit. |
These were only the most commonly used options available with the rsync command in Linux. Make sure to check the other options using the man command to utilize the full functionality of the rsync command.
Practical Use of the rsync command in Linux
Now that we understand how the rsync command in Linux works, it is time to learn how to use it. Here we explore some common useful applications of the rsync command. The commands remain the same local and remote backups and for this demonstration, I’ll perform local backups. You simply need to change the destination address for remote backups (demonstrated in subsection 5 here)
1. Syncing directories using the rsync command
The most basic use of the rsync command in Linux is to sync files and directories. In this example, we will sync the contents of one directory to another. Here is the command for syncing two directories.
rsync -a address/to/source/dir/ address/to/destination/dir/
If the destination directory does not exist, it will be created by rsync command. As you can see in the following screenshot, the source and the destination are synced

2. Setting up incremental backups
Backups are an essential safety precaution against data loss. When your latest copy gets deleted or corrupted and there is no way for recovery, backups allow you some compensation. With them, you only need to re-do stuff since your last backup. And rsync can help with this.
Suppose you wish to create daily backups of your work. This can be done with the following command.
rsync -a /dir1/ --delete /dir2/


# Cronjob command to run the backup daily -- Add this to the crontab file
0 20 * * * rsync -a /dir1/ --delete /dir2/
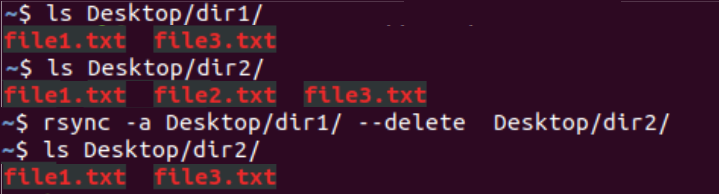
As we can see in the screenshot above, all the files which aren’t in the source were deleted from the destination.
We use cronjob to ensure the command automatically runs every day. You can learn more about automating tasks with cronjobs here.
It is generally advised to create at least two types of backups – daily/weekly or weekly/monthly – depending on your requirements. The second backup is a fail-safe in case you wish something was deleted in the daily/weekly sync and you need it back. The weekly/monthly backup should still have such a file.
3. Deleting Source Files After Sync
Mirroring is useful when you are working on a project with multiple systems. In such a case, it is important that when you delete something on one system, it should be removed from all the systems to keep them in sync. This can be done easily with the rsync command. When you wish to delete files from the destination which are removed from the source, we use the following command.
rsync --remove-source-files /dir1/ /backup-dir
4. Setting speed limits for sync
When we are transferring files using rsync, it can hog up our system resources (when used locally) and the network bandwidth (when used to sync with a remote host). To prevent this, we can limit the rate at which the data transfer takes place. Here is how we do so.
rsync --bwlimit=2000 /dir1/ /dir3/
Using the –bwlimit function in this command, we cap off the data transfer rate for this sync at 2000 KBPS (KiloBytes, not kilobits). This ensures that we can utilize system resources for other uses, even while a sync is in progress.
5. Using rsync for remote directories
The main purpose of the utility is for remote syncing files between servers or systems. But the command remains the same essentially. Since the command uses ssh and rsh protocols to communicate over the network, the destination directory can be specified in the same format as we use while connecting to a ssh server.
rsync -a /home/dir1 username@ipaddress:<directory>

# For example:
rsync -a /home/dir1 [email protected]:/home/dir1
If we interachange the source and the destination in the above command, we can also sync files from the remote server to a directory on our local machine.
Wrapping up
The rsync command is a powerful utility to fulfill the copying and syncing requirements of a Linux user. It has a wide variety of applications and optimizes the process of data transfer and backup with its special delta transfer algorithm. We hope this tutorial was able to help you understand the rsync command in Linux. If you have any feedback, queries, or corrections, feel free to leave them in the comments below.