

Windows has multiple GUI utilities for extracting and working with compressed files. In this tutorial, let’s understand the tar command in Linux which allows us to work with tar, gzip, and other archive files within Linux.
What is the tar Command in Linux Used For?
If you have used WinRAR or 7zip Utility in Windows before, you know that if you want to open archive files you need an application. For Windows, the most commonly used ones are WinRAR and 7zip which are GUI based applications and work with a very wide array of archive types.
Since Linux is an operating system that was used since the time of tape drives, file compression was implemented at that time. The name “tar” is an acronym for “tape archive” which denotes the fact that this archiver was originally created to archive files for tape drive storage.
In Linux, we have 7zip and tar utilities to work with archive files among many others. With tar, you can majorly work with tar, xz, gzip, bunzip, and other similar formats. Let’s see how.
Creating Archives With the tar Command in Linux
Let’s learn to create an archive with the tar command in Linux here. We’ll make use of the -c option to indicate that we want to create an archive, and the -f option to indicate that the archive should be stored in the file name that follows.
To do so, the syntax is as below:
tar -cf <archive file name>.tar <space separated list of files>
OR
tar -f <filename for new archive> -c <space separated list of files>

In the above example, I’ve created a tar file for all the text files that I had in my current directory. To list the text files, I’ve made use of the ls command in Linux which we’ve covered previously.
Creating a gzip or bunzip archive with tar
Since the tar command can work efficiently across multiple different compression algorithms, let’s learn how to create an archive with the gzip and bzip compression. The only difference when you want to create these types of archives is an additional option.
- -z for gzip
- -j for bzip
#gzip archive
tar -cz <space separated file names> -f <archive name>

#bzip archive
tar -cj <space separated file names> -f <archive name>
But is there much of a difference between these archive types? Let’s find out how much space each of these archives takes. We’ll compress the same text files as before and list out all the archives together with their sizes.
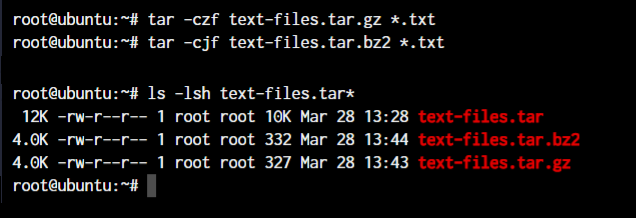
As you can see, the gzip file is the smallest – 327 bytes. The tar file is the largest with 10kb as its size. The differences with these small files are barely noticeable compared to the hard drive sizes that we currently carry around. But this difference is also noticeable when working with larger files which is why you’ll see a lot more tar.gz files around when it’s anything Linux.
Listing Archive Files Using the tar Command in Linux
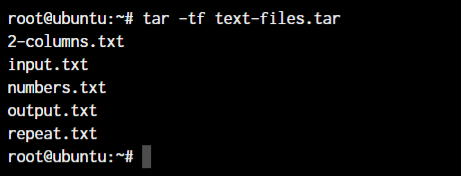
Now that we learned how to create archives of different types, let’s find out how we can list out the files within an archive. Without extracting the files, if you want to list the contents of the tar archive we can use the -t or –list option.
tar -tf <archive name>
Extracting Archive Files with Linux tar
Now let’s learn to extract the different types of archives. Similar to the creation of archives, we can extract the different types of archives using the options for specific archive types. The base option is -x which indicates that we want to extract the file. Now depending on the file type, we need to specify -z or -j for gzip or bzip files.
tar -xf <tar archive file>
tar -xzf <gzip archive file>
tar xjf <bzip archive file>
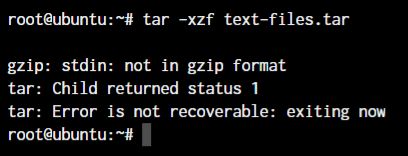
Since we’ve created these archives using the basic tar commands, we can extract these files using the basic -xf command. But if you try to specify the -z or -j option for a file that’s not gzip or bzip compressed, you’ll get an error like the one below:
Adding and Deleting New Files to an Existing Tar File
If you want to add or delete a file to an existing archive file (tarball), you can use the –append or -r to append files to the existing tarball.
tar --append -f <tar file name> <files to add separated by space>
tar -rf <tar file name> <files to add separated by space>
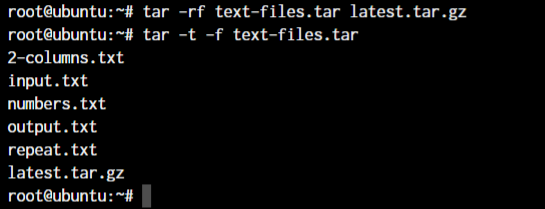
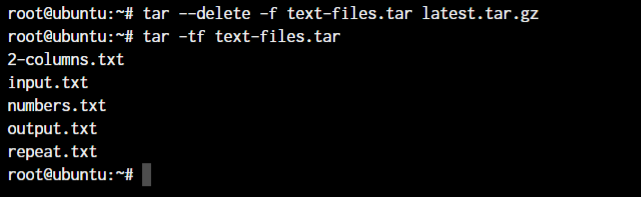
As you can see, the file latest.tar.gz has been appended to the archive. Let’s now delete the file from the archive. For that, we’ll use the –delete option.
tar --delete -f <tar file name> <files to delete>
Conclusion
The tar command is extremely flexible and there are a ton of options that you can play around with in the tar command in Linux. If you want to explore more of the command options, feel free to use the –help or the man command to view the manual pages of the command. We hope this tutorial has been useful to you and you’re not more comfortable with this command.