
When it comes to using Linux, effectively managing USB drives is a crucial skill for everyone, whether you’re just starting or a seasoned user. Linux’s many capabilities allow us to efficiently handle USB devices, but some users may not know where to start. But don’t worry – we’ve put together a complete guide to walk you through the process of easily mounting USB drives in Linux. This article will cover everything from identifying your USB drive to creating a mount point and finally mounting the block device. Whether you’re a beginner or an expert, this guide will give you the knowledge to easily access, manage, and unmount your USB drives like a pro. So let’s get started and unlock the full potential of USB drive management in Linux!
Steps to Mount USB Drives in Linux
Let’s go over the steps without any further delays. The entire process is straightforward, and I’ll walk you through it as a beginner.
Step 1: Plug In The USB Drive

Plug the USB Drive in the correct USB Port (check for 2.x/3.x specific ports for better performance). Make sure your hardware is all fine, and just with that, we are done with Step 1!
Step 2: Identify Your USB Drive
To use our USB Device, first, we need to identify it. Now there are a couple of different commands which can be used here. However, we will go with trusty old fdisk in command line which lists our USB Drive along with its model name, the drive’s capacity, and much more!
Once the USB drive has been plugged in, it will be registered as a new block device in /dev/ directory ( Remember that everything in Linux is a file!). To list all block devices, we can type:
$ lsblk
This should return something like follows :
NAME   MAJ:MIN RM   SIZE RO TYPE MOUNTPOINT
sda      8:0    0 931.5G  0 disk
├─sda1   8:1    0   512M  0 part /boot/efi
├─sda2   8:2    0   929G  0 part /var/lib/lxd/storage-pools/default
└─sda3   8:3    0     2G  0 part [SWAP]
sdb      8:16   1  57.3G  0 disk
└─sdb1   8:17   1  57.3G  0 part
Here sda is the primary block device whereas sda1, sda2 and sda3 are the various partitions where the components of the running Operating System are located. Next comes sdb, which represents our USB Drive as a block device. Likewise, sdb1 denotes the partition on the USB Drive in our case.
If you have multiple hard disks installed, it will be different. From the above output, we can also see the size of various partitions and their mount points. As one can see, our USB Drive is not mounted, but we’ll fix that in a minute.
Note that the name of our USB block device may be something other than sdb. Still, it’s almost always of the form sdX, where X usually is a smaller case alphabet like ‘b’, ‘c’, ‘d’, and so on but is seldom ‘a’ as it usually denotes the primary block device containing the Operating System. Also
Moving on, we can identify our USB Drive using the following :
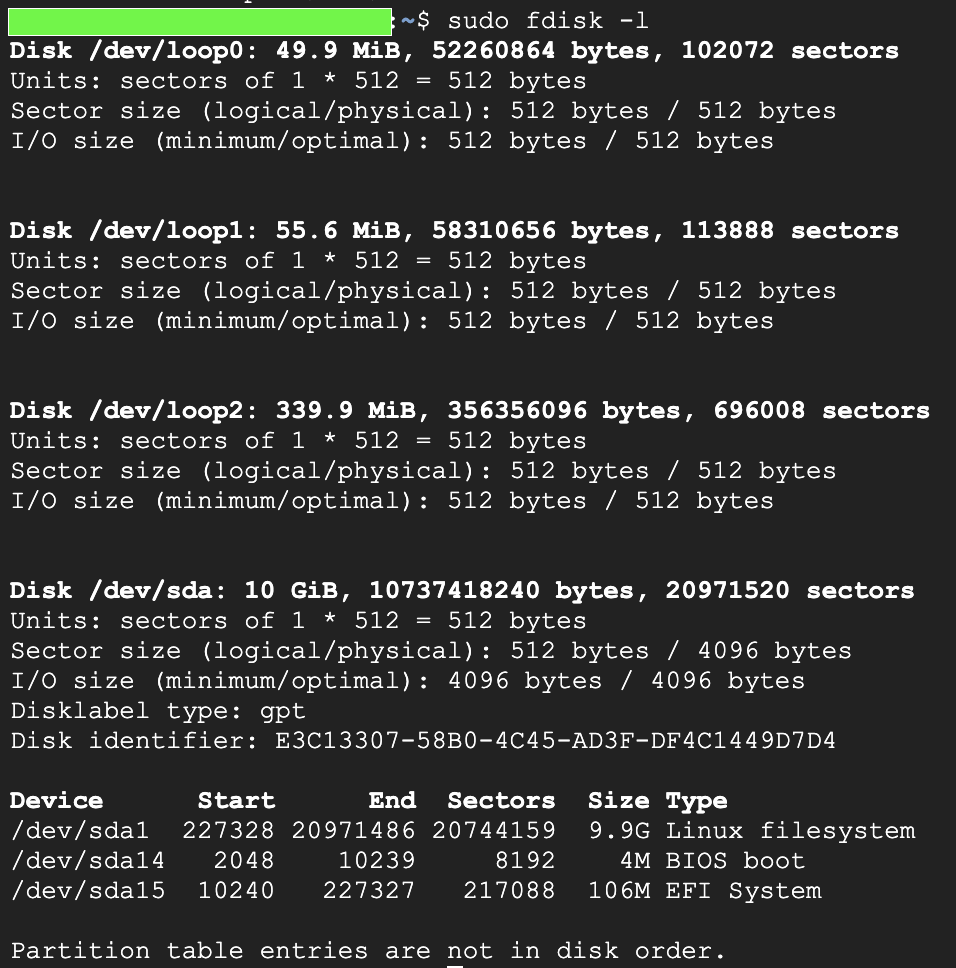
$ sudo fdisk -l
In the output, we should get an output like this :
Disk /dev/loop0: 49.9 MiB, 52260864 bytes, 102072 sectors
Units: sectors of 1 * 512 = 512 bytes
Sector size (logical/physical): 512 bytes / 512 bytes
I/O size (minimum/optimal): 512 bytes / 512 bytes


Disk /dev/loop1: 55.6 MiB, 58310656 bytes, 113888 sectors
Units: sectors of 1 * 512 = 512 bytes
Sector size (logical/physical): 512 bytes / 512 bytes
I/O size (minimum/optimal): 512 bytes / 512 bytes


Disk /dev/loop2: 339.9 MiB, 356356096 bytes, 696008 sectors
Units: sectors of 1 * 512 = 512 bytes
Sector size (logical/physical): 512 bytes / 512 bytes
I/O size (minimum/optimal): 512 bytes / 512 bytes


Disk /dev/sda: 10 GiB, 10737418240 bytes, 20971520 sectors
Units: sectors of 1 * 512 = 512 bytes
Sector size (logical/physical): 512 bytes / 4096 bytes
I/O size (minimum/optimal): 4096 bytes / 4096 bytes
Disklabel type: gpt
Disk identifier: E3C13307-58B0-4C45-AD3F-DF4C1449D7D4

Device      Start      End  Sectors  Size Type
/dev/sda1  227328 20971486 20744159  9.9G Linux filesystem
/dev/sda14   2048    10239     8192    4M BIOS boot
/dev/sda15  10240   227327   217088  106M EFI System

Partition table entries are not in disk order.
From the given output, we can identify our USB Drive’s model, size, and other information which can help us pinpoint our USB Drive. Note the Block Name from here, which is /dev/sda in the given example is Linux Filesystem, had it been a windows system we would have seen ntfs file system. Now, lets proceed to the next step.
Step 3: Creating A Mount Point
Now that we have identified which Block Device we want to mount, we would need a place to mount it to. Usually, we make a folder under /mnt directory using the mkdir command:
$ sudo mkdir /mnt/USB
With this, we finally have a place to mount our block device. Onto the next step!
Step 4 : Mount The Block Device
Finally, we can now mount our USB Drive in the folder we made earlier! This can be easily done via the mount command. Following our example, remember that we had our USB Drive registered as the block device /dev/sdb? Remember how it had a partition /dev/sdb1? We cannot mount block devices, rather we shall mount this partition as follows:
$ sudo mount /dev/sdb1 /mnt/USB/
And now, we can access the contents of our USB Drive right as if it were just another folder on our Desktop. We can also change the ownership of the folder where we mounted our USB Drive as such :
$ sudo chown $USER /mnt/USB/
After the above command, you no longer need to type sudo repeatedly whenever we move data to-and-from our USB Device! Just to validate that our USB Drive has been mounted correctly, we can return it to our good friend lsblk and it should show us an output like:
NAME   MAJ:MIN RM   SIZE RO TYPE MOUNTPOINT
sda      8:0    0 931.5G  0 disk
├─sda1   8:1    0   512M  0 part
├─sda2   8:2    0   929G  0 part /home
└─sda3   8:3    0     2G  0 part [SWAP]
sdb      8:16   1  57.3G  0 disk
└─sdb1   8:17   1  57.3G  0 part /mnt/USB
As we can see, our USB Drive is mounted in the folder we previously created ( /mnt/USB ); hence, we have successfully mounted our USB Drive!
Bonus: How To Unmount USB Drive?
Once we finish all of our desired USB operations, unmounting our USB Drive before physically removing it from our machine is good practice. This can be achieved via the umount command that umounts media attached to the system. Just simply type in:
$ sudo umount [FOLDER WHERE DRIVE IS MOUNTED]
Staying consistent with our previous example, this would translate to:
$ sudo umount /mnt/USB
With that, we are done and free to remove our physical media like usual!
Conclusion
To sum up, connecting a USB drive to a Linux system is an easy and effective process that can be done in four uncomplicated steps. These steps include plugging in the USB drive, identifying it, making a mount point, and finally mounting the block device.
Once you have mastered these steps, you will have seamless access to the contents of your USB drive on your Linux system. Moreover, you will also learn how to safely unplug your USB drive after use to safeguard your data. This beginner-friendly guide enables Linux newcomers to effortlessly navigate the process and enjoy the advantages of using USB drives on their Linux devices.
Note that sometimes, the mount command fails to mount our USB Drive, primarily because of file types: The USB Drive might have a different file system than the Operating System. In such cases, the -t flag can be used to specify the type of file system you want to mount. For more information, check out the man pages for mount.
How can I detect a USB drive on my Linux system?
You can detect a USB drive on your Linux system by plugging the drive into a USB port. The system should automatically detect the drive and mount it.
What is the process for mounting a USB drive on Linux?
To mount a USB drive on Linux, you can use the ‘mount’ command in the terminal. First, create a mount point directory, then use the ‘mount’ command followed by the device name and the mount point directory.
How do I format a USB drive in Linux?
You can format a USB drive in Linux using the ‘mkfs’ command along with the desired filesystem type, such as ext4 or fat32.
Can I use a FAT filesystem on my USB drive on a Linux system?
Yes, you can use the FAT filesystem, such as fat32, on your USB drive in a Linux system. This filesystem is widely supported across different platforms.
What is the difference between mounting a USB drive as FAT and ext4 filesystem?
The main difference between mounting a USB drive with FAT and ext4 filesystem is the compatibility and features each filesystem offers. FAT is more widely supported but has limitations in file size and permissions compared to ext4.
How can I mount a USB drive permanently on my Linux system?
To mount a USB drive permanently on your Linux system, you can edit the ‘/etc/fstab’ file and add an entry for the USB drive using its UUID or device path.
What tools or software can I use to manage USB drives on a Linux system?
You can use tools like ‘gparted’ for partitioning and formatting USB drives, or the ‘udisksctl’ command for managing storage devices in a Linux system.