

Linux, Apache, MySQL, and PHP are all open-source technologies that can be used to create powerful web applications. These technologies together power a good chunk of the internet today. The most prominent project that utilizes this technology would be WordPress, but there are even more companies that use LAMP stack such as Wikipedia, Tumblr, Slack, etc.
What is LAMP Stack?
LAMP Stack is a group of open-source tools used to create dynamic websites and web-based applications. The acronym “LAMP” stands for Linux, Apache, MySQL, and PHP.
Linux is the operating system, Apache is the web server, MySQL is the relational database management system (RDBMS), and PHP is the object-oriented scripting language.
The LAMP Stack is one of the most popular web development platforms because it is free and open source. It is also easy to install and configure.
The Components of the LAMP Stack
Linux is the foundation of the LAMP Stack. It is a free and open-source operating system that is used on servers, desktops, and embedded systems.
- Apache is the most popular web server in the world. It is free and open-source software that is used to serve web content.
- MySQL is the most popular open-source database. It is used to store data for websites and applications.
- PHP is a widely used open-source scripting language. It is used to create dynamic web content and applications.
The Benefits of LAMP Stack
The LAMP Stack is a popular choice for web development because it is free and open source. It is also easy to install and configure. The LAMP Stack provides a stable, secure, and scalable platform for developing websites and web-based applications.
Installing the LAMP Stack
There are various ways to install the LAMP stack, perhaps the quickest way to get up and running with the LAMP Installation is by using the Tasksel command in Linux Terminal.
If you already have an installation of Ubuntu, you follow the steps detailed below,
Installing LAMP Using Tasksel
Before we go ahead and install Tasksel,
Let’s check if all the packages are up-to-date using the apt update command like so:
sudo apt update

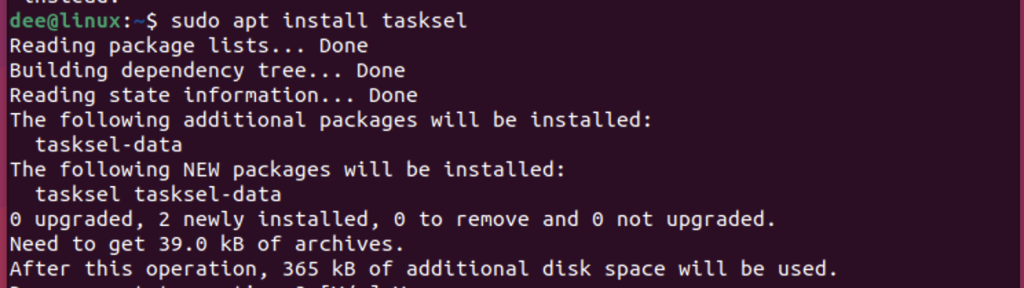
Now, Let’s install the Tasksel command,
sudo apt install tasksel
Now we can install Lamp Sever using Tasksel,
sudo tasksel install lamp-server
Installing LAMP Using Apt Install
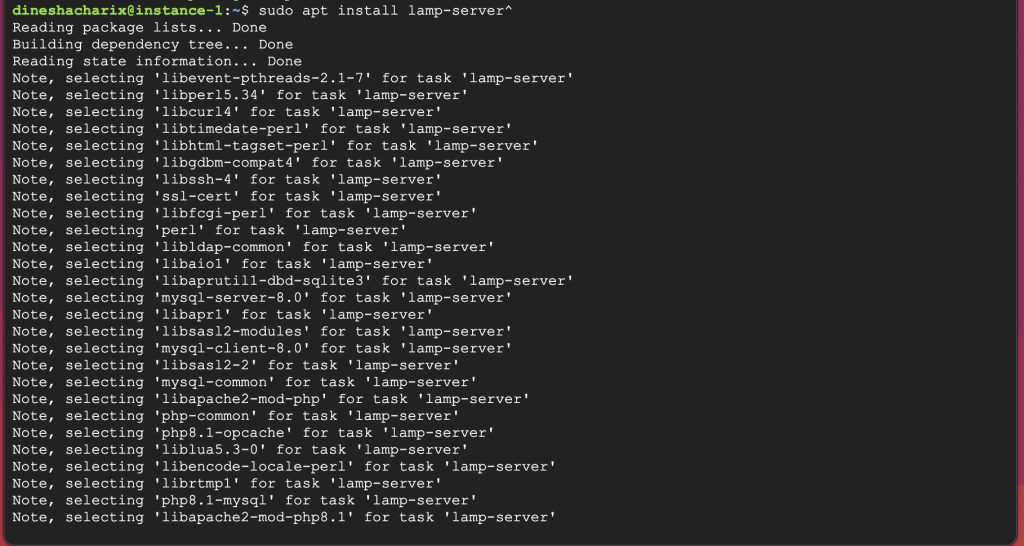
Alternatively, you can bypass tasksel and install the Lamp Server directly using apt install,
sudo apt install lamp-server^
Let us verify the installation now,
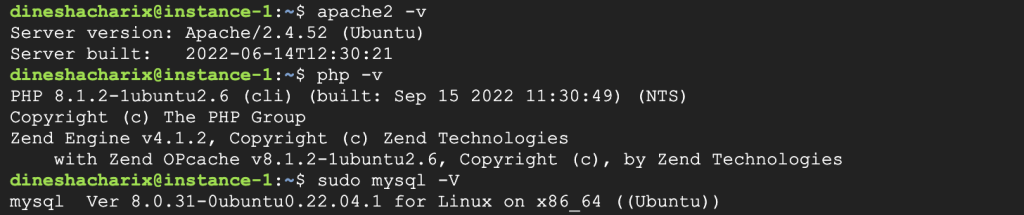
To check the version of the Apache Server installation,
apache2 -v
To check the version of the PHP installation,
php -v
To check the version of the Mysql database installation,
sudo mysql -V
Installing each of the modules of the LAMP Stack Manually
The above few methods would work for most of the users of the LAMP stack, especially for beginners. However, most professionals require customizability during their installs. So, this is where manual installation of the LAMP stack would be quite useful.
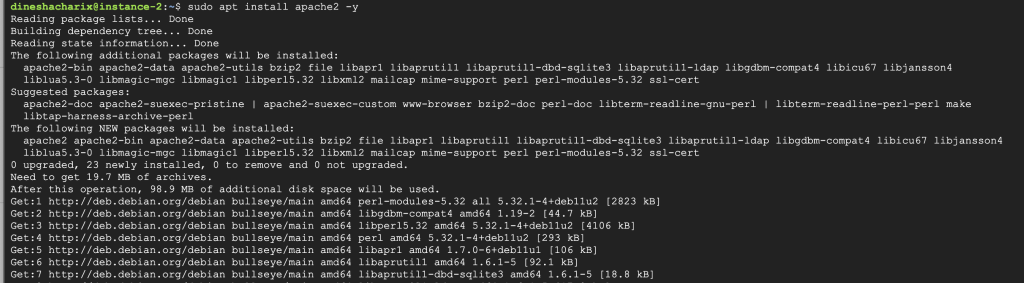
First off we start installing the Apache web server,
sudo apt install apache2 -y
Next, Mysql Installation
Here we will be installing the database required for our LAMP stack,
apt install mysql-server -y
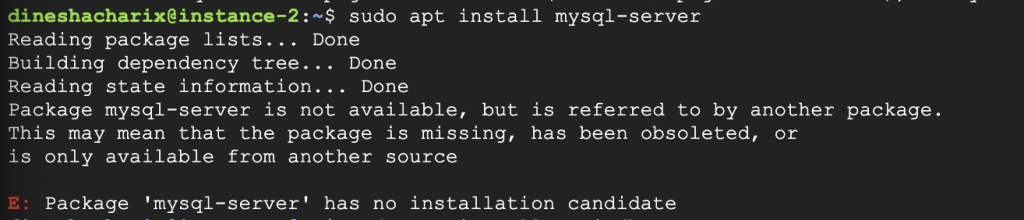
Note – Ubuntu no longer ships with MySQL as its default database in its apt repository. It has instead been replaced with the community version of MySQL called the maria DB server.
If the above command doesn’t work for you, do follow the following steps for installing the maria DB server,
Do update the apt repositories,
sudo apt update

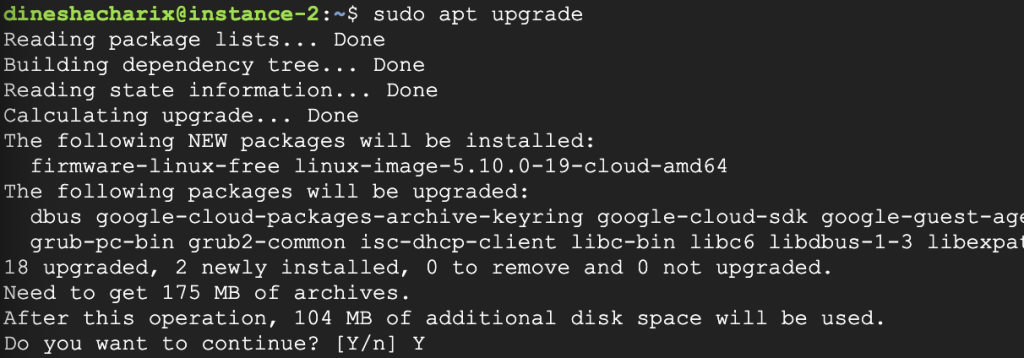
Let’s upgrade all the pending updates at once using the upgrade command,
sudo apt upgrade
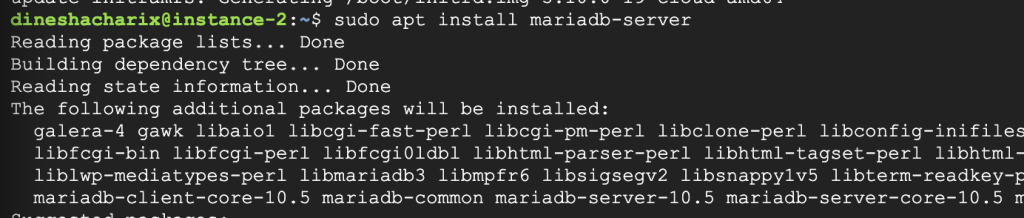
Let’s install the Maria DB server,
sudo apt install mariadb-server
By default, MariaDB installs without any password, let us secure the database with a username and password,
sudo mysql_secure_installation
Do go through this screenshot to quickly change the default password,
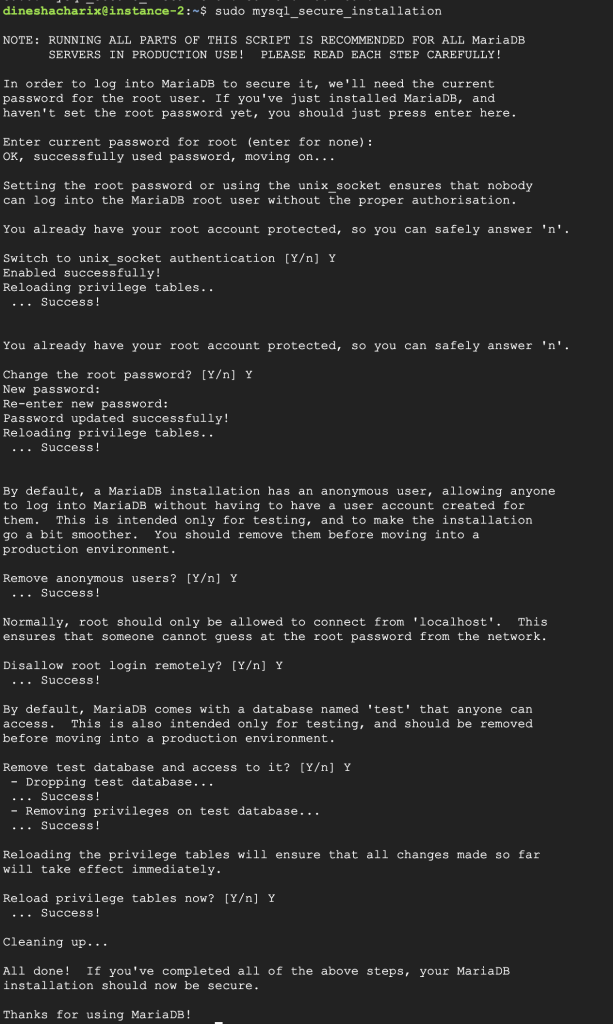
The root user is the default user for a MariaDB installation. The root user has full access to all databases and can perform any operation.
By default, a MariaDB installation has an anonymous user, allowing anyone to log into MariaDB without having to have a user account created for them. This is intended only for testing and should be removed before moving into a production environment.
Root should only be allowed to connect from ‘localhost’. This ensures that someone cannot guess the root password from the network.
By default, MariaDB comes with a database named ‘test’ that anyone can access. This is also intended only for testing and should be removed before moving into a production environment.
Now let’s check if the installation of the database succeeded by accessing the database,
sudo mysql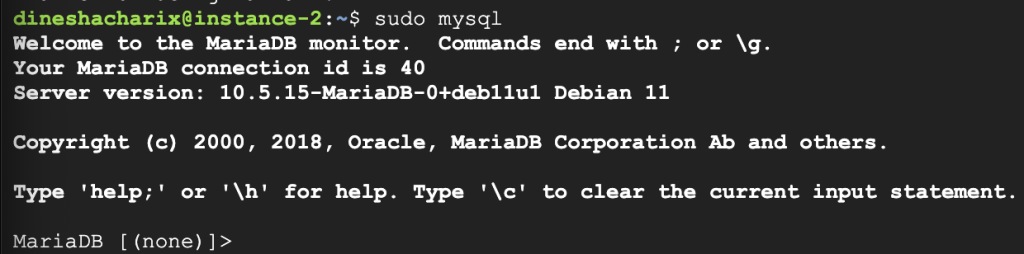
Now, let’s exit the database server by typing the following argument,
MariaDB [(none)]> exit
Installation of PHP
Till now we have installed the apache server to serve the web content and mariadb/mysql to interact with the data storage. We need to install PHP for the front end of the entire stack. As the pages displayed when we visit any website are rendered by a script written in PHP on the server side.
Following is the code to install PHP,
sudo apt install php libapache2-mod-php php-mysql
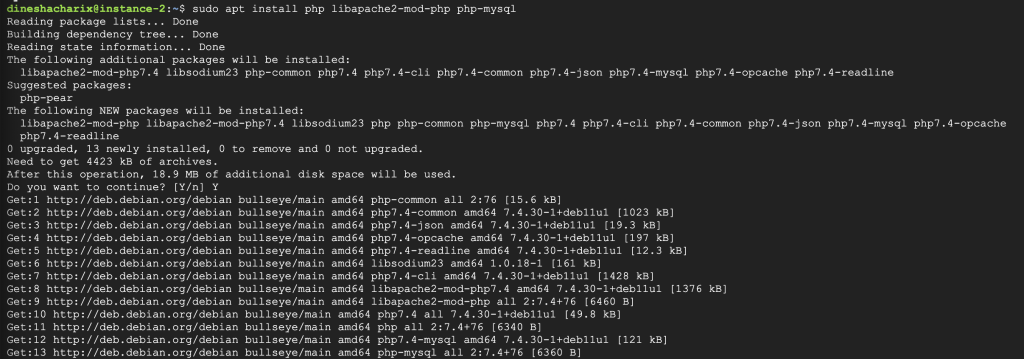
Let’s verify if PHP has been successfully installed,

Now that we have installed all the components of the LAMP stack. There is a little bit of other upkeep we need to carry out before our server starts serving up the website.
Working with the Firewall
Uncomplicated Firewall (UFW) is a user-friendly front-end for managing iptables firewall rules. It provides a command line interface and aims to be uncomplicated and easy to use.
UFW supports several profiles:
- default – This is the default profile. It allows all incoming connections and blocks all outgoing connections.
- allow – This profile allows all incoming and outgoing connections.
- deny – This profile blocks all incoming and outgoing connections.
- limit – This profile limits incoming connections and allows all outgoing connections.
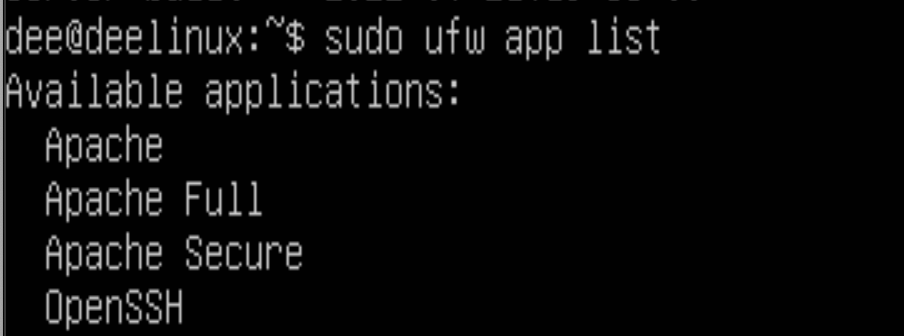
There are four profiles in UFW:
- Apache: This profile allows traffic on port 80 (HTTP)
- Apache Full: This profile allows traffic on port 80 (HTTP) and port 443 (HTTPS)
- Apache Secure: This profile allows traffic on port 443 (HTTPS) only
- OpenSSH: This profile allows traffic on port 22 (SSH) only
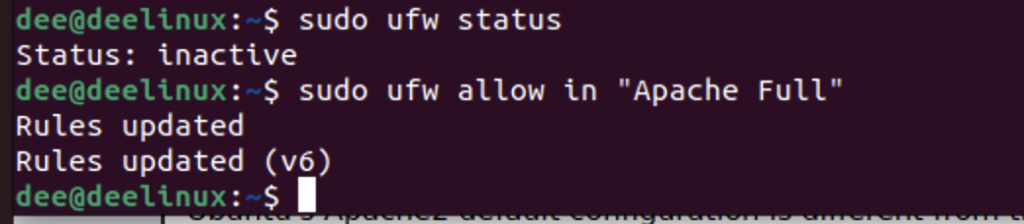
The UFW is disabled by default,

I would like to allow traffic on port 80 and port 443 so I will be selecting the profile that lets me do just that which will be Apache Full.
So the command we need to execute will be:
sudo ufw allow in "Apache Full"
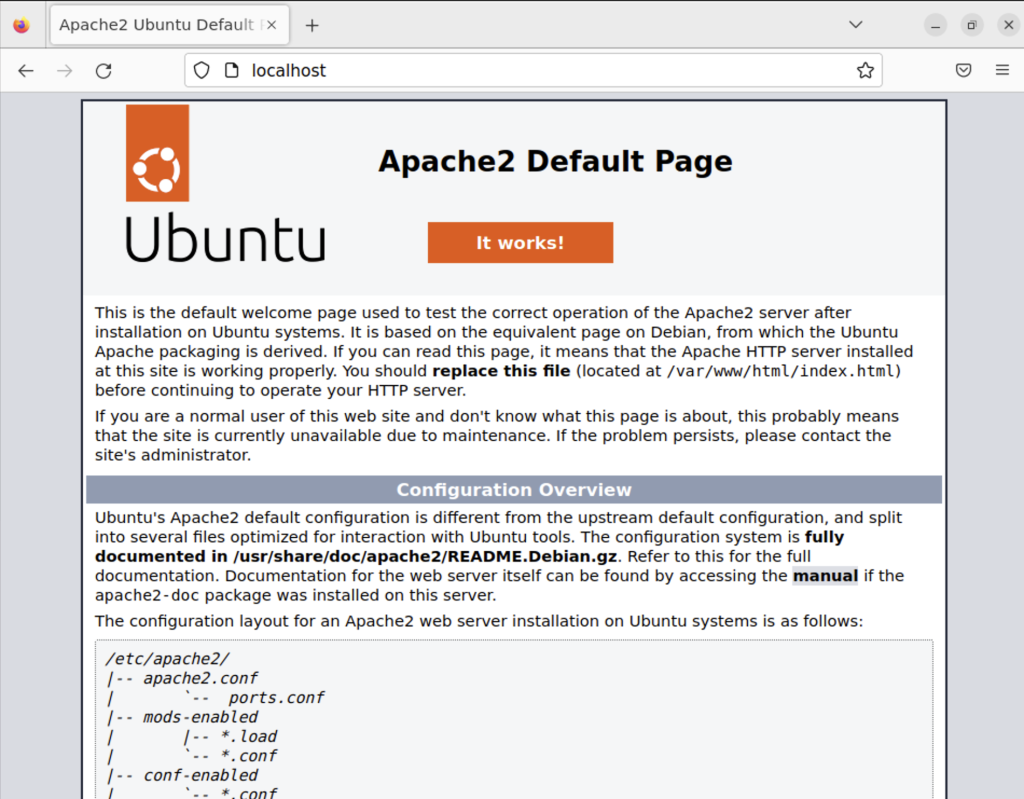
Finally, let us check is the localhost is up and running
In your browser URL bar, enter,
http://localhost/
This is what you should see upon entering the local host in the URL.
Summary
The LAMP stack is a popular choice for web development because it is free and open source. It is also easy to install and configure. The LAMP Stack provides a stable, secure, and scalable platform for developing websites and web-based applications.