

In this article, we’ll learn how to install Apache web server on Ubuntu.
Apache web server is an HTTP based server developed by The Apache Software Foundation which was launched to make powerful features of an HTML server available to everyone for free. It is open-source and has cross-platform support for all modern OS like Windows and Ubuntu.
It is an essential tool because of its extensive media support and ability to load a module dynamically. This tutorial will also show you how you can configure and install Apache web server on Ubuntu.
What’s Needed to Install Apache on Ubuntu?
This tutorial was made with an Ubuntu 18.04 running system. You would require a non-root user with sudo privileges or access to the root user to follow this tutorial to install Apache Web server on Ubuntu and configure your server.
Steps to Install Apache Web Server on Ubuntu
To install Apache Web server on Ubuntu, you don’t need to download anything as the Apache Web server comes with the default Ubuntu repository. The service is named apache2 and can be accessed using the apt command.
1. Update Repositories and Download Apache Web Server
Before we begin to install Apache Web server on Ubuntu, we want to make sure that we have the latest version of the Apache Web server package. To do this, we need to update our default repositories using the apt package management service.
To do this, you need to open the terminal on your Ubuntu system and type the following.
sudo apt-get update
We will use the apt package management service to install the apache2 service. To do so, we enter the following in our terminal.
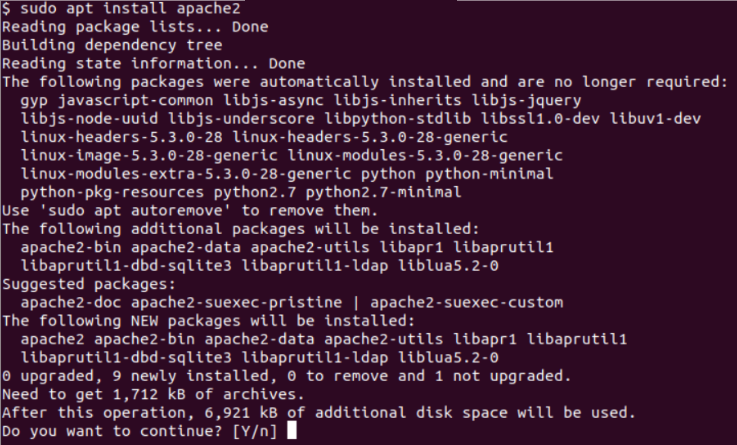
sudo apt install apache2
You might be prompted to confirm the installation. If you get a prompt, enter ‘Y’ to proceed with the installation. This is what you should expect to see on your output screen.
2. Starting the Apache Service
Once we are done with the installation, we need to verify that the installation was completed successfully. This can be done by asking the terminal to display the status of the Apache package installed on your system using the status command in the terminal. You need to input the following in the command line.
sudo systemctl start apache2
sudo systemctl status apache2
You will receive an output with a message stating the the service status is active.
3. Configure Firewall Ports for Apache
Now we will adjust the ufw firewall settings to allow Apache to be accessible from the internet. For this we’ll enable the Apache Full profile that’s built-in the UFW firewall settings.
sudo ufw allow 'Apache Full'
Once we have done so, we can verify this by checking the ufw status. This can be done by using the following command.
sudo ufw status

Status: active

To                         Action      From
--                         ------      ----
OpenSSH                    ALLOW       Anywhere
Apache Full                ALLOW       Anywhere
OpenSSH (v6)               ALLOW       Anywhere (v6)
Apache Full (v6)           ALLOW       Anywhere (v6)
As you can see, Apache Full has been allowed and can now be connected from anywhere across the internet.
4. Verifying Apache Web Server Installation
We are done with our goal to install Apache Web server on Ubuntu. Now it’s time to check if the Web server is working properly. For this, we first find out the IP address of our host machine. Enter the following in your terminal to find out your IP address.
hostname -I
This will show you the IP address(es) of your host machine. Just take any IP address given out by the command and enter it in your web browser as given below.
http://<IP>
OR
http://localhost
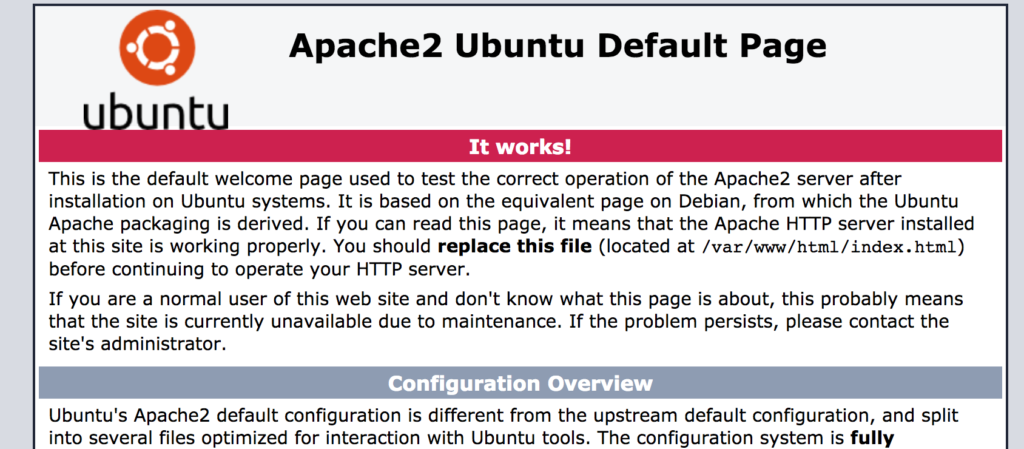
If you see the following screen with the default Ubuntu 18.04 Apache Web server page, you have successful to install Apache Web Server on Ubuntu.
Now that your HTTP Apache Web server is up and running, you can replace the file stored at /var/www/html/index.html and proceed with operating your HTTP server. Here is a bonus step that will likely help you when you use the Apache Web server on your system.
5. Testing Apache Web Server
It is helpful to create multiple virtual hosts once you install Apache Web server on Ubuntu. This helps you to host multiple domains from just a single server. Also, you can encapsulate the configuration settings suited to your needs.
We will show you an example by creating a domain named LinuxForDevices. You can simply replace the name with any name you wish to choose for your virtual host.
When setting up a domain, we need to start by creating a directory for our domain. This can be done by the following command.
sudo mkdir /var/www/LinuxForDevices
Now we will assign the ownership for the directory and create an index.html file using a code editor of your choice. For this tutorial, we are using the nano editor. You would need to enter the following commands.
sudo chown -R $USER:$USER /var/www/LinuxForDevices

nano /var/www/LinuxForDevices/index.html
Once you open the HTML file, enter this sample code to create our test web page.
<html>
    <head>
        <title>Linux for Devices</title>
    </head>
    <body>
        <h1>Hello from Linux For Devices! Your Apache web server configuration is working perfectly!</h1>
    </body>
</html>
We will save the file and close it. Now, we will create a new virtual host configuration file to hold out custom configuration for the virtual host LinuxForDevices. This file will be named LinuxForDevices.conf. Enter the following command to create this file.
sudo nano /etc/apache2/sites-available/LinuxForDevices.conf
Copy and paste the following section in the configuration file to finish the setup.
<VirtualHost *:80>
    ServerAdmin webmaster@localhost
    ServerName LinuxForDevices
    ServerAlias LinuxForDevices
    DocumentRoot /var/www/LinuxForDevices
    ErrorLog ${APACHE_LOG_DIR}/error.log
    CustomLog ${APACHE_LOG_DIR}/access.log combined
</VirtualHost>
Now that our custom configuration file is set up, we will enable it and disable the default configuration file. This can be done using the following commands.
sudo a2ensite LinuxForDevices.conf

sudo a2dissite 000-default.conf
Next, we will check the file for any configuration errors which may be present using this command.
sudo apache2ctl configtest
If we did everything correctly, the terminal should return an output saying “Syntax OK”. For our custom configuration file to take effect, we will restart the Apache Web server with the following command.
sudo systemctl restart apache2
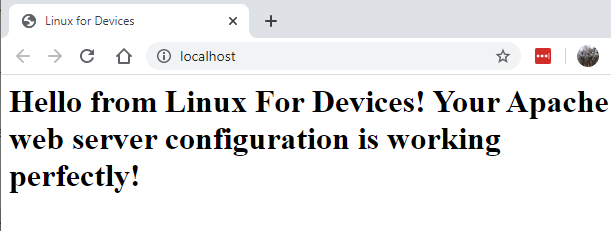
Now the Apache Web Server should be hosting your domain. To check this, enter the following in your web browser.
http://LinuxForDevices
OR
http://localhost
Conclusion
We hope we were able to teach you how to install Apache Web server on Ubuntu. You can experiment using the steps shown in this tutorial to create your customised website and configuration. If you have any feedback, queries or suggestions, reach out to us in the comments below.