

Today we will be learning about Conky, which is used to create beautiful infographics of your system with the help of widgets. If you have ever browsed r/unixporn and looked at a similar desktop and wondered how you can recreate the same beautiful monitoring setup on your Linux or FreeBSD device, you are in for a treat.
With its ability to display a wide range of system stats, music player integration, email notifications, and Lua scripting support, Conky is a free and open source tool to enhance your desktop experience. Get started by installing Conky, then dive into the exciting journey of configuration and theme customization. Check out amazing Conky setups, borrow ideas, and create your unique masterpiece.
What is Conky?
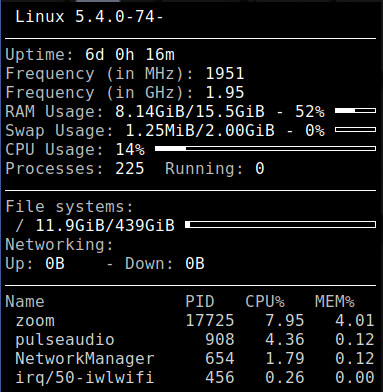
Conky, simply put, is a light-weight system monitor for X, which is a GUI framework for Linux. In the picture above you can see that it is displaying system information like CPU temperature, cores used, tasks running, battery, uptime, etc. There are many other efficient systems monitor like top, gtop, htop but none of them can be customized on the same level as conky.
Features of Conky Manager
- Displays OS stats like uname, uptime, processes, active cores, memory usage, CPU usage, disk usage and many others. Infact it can be customized to display ANY text output. This enables conky to be insanely extensible.
- Built in support for MPD, Audacious, and other many popular music players so you can display the currently playing music and music queues.
- Built in IMAP and POP3 support so you can check on your mail notifications.
- Built in Lua support, which can be used to write any custom scripts and modules.
- Built in Cairo support, which, when used with Lua, can be used to draw and display images.
Installing Conky on Linux
You can install this application with the help of AppImage on any distro by typing this in the command line:
curl -sL -o conky-x86_64.AppImage \
    $(curl -sL https://api.github.com/repos/brndnmtthws/conky/releases/latest | \
    jq --raw-output '.assets[0] | .browser_download_url')
chmod a+x ./conky-x86_64.AppImage
If you are using Debian or any Debian derivatives (Ubuntu, Mint, etc.) you can also install conky from the package manager using the following command.
sudo apt-get install conky-all
Using conky for the first time
You can run conky using:
./conky-x86_64.AppImage
if you installed the AppImage.
If you installed it from the package manager, you can just type conky in the terminal to run it.
Conky by default looks quite ugly, nothing like the beautiful panels we see in those beautifully customized images. The real power of conky lies in configuration.
We will now learn the basics of configuring conky.
Configuring Conky – Basics
The config file by default is /etc/conky/conky.conf
To start with customizing, create a .conkyrc file in ~/ using the following command,
touch ~/.conkyrc
Now every time you run conky, it will source config from conkyrc instead of the default config file.
To run and use conky from a custom config file, you can use the -c flag shown below:
conky -c /path/to/config/file
Basic config options
Every conky configuration file has two parts. The first part controls how conky acts, i.e. how often it updates, alignment, colors, gaps, borders, transparency, etc. The second part starts after the line that says TEXT, and it controls the actual content that is rendered on the screen i.e. time, CPU temperature, kernel version, and weather.
To know about all the inbuilt settings and variables in a precise manner, visit Conky Variable documentation and Conky Settings documentation.
Installing a Conky theme
While you can definitely write your own config from scratch, it’s usually easier to install a theme you like and then modify it over time. You can find installation files of conky themes for download on DotShare, Deviant Art, Gnome Looks, r/unixporn, and r/conkyporn just to name a few.
The theme I will be installing here is called Victor Conky. To install it I will be cloning its GitHub repository, then moving the victorConky folder to ~/.conky and moving all the fonts to ~/.fonts as shown below.
git clone https://github.com/gictorbit/victorconky
mkdir ~/.conky
mv victorconky/victorConky ~/.conky/
mv victorconky/fonts/* ~/.fonts
Now you can run conky with the appropriate config. Victor Conky provides you with six versions of its theme with different sizes and logos. Here I will be running the ArchMedium config
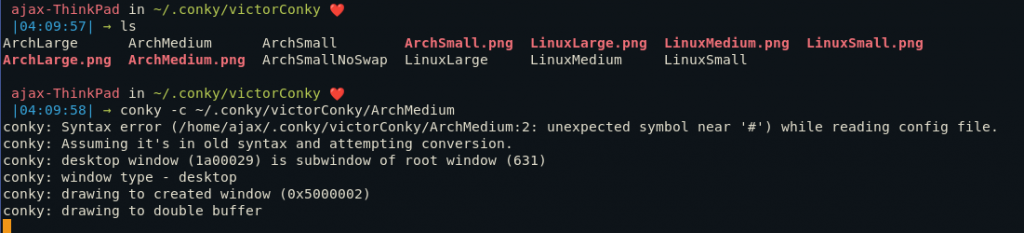
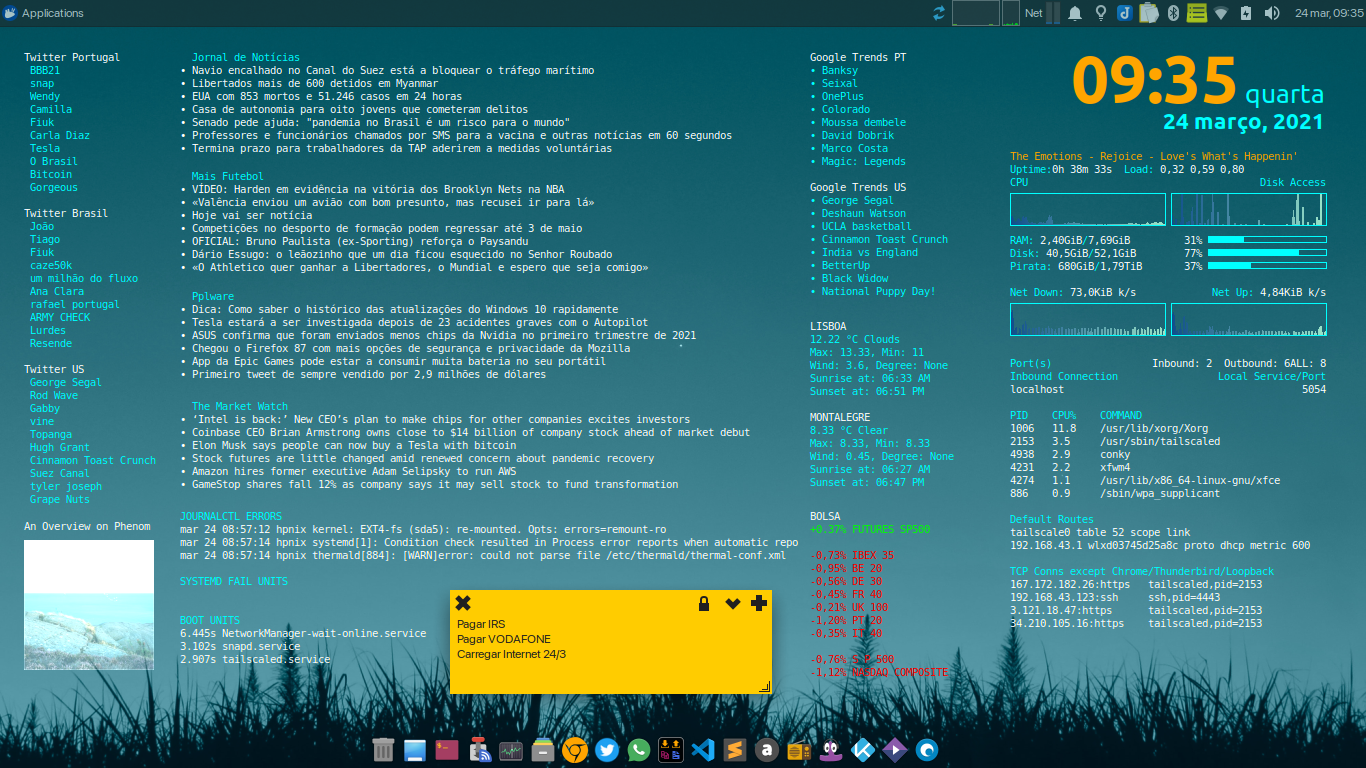
Now, conky is running. You can see the output on the wallpaper.

Tips for configuration
- The best way to get beautiful conky designs is to browse related Subreddits (mentioned above) and copy the parts of the config you like. This way you can also find new ideas for modules, fonts and display art.
- Make your configs modular. This would mean that you write separate bash/lua scripts for every functionality you want (for ex. a news bulletin) and then add those to the code. This makes it easier to share snippets of your code and makes it easily extensible.
Featured conky configurations
Here are some screenshots of my favorite conky setups that I have come across in the past.


Conclusion
This is all you need to get started with conky. Now, even you can make your desktop environment look like it’s from the future and make Windows users jealous. If you want to write your own configs from scratch, don’t forget to go through the documentation, as it is quite helpful. Keep exploring!
See Also
Read more on conky wiki
What is Conky?
Conky is a system monitor program for Linux systems. It can display various system information on your desktop such as CPU usage, disk usage, monitor status, and more.
How do I configure Conky?
You can configure Conky by editing its configuration file called conkyrc. This file is typically located in your home directory.
What is Conky Manager?
Conky Manager is a GUI tool that helps you manage and switch between different Conky themes easily. It simplifies the process of customizing your system monitor.
How do I install Conky on Ubuntu?
To install Conky on Ubuntu, you can use the package manager. Simply open a terminal and type sudo apt-get install conky to install it.
Can I run Conky at startup?
Yes, you can configure Conky to run at startup by adding it to your system’s startup applications list. This way, Conky will start automatically when you boot up your system.
What is the significance of lua in Conky?
Lua scripting language is often used to create custom scripts and configurations for Conky. It allows for more advanced customization and functionality within the system monitor.
How can I make Conky transparent?
To make Conky transparent, you can adjust the transparency settings in the configuration file. This allows you to overlay it on your desktop without obstructing the background.