
In this tutorial, we will learn how to set up Nginx with HTTP/2 support on Ubuntu. Nginx is a web server that is used as a reserve proxy, load balancer, mail proxy, and HTTP cache. Let’s understand Nginx in-depth.
What is Nginx?
Are you aware of what is webserver? It is the software that delivers the client’s requested web pages. The user request for any domain through the web browser, the request goes to the webserver through HTTP protocol. The server process it, and responds back with the requested page through HTTP. This generally happens between client and server.
Every web server has an IP address and a domain name. Any computer can become the webserver. The user needs to install Softwares like XAMPP, Apache, NGINX, Tornado, and so on.
Nginx is the web server that provides:
- An open-source software used for Web serving.
- It is the webserver used for reverse proxying, caching, and load balancing.
- It provides HTTP server capabilities
- It is designed for maximum performance and stability i.e. it reduces the page load time.
- IT functions as a proxy server for emails such as IMAP, POP3, and SMTP.
- It uses Non-threaded and event-driven architecture.
Check the Nginx Official Documentation for more details.
What is the difference between HTTP/1 and HTTP/2?
As we going to set up Nginx with HTTP/2 support, therefore it’s important to understand the difference between HTTP 1 and HTTP 2. The HTTP/2 is the latest version of HTTP. The versions of HTTP are as follows:
| HTTP Version | Year |
|---|---|
| HTTP/0.9 | 1991 |
| HTTP/1.0 | 1996 |
| HTTP/1.1 | 1997 |
| SPDY/2 | 2012 |
| HTTP/2 | 2015 |
There were some of the short comings in HTTP/1 that was solved by the HTTP/2. Let’s have a look at the table below:
| Character | HTTP/1 | HTTP/2 |
|---|---|---|
| Head of Line blocking | The TCP connection is blocked by the preceding request until the server responds to it. The other requests has to wait. | The blocking time is totally reduced. The same TCP connection itself service multiple HTTP requests by Multiplexing |
| Redundancy in request-header | As HTTP protocol is stateless, therefore the same HTTP headers parameters have to be sent out again and again with the request and response. | It uses the H-pack compressor to compress all the header parameters. It works at the connection level. |
| Push | No such feature is there in HTTP/1 | It allows to respond to the request that hasn’t even been sent but the client will ask for those request for sure. Such as index.html, style.css, or script.js. These files are already sent to the client. |
I hope the concept is cleared. Let’s understand how to install and setup Nginx.
Update the repositories
The first step is to update and upgrade the repositories. Using update command we’ll download the list of packages with their latest version installed in the system. Upgrading will install the latest version of the packages present in the list.
We will use the apt command to update and upgrade the packages. check the tutorial to know the difference between apt and apt-get command in Linux.
Let’s have a look at the command below:
sudo apt update && apt upgrade
Install the Nginx package
Once we are done with upgrading the packages, the next step is to install the Nginx package. Note that, HTTP/2 supports the Nginx 1.9.5 version or more than that. Therefore, we need to install the latest version of the Nginx package.
The user can use apt install command to install the Nginx package. Let’s have a look at the command below:
sudo apt install nginx
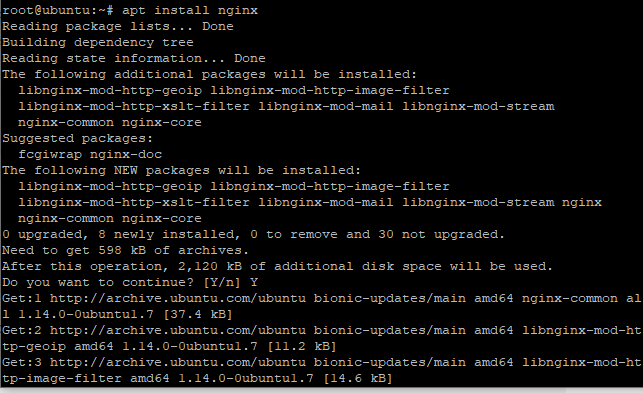
You will be prompted to confirm the installation process. Respond it with YES and finish the installation process.
The next step is to check the version of the package whether we have installed the right version or not. Use -v option to check the version. Let’s have a look at the command below:
sudo nginx -v

Enable HTTP/2 support
After installing the package, we need to enable the HTTP/2 port. The user has to change the port from 80 to 443. Port 80/HTTP is the World Wide Web whereas the port 443/HTTP is the HTTP protocol over TLS/SSL.
The user needs to make the changes in the configuration file named “default” located in the folder /etc/nginx/sites-available directory. Let’s have a look at the command below:
sudo nano /etc/nginx/sites-available/default
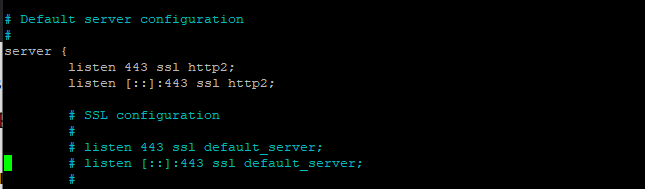
You can use any text editor of your choice. You can see the default value of Listen is set to 80. There are two different “listen” variables as given in the image below. The first listen variable denotes IPv4 connections whereas second denotes IPv6 connections. Change the port number to 443 and add SSL connection too as shown below.
Make the changes as shown below:
listen 443 ssl http2;
listen [::]:443 ssl http2;
Let’s have a look at the image below:
Nginx is now able to use browsers that supports HTTP/2 protocol. Save the configuration file using “Ctrl + O”.
Alter and add the server block
Earlier we changed the port, the next step is to change the server name. Why is it important? Because the server name is associated with the domain name otherwise it would accept all the incoming requests. The user just needs to change the server name in the configuration file.
The server name is set to “_” (underscore) by default. Therefore, you need to change this. Let’s have a look at the command below:
server_name example.com
You can use your domain name here.
The user also needs to add the server block which will direct all the HTTP requests to HTTPs. Don’t forget to change the server name in the configuration file. Let’s have a look at the code below:
server {
listen         80;
listen    [::]:80;
server_name    example.com www.example.com;
return      301 https://example.com;
}
Save the configuration file using “Ctrl+O” as discussed earlier.
Removing the Ciphers
What is Cipher? It is an algorithm used in cryptography to perform encryption and decryption. These are used to secure network connections. The Cipher suites are the bundle of algorithms. Check the Cipher suites Official Documentation for more details.
HTTP/2 has a huge list of old and insecure ciphers which need to be removed or avoided. Therefore, we will mention the list of ciphers that are more secure than the HTTP/2 ciphers. We need to make the configurations in the nginx.conf file located in the directory /etc/nginx/. Use any of your favorite editors.
Let’s have a look at the command below:
sudo nano /etc/nginx/nginx.conf
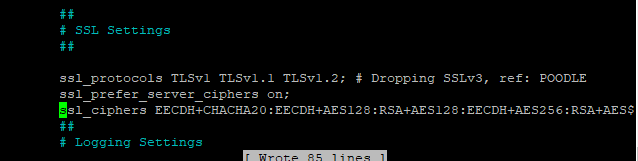
Add the following line of code as shown below just after ssl_prefer_server_ciphers on. This line includes the list of all the latest ciphers that HTTP2 browsers understand.
ssl_ciphers EECDH+CHACHA20:EECDH+AES128:RSA+AES128:EECDH+AES256:RSA+AES256:EECDH+3DES:RSA+3DES:!MD5;
Save and exit the file using “:wq!”.
Check for the syntax error
The last step is to check for the syntax error i.e. the changes made in the configuration files are correct or not. Use -t option to check the syntax with nginx command. The output will be successful for no errors.
To do so, type the following in the terminal:
sudo nginx -t

Start the services
After making all the basic configurations, the next step is to start the services. The user has to use the start command to start the Nginx services. We can also check the status of the service using the status command.
Let’s have a look at the command below:
sudo systemctl start nginx.service
sudo systemctl status nginx.service
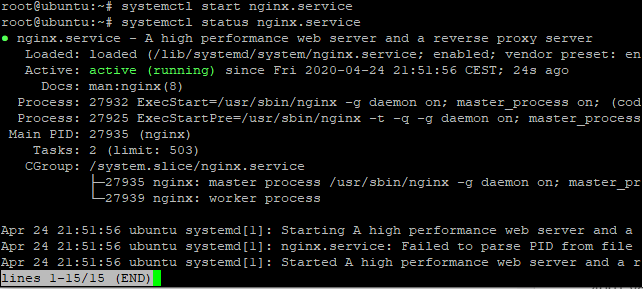
You can see the status as active as highlighted in the above image. Sometimes it happens, that service has already been started. In such a case, you need to reload the nginx.service file again. Let’s have a look at the command below:
sudo systemctl restart nginx.service
Test the nginx
The last step is to check whether it has enabled or not. To do so, we will use curl command. It will let us know whether the HTTP/2 port has been enabled or not. If it shows details like date, location, or content-length i.e. it is enabled.
To do so, type the follwoing:
curl -I -L https://your_domain
You can see that the service is enabled.
Conclusion
We have successfully learned how to set up Nginx with HTTP/2 support. We have also cleared the difference between HTTP/1 and HTTP 2. If you still face any issues, do let us know in the comment section.