
Mount an SMB share on CentOS 7 with cifs-utils, a protected credentials file, and mount.cifs through the mount command. CIFS is the older name commonly used for the Linux client path, while current servers usually negotiate SMB2 or SMB3.
Install the CIFS client tools
Install cifs-utils before using credential files or SMB protocol options.
sudo yum install cifs-utils
CentOS 7 is a legacy distribution, so use an enabled repository that supplies cifs-utils for your maintained environment and confirm that your account can use sudo.
Create the mount point and credentials file
Use a dedicated local directory as the mount point.
sudo mkdir -p /mnt/team-share
sudo install -m 600 /dev/null /etc/cifs-team-share
sudo sh -c 'printf "%s\n" "username=shareuser" "password=sharepassword" "domain=EXAMPLE" > /etc/cifs-team-share'
Replace the sample values with the account accepted by the SMB server, then use chown only if the file ownership has changed from root.
That file contains a password, so its permissions matter as much as its location. Use the Linux chmod command before allowing another user to read it.
Mount the SMB share
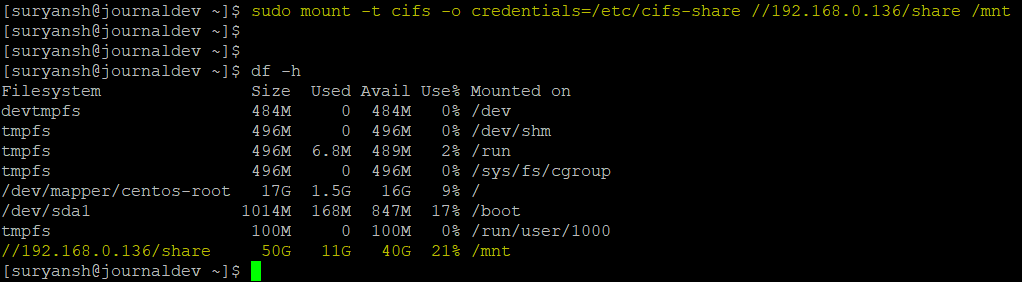
Run mount with the server name, share name, mount point, and credentials file.
sudo mount -t cifs //server.example.com/team /mnt/team-share -o credentials=/etc/cifs-team-share,vers=3.0,uid=$(id -u),gid=$(id -g),file_mode=0640,dir_mode=0750
The uid and gid options make files usable by your local account, while file_mode and dir_mode set the Linux-side view of permissions. Server permissions still decide whether the account can read or write a file.

df -h /mnt/team-share
ls -la /mnt/team-share
The first command confirms the mounted filesystem.

Make the mount persistent
Add one fstab entry only after the manual mount works. The Linux filesystem management guide explains how fstab controls mounts at boot.
//server.example.com/team /mnt/team-share cifs credentials=/etc/cifs-team-share,vers=3.0,uid=1000,gid=1000,file_mode=0640,dir_mode=0750,_netdev,nofail 0 0
Use your account’s numeric uid and gid in place of 1000.
sudo mount -a
df -h /mnt/team-share
Fix any error from mount -a before rebooting. If you need to create or diagnose the server side, start with installing Samba on CentOS and the broader Samba on Linux guide.
Unmount the share
Unmount by mount point when you no longer need the share.
sudo umount /mnt/team-share
Troubleshoot a failed CIFS mount
Permission denied usually means the SMB server rejected the account or the share’s access control list. A protocol error calls for an explicit supported version such as vers=3.0, not a downgrade to SMB1.
When the host cannot be found, verify the server name, route, and firewall before changing mount options. The mount.cifs manual remains the authoritative list of client options for the installed cifs-utils version.