
In this tutorial, we’ll go over the chown command in Linux. The Linux operating system is designed to be secure and allows file access to only those users who have the required permissions. Each file has specific owners and only those owners can view or edit the files. Let’s go over the chown command in detail and understand the different types of permissions and owners who can interact with files within the system.
File Permissions in Linux
There are three types of owners for any given file in Linux:
- Users: By default, the creator of the file becomes the owner. The creator also has read-write access.
- Groups: In Linux, we can also create a group of various users. Every member of the group shares the same set of permissions. Groups are useful when we need to assign multiple users the same set of access permissions.
- Others: A user who hasn’t created the file. The user is also not in the group of users who have access to the file.
Permissions given to a user, control the user’s access to files. The various permissions defined for users in Linux are read, write and execute.
- Read: It allows the permitted user to open and read the file. Users with “read” permission of a directory can list the contents of the directory.
- Write: It allows the user to change the contents of the file. For a directory, the user will be able to rename, add and move files stored on it. Suppose if a user has the write permission only on the file. The permission allows the user to modify content in the file. However, the user cannot rename, move or delete the file from the directory.
- Execute: It allows the user to run the program code. In the case of a directory, the user would be able to view its contents.
How Permissions are Represented in Linux
File permissions are expressed in terms of three-digit octal codes:
- r – Read
- w – Write
- x – Execute
| Octal | Binary | Notation |
| 0 | 0 | — |
| 1 | 1 | –x |
| 2 | 10 | -w- |
| 3 | 11 | -wx |
| 4 | 100 | r– |
| 5 | 101 | r-x |
| 6 | 110 | rw- |
| 7 | 111 | rwx |
Data that might be useful for the owner of the file might not be required by other users and unnecessary access given to them can create a loophole for data misuse. Hence Linux classifies its users based on their data requirement and then assigns the accessibility to each category. We can then change the category of users of a specific file/directory using the chown command in Linux.
The basic syntax of the chown command in Linux is given as:
chown <options> user:group <filename>
Each of the attributes in the syntax can be understood as:
- options – these give additional information and specification on how the command must be executed( these are optional).
- user – It is the username or the user ID of the new owner.
- group – It is the group name or group Id
Usage Instructions for chown Command in Linux
Let’s begin working with an example file that we’ll create for this demonstration. I’m naming this file “LinuxForDevices.txt“.

We use the ls command to list the files along with their permissions and owner details. As you can see, the owner and the group owner of the file is ninad while the permissions are read-write-read-write-read.
- The first rw- represents the permissions for individual user owner. (which in this case is read and write)
- The second rw- represents the permissions for group owners (which in this case is read and write)
- Lastly, r– represents the permissions for “other” users who have neither created the file nor have explicit permissions to access. (this file is read-only for such users)
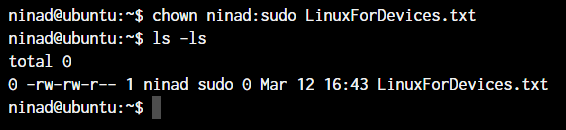
1. Change Group Using Linux chown Command
Let’s change the default group from “ninad” to “sudo”. The “sudo” group is a group for all the users who have access to sudo privileges.
chown ninad:sudo LinuxForDevices.txt
Alternatively, you can skip the “username” part and simply type the colon followed by the group name you want to change the file owner to.
chown :sudo LinuxForDevices.txt
2. Change File User Using chown Command in Linux
Now that we know how to change the file group owner using the chown command, let’s change the user. This is really simple. We just have to change the username part in the command with the desired username.
In this case, I’ll be changing the file owner to root and hence I’ll need to use sudo.
sudo chown root:sudo LinuxForDevices.txt
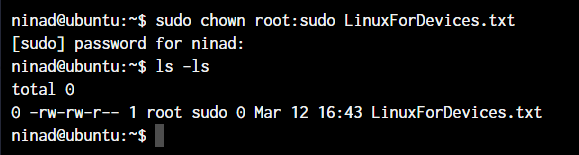
Perfect! As you can see, the owner of the file is now root. But the current user will still have access to the file because it belongs to the “Sudo” group.
If you do not specify the group name after the username and simply type <username>:, the group name will automatically be changed to the user’s default login group, which is the username itself.
sudo chown ninad: LinuxForDevices.txt
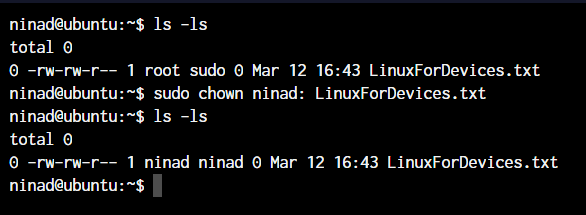
As you may notice, the user group has also changed to ninad.
3. Change File Owners Based on Another File
The –reference option allows us to replicate the owners that another file has for the current file(s). Let’s see an example of how this works. For the demonstration, I’ll create another file and change the owner of the file to root:root.
sudo chown --reference=LinuxForDevices.txt Linux.txt
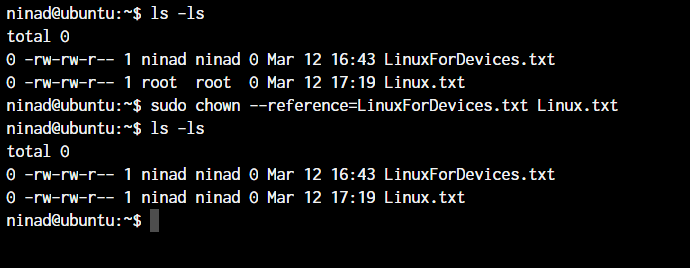
We have created a file named Linux.txt with the owners as root:root. We then reference the LinuxForDevices.txt file from where the owners need to be copied. This will allow us to change the owners of Linux.txt to be the same.
4. Linux chown Command With Symbolic Links
By default, if you change the owner details of a symbolic link, the owners for the original file will be changed. Have a look at the demonstration below.
sudo chown root:sudo Linux-symlink

But what if you want to change the owner for the symlink instead of the original file? With the chown -h option you can change the owners of only the symbolic link and not the original file.
chown -h ninad:sudo Linux-symlink
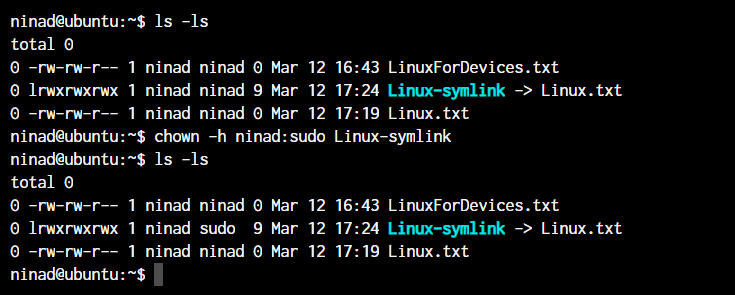
The difference can be easily seen by comparing the two screenshots in this section.
5. Changing Owners for Multiple Files Using chown Command in Linux
Changing file owners one at a time is one option. But that’s not a feasible option when there are hundreds of files. In this case, you can use the default wildcards in Linux to work with multiple files along with the chown command in Linux. Alternatively, you can also list the file names individually separated by spaces.
chown <username>:<group> file1 file2 file3
Here’s an example:
chown ninad:sudo *
OR
chown ninad:sudo Linux.txt LinuxForDevices.txt Linux-symlink
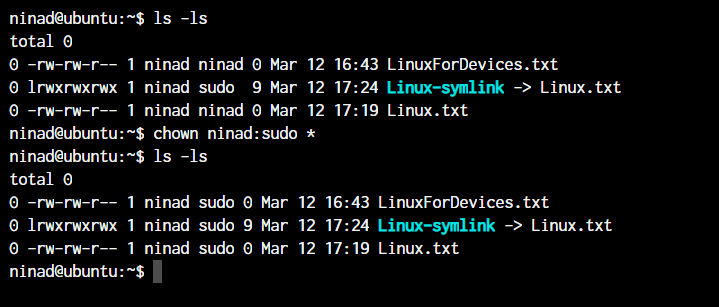
All the files now have a new owner group as sudo.
6. Recursively Change Owners For Files
To demonstrate this, I’ll create a folder hierarchy and change the owners for all the folders and sub-folders along with the files in it. I’ve created folder2 which is inside folder1 and moved the three files from our above demonstration within that folder.
chown -R ninad: folder1
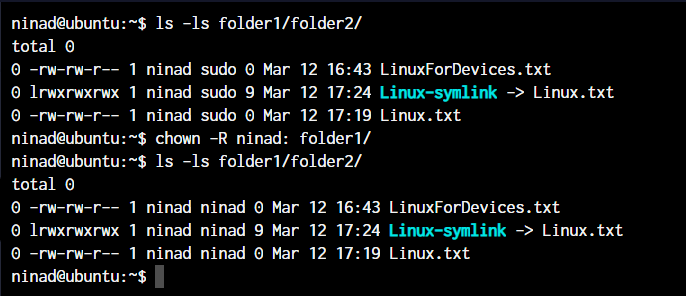
As you can see, all the files now have the changed group. The new owner settings that we executed with the chown command in Linux have been applied to all the folders, subfolders and files of our initial directory.
7. Change Permissions of Files Based on Existing Owners
The chown command in Linux provides a command option –from which allows us to change the owners for files with only the specified owners.
chown --from=ninad:ninad ninad:sudo folder1/
The above command will change the owners to ninad:sudo only if the existing owner is ninad:ninad.
Conclusion
With this, I’d like to conclude our tutorial and reference guide for the chown command in Linux. You can learn more about the chown command using the man command and understand the less frequently used options of this command. I hope this tutorial has helped you learn the command well.
Reference:
Journaldev Article on chown