

In this tutorial, we are going to discuss how to use the cut command in Linux. The cut command is used in Linux or Unix based operating systems. “Cut” simply means to snip a portion from a particular thing. Similarly in Linux, the cut command is used to snip a portion from a file or we can say to print a particular section or a particular line. This command first appeared in AT&T System III UNIX in 1982.
You might be thinking about how to cut these sections. These sections can be cut according to byte position, character position or delimiter. Consider an example given below:
SDLC stands for Software development life cycle.
Testing is used to identify and eliminate defects.
Hello Linux World.
Now, you want to print a particular section of a particular line. Suppose you want to print SDLC, Testing and hello from the lines. So for this, we will use cut command. Consider other examples: To print a single letter of the line i.e S, T & H, to print a particular letter placed at any position and so on.
The syntax of the cut command is as follows:
$ cut [option] [filename]

Don’t worry, we will discuss the options used in cut command further. Here, ‘-c 1-‘ is the option used with the cut command.
Let’s discuss the options used in the cut command:
- -c(–character): used to print a set or range of characters, or specific character.
- -b(–bytes): used to print a set or range of characters by specifying the bytes.
- -f(–field): used to print set of characters by specifying field number or range.
- -d(–delimiter): used to specify delimiter which is combined with the ‘-f’ option.
- –complement: print those characters which aren’t selected.
- –output-delimiter: used to replace the input delimiter with output delimiter.
Consider the following statements in Hello.txt file which we will use further in the examples.
Linux is operating system
echo command is one of the Linux based command
Many people in India has been affected by Corona Virus
Testing helps to identify, understand and eliminated software defect.
Cut by character using the cut command in Linux
Let’s understand how to select a column of characters. For this, we use the ‘-c’ option associated with the desired number of characters. For example, you want to print characters situated at 1st position i.e. L,e, M, T. So for this, the syntax will be:
$ cut -c 1 hello.txt

Here, it would print only the first character of the line. You need to specify the column number or position after the ‘-c’ option.
Print a character specified in the second position
As discussed above, we can print any column using the ‘-c’ option. Here, I want to print 2nd character in the lines. What I did, is just stated the column no. in the cut command in Linux. The syntax for this is as follows:
$ cut -c 2 hello.txt

It will print characters at second position i.e. i,c,a,e.
To print first “n” characters using the cut command in Linux
Till now we have discussed how to print characters at a particular position. Now, what if you want to print first n characters. We have to only specify the value of n.
The syntax for this is as follows:
$ cut -c-8 hello.txt

Here, it will print the first 8 characters including space. Remember, ‘n’ can be any number.
Print Characters in Multiple Columns
Let’s discuss how to print characters located at different positions. For this, you have to just specify different locations i.e. 2,3, 6 or any position.
The syntax for this is as follows:
$ cut -c 2,5,7 hello.txt

In this example, characters situated at position 2nd, 5th and 7th will get printed.
Consider another example. Let’s suppose we want to print characters at positions 1,2,3,4. So we just have to specify the position number as shown in the figure below. The syntax for this is as follows:
$ cut -c 1,2,3,4 hello.txt

Print a Range of Characters Using the cut Command in Linux
Till now, we have learned how to print characters in different positions. Now, let’s look at how to print characters within a range using the cut command in Linux. For this, just specify the range i.e starting and end position of the range as shown in the figure given below.
The syntax for this is as follows:
$ cut -c 1-5 hello.txt

[1-5] specifies the range. ‘1’ is the starting position while ‘5’ is the ending position. Therefore, it will print the characters of the specified range.
How to Cut by Byte Using the cut Command in Linux?
You might be confused about what the difference is between cut by byte and cut by characters. A byte is of 8 bits and it can hold values from -128 to 127 but a char variable can hold any value between 0 to 255 i.e 256 characters. Eight bits are called a byte.
One byte character set contains 256 characters. The current standard which is followed is UNICODE which uses two bytes to represent all characters in all writing systems. Due to this upgrade, based on the Unicode format (Unicode-16 or Unicode-32), the byte size can range from 1 to 4 bytes per character. For example, ‘ Ü ‘ character takes 2 bytes while ‘u’ takes only one byte. I hope the difference is clear.
In the given figure below, use ‘-b’ to cut out a section by just specifying the position.
The syntax for this is as follows:
$ cut -b 1 hello.txt

Print Multiple Bytes Using the cut command in Linux
Let’s understand how to print characters specified at different positions using the Linux cut command. You have to specify the byte position as shown in the figure given below.
The syntax for this is as follows:
$ cut -b 1,2,3,4 hello.txt

In the given example, the characters take only 1 byte. It doesn’t have any special character. So, it will print characters located at the specified position but according to the byte count.
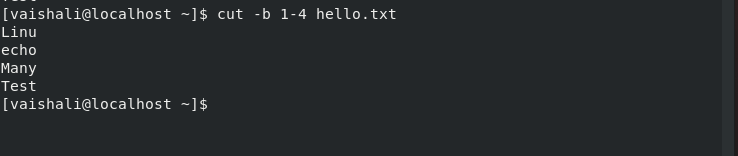
Print Bytes Within a Specified Range
Till now, we have understood how to cut or extract characters according to the byte at specified positions. Let’s understand how to print bytes within a range using the Linux cut command. As shown in the figure given below, you need to specify the starting byte position and ending byte position.
The syntax for this is as follows:
$ cut -b 1-4 hello.txt
Cut Piped Output From Other Commands using the cut Command in Linux
Consider an example where you want to print a particular character in the given string. You might be thinking of how two combine two commands. We use ‘|’ (pipe operator) to pass the output of one command to the other. Consider the syntax given below:
$ cmd1 | cmd2
The output of command 1 will work as an input for command 2. Therefore, ‘|’ is used to transfer the output of the first command as input to second. Similarly, we will use this to print the particular character using -b option.
The syntax for this is as follows:
$ echo "HelloWorld" | cut -b 5

It will print the 5th byte in the “HelloWorld” string i.e. ‘o’.
Print First n Bytes Using -b Option
As discussed above, we learned about how to print character specified at a particular position in a string. Here, we will discuss how to print ‘n’ bytes. ‘-‘ is used before the number specified which prints the bytes from start to the nth position.
The syntax for this is as follows:
$ echo "HelloWorld" | cut -b -5

In the given example above, it will print up to 5 bytes from starting to 5th position.
How to cut by field using the Linux cut command
Till now, we were discussing how to extract characters, but instead of selecting characters we can extract a whole field using ‘-f’ and ‘-d’ option. ‘-d’ stands for the delimiter. A Delimiter is a sequence of one or more characters for specifying the boundary between separate, independent regions in a plain text. For example, “,”, ” ” are kind of delimiters. Consider the example given below:
$ cut -d " " -f 1 hello.txt

Here, it would print the first field after the strings have been “separated” by the space delimiter.
Print a Range of Fields using Cut Command in Linux
As discussed, we will combine ‘-d’ and ‘-f’ options to print fields. So, to print the number of fields you have to specify the start and end position. Consider the example given below, here the range is given [1-3]. Therefore it will print fields starting from 1st position to 3rd position. Note, that it will not count the characters instead of this it will count field.
The syntax is as follows:
$ cut -d " " -f 1-3 hello.txt

Complement Option For cut Command in Linux
The complement option will output the opposite of what the previous options would have outputted. For example, below I’ve used -c 3 to cut and display the first 3 characters. The expected output is “Hel”. But because of the “–complement” option for the cut command in Linux, you see the text excluding the first 3 characters.
The syntax for this is as follows:
echo "Hello Journaldev" | cut -c -3 --complement

Replacing Existing Delimiters in Linux cut Command Output
You might be confused regarding this, it simply means to substitute a delimiter by another delimiter. Consider an example below. Here, we have substituted ” ” delimiter by ‘$’ delimiter. We can use the ‘–output-delimiter ‘ option to do the following.
The syntax for this is as follows:
$ cut -d " " -f 1,2 hello.txt --output-delimiter='$'

Here, the ” ” will be replaced by ‘$’ delimiter in the output
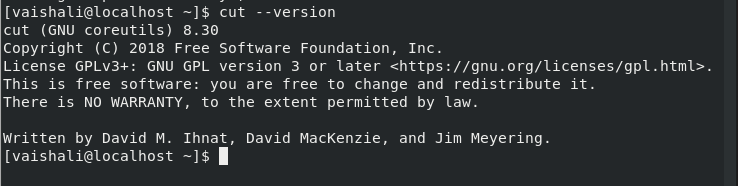
Check Linux cut Command Version
There are different versions of the cut command in Linux such as GNU, BSD and so on. To check the version of the cut we are using, ‘–version’ command is used.
The syntax for this is as follows:
$ cut --version
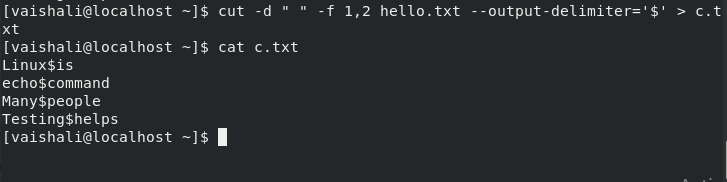
Redirect Linux cut Command Output to a File
We can also store the output of the cut command in Linux in a file by using ‘>’ output redirecting symbol. This symbol is used to send the output of any command to a file. Consider the example given below where our Linux cut command will redirect the output to c.txt file.
The syntax is as follows:
$ cut -d " " -f 1,2 hello.txt --output-delimeter='$' > c.txt
Conclusion
In this tutorial, we’ve gone through how to use the cut command in Linux. We hope that you now know how to use the command efficiently. If you have any questions, do let us know in the comments. If you’re looking for more detailed information, you can always refer to the man pages.