

In this tutorial we will learn to set up URL rewriting in Apache using mod_rewrite on Ubuntu.
Prerequisites for URL rewriting in Apache
- A Ubuntu 20.04 system
- with an Apache HTTP server installed on it
(learn here how to install Apache HTTP Server on Ubuntu)
What is URL rewriting?
URL rewriting purpose is to change the appearance of the URL to a more user-friendly URL. This modification is called URL rewriting.
For example, http://example.com/form.html can be rewritten as http://example.com/form using URL rewriting.
There are several modules in different web frameworks that are used for URL rewriting.
In the Apache HTTP server, the mod_rewrite module serves this purpose, and in this article, we will learn how to set it up.
Steps to set up mod_rewrite in Apache on Ubuntu
Follow the steps to set up URL rewriting in Apache HTTP server with the help of the mod_rewrite module.
Step 1: Enable mod_rewrite module in Apache
To enable the mod_rewrite module, execute the following command:
sudo a2enmod rewrite
Then restart the Apache HTTP server with service command with sudo:
sudo service apache2 restart
or using the systemctl command with sudo:
sudo systemctl restart apache2
Now that we have mod_rewrite enabled, we can proceed further to configure it.
Step 2: Enable the usage of the .htaccess file
A .htaccess file allows you to have configuration changes on a per-directory basis. Using .htaccess instead of making changes directly to Apache’s configuration files can impact the performance of the HTTP server. But a small .htaccess file should have a negligible impact on the performance.
Apache suggests using the .htaccess file only when you are not allowed to make changes in the main server configuration file or if there is a need to configuration changes on a per-directory basis.
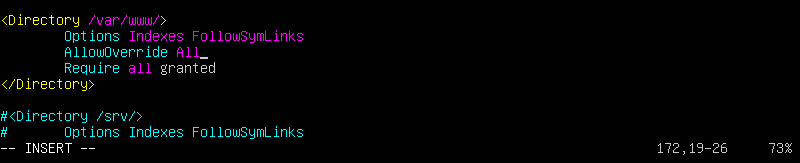
Before we proceed, to allow the usage of the .htaccess file, enable AllowOverride by making changes in the configuration of the Apache HTTP server with the help of your favorite text editor.
sudo nano /etc/apache2/apache2.conf
Find the following section in /etc/apache2/apache2.conf
<Directory /var/www/>
        Options Indexes FollowSymLinks
        AllowOverride None
        Require all granted
</Directory>
and change, from AllowOverride None to AllowOverride All
<Directory /var/www/>
        Options Indexes FollowSymLinks
        AllowOverride All
        Require all granted
</Directory>
Then, restart the Apache HTTP server to apply the configuration by executing:
sudo service apache2 restart
Step 3: Creating .htacccess file
Now, to create a .htaccess file in the root directory of your website.
sudo nano /var/www/html/.htaccess
Use your favorite editor to add the following on the top of the newly created .htaccess file:
RewriteEngine on
This, will enable a rewrite engine on your website.
Step 4: Adding URL rewriting rules
Once we have completed all the steps above, we can now proceed to add URL rewrite rules in the .htaccess file.
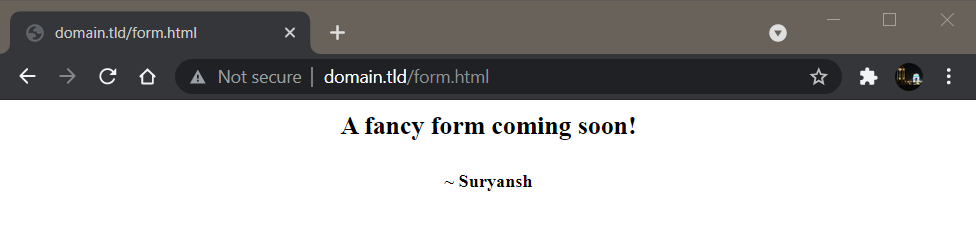
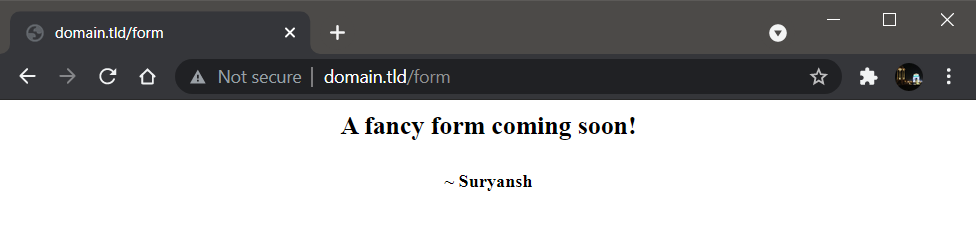
For demonstration purpose, we’ll set up a rewrite rule to display the form.html page at http://domain.tld/form instead of http://domain.tld/form.html
To add such a rule, add RewriteRule ^form$ form.html [NC] just below RewriteEngine on in .htaccess file using your favorite editor.
RewriteEngine on
RewriteRule ^form$ form.html [NC]
Save it and, now you must be able to see the form.html webpage at http://domain.tld/form instead of http://domain.tld/form.html
You can similarly set up for other pages on your website as well and if you want to learn more about rewrite rule flags, visit here.
Conclusion
URL rewriting is a beneficial tool to present your URLs beautifully to both the users and the search engines, which overall increases the popularity of your website as it is more SEO-friendly. It is simple to set up URL rewriting on Apache using the mod_rewrite module follow the steps mentioned above.
We hope you found this article helpful. Thank you for reading! 😀