

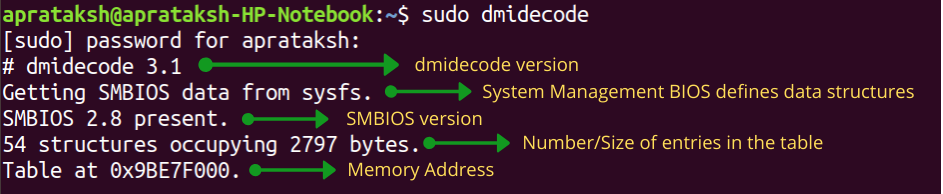
If we are interested in finding out our computer’s hardware details, “dmidecode command” is the go-to Linux command. Hardware information ranges from BIOS (Basic Input/Output System) information to the sizes of the memory devices.
When we run dmidecode on the terminal, the system retrieves the contents of the DMI (Desktop Management Interface) table, which has the main purpose of providing such crucial details to management software. In a way, the command acts as a decoder of the DMI table, hence the name “dmidecode”.
How to run the dmidecode command?
Since hardware information like serial numbers and MAC addresses are confidential to the owner of the system, this command requires superuser permission. The easiest way is to use sudo dmidecode and enter the password.
The other way is to switch to the root user by sudo su or sudo -s. Click here for more information on sudo. After entering the password, the terminal is run as a root user. It is indicated by the keyword “root” before the hostname.
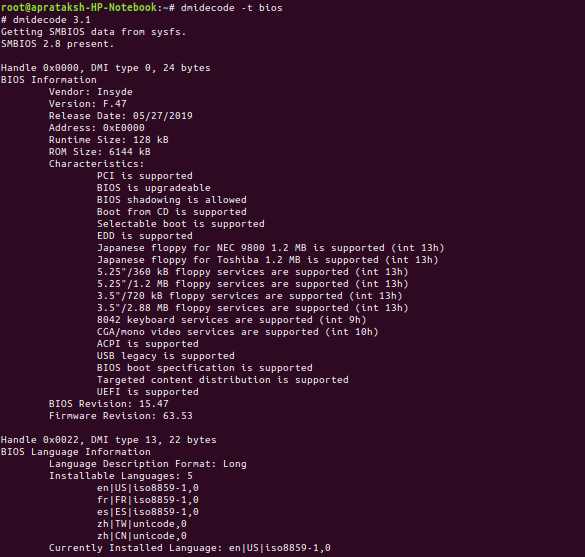
What does the standard dmidecode output look like?
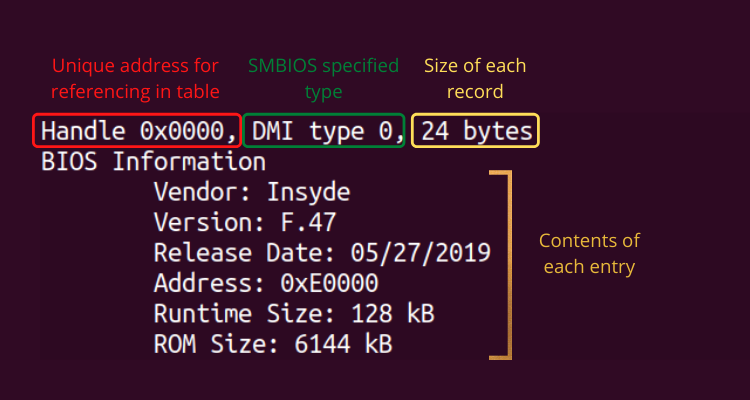
Each table entry has the following elements.
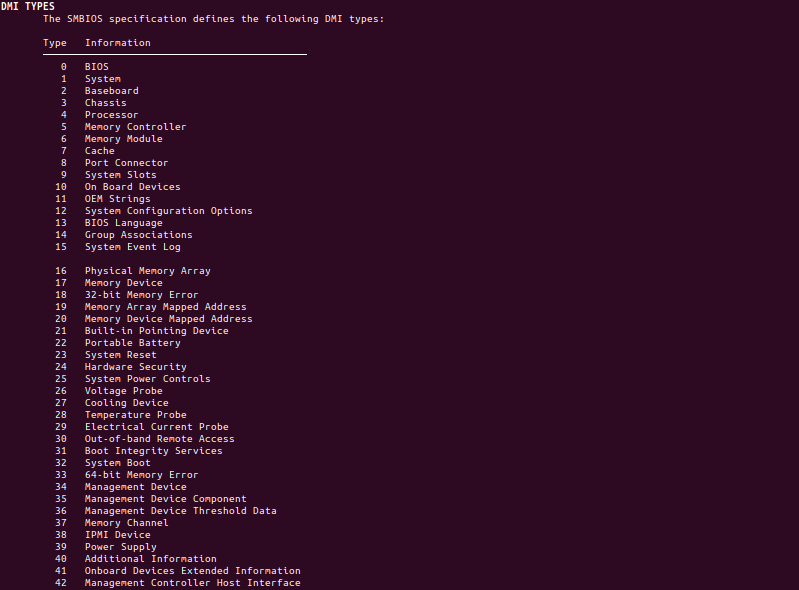
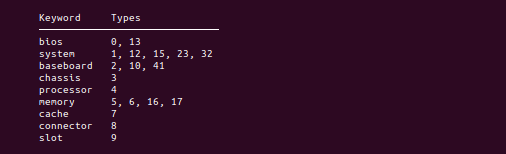
DMI Types
The type number plays an important role as it can be used to extract a particular entry in the table by running the following commands. Let’s begin with extracting data using the dmidecode command based on the dmi types.
Extracting on the basis of DMI Types
dmidecode -t 4
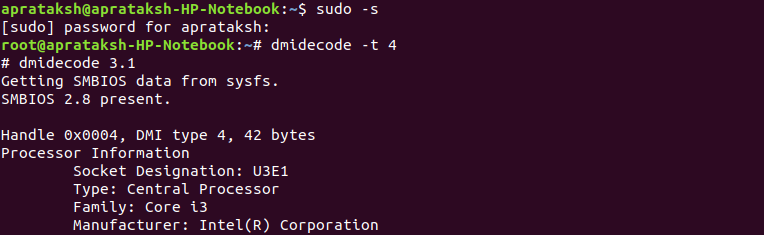
Each type corresponds to a specific class of information. For instance, as it is clear in the above figure, ‘type 4’ focuses on processor information.
More information on DMI Types
To find out the mapping of type number to their categorical information, we can always refer to the manual page in the terminal by using the man command.
man dmidecode
After scrolling down the manual, you can find all the designated DMI types
Display entries using multiple DMI Types
To display multiple types of hardware information -t <TYPE NO.> is repeated every time. For instance, to display Baseboard and Chassis Information at the same instance, we run:
dmidecode -t 2 -t 3
or,
dmidecode -t 2,3
DMI Keywords
Instead of displaying details with their DMI number, we can also use special keywords like ‘bios’, ‘memory’, etc. This can be done by:
dmidecode -t bios
By referring to the above table of DMI Types, we can notice that type number 0 and 13 corresponds to BIOS related information, hence the output:
To gain more knowledge about the types of in-built keywords, we can again look up the manual page. We will find the following keywords:
Note: The keywords in dmidecode are matched case-insensitively.
dmidecode -t biosanddmidecode -t BiOsgives the same output. In case, the argument provided is not a valid keyword, the terminal displays all the valid ones.
DMI Strings
There is indeed one more method to display such sensitive information – using strings. These strings are predefined and store some offset, which helps the system to look up its corresponding value. Suppose we want to check our processor version, we will execute the following command:
dmidecode -s processor-version
Output:

Note: These strings can provide multiple outputs depending on the system configuration. In case, we enter some invalid string, the terminal will display all kinds of predefined string keywords.
Decoding contents of another device file
By default, dmidecode extracts all the hardware information from /dev/mem file. For more information. refer to this StackOverflow question. In the event we require to decode a DMI Table from a different device file, we run:
dmidecode -d FILENAME
How to dump dmidecode data?
Linux also provides the service of dumping the contents of the DMI table, rather than decoding them. Such dumps are mainly used for debugging purposes, but it can help us to decode DMI tables of other systems as well. There are two ways to dump the contents using dmidecode:
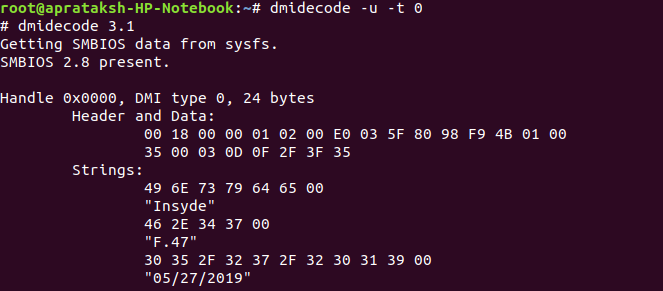
Hexadecimal dump – The output of this dump contains data in hexadecimal format as well as various strings.
dmidecode -u -t 0
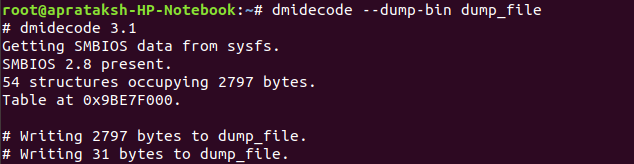
Binary dump – Complete DMI table is dumped into a file in binary format.
dmidecode --dump-bin FILENAME
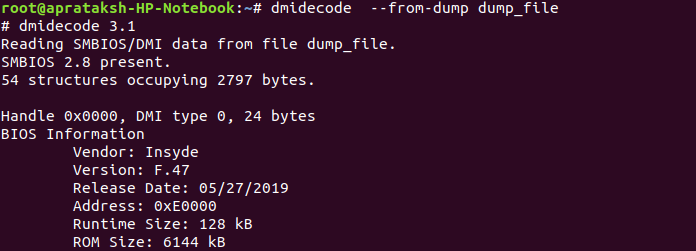
Extracting DMI data from a binary dump file
You can also read the binary data from the dump file by using the below command.
dmidecode --from-dump FILENAME
Additional dmidecode Command Options
There are some simple commands to extract some crucial information using dmidecode.
Current Size of RAM/s: The following command lists the size/s of RAM in all the memory slots.
dmidecode -t 17 | grep -i size

Note: The pipe symbol (
|), is used to pass the output of one sub-command to another. In the latter sub-commandgrepis a searching tool. For detailed information, refer to this.
Maximum Capacity of Memory: In order to upgrade the system’s RAM, you must know the maximum capacity the system can withstand. It can be known by:
dmidecode -t 16 | grep -i max

The number of Cores and Threads: In the multi-threading environment, the number of cores and threads play a huge role. To find out their count, we run:
dmidecode -t 4 | grep -iw count

We can always refer to the manual pages using “man dmidecode" for rigorous details. Moreover, for understanding dmidecode options, you can enter "dmidecode -h".
Conclusion
We hope this tutorial helped you understand the dmidecode command in detail. Don’t forget to have a look at some of our recent articles on awk and sed. Feel free to get in touch with us if you have any questions.