

The dd command is a utility to copy and convert files from one location to the other. Interestingly, it stands for ‘copy and convert’ but since the name cc was already taken by the C compiler, it was named ‘dd‘. Since dd interacts directly with the sectors of a disk it is a potentially dangerous command and should be used with utmost caution.
Basic usage of the dd command
dd command by default reads from standard input and writes to standard output. This can be changed using the if and of options. if specifies the input file and of specifies the output file:
$ dd if=<input-file-name> of=<output-file-name>
Do not run dd if you’re unsure of what to put in if or of. (dd is infamously known as the disk destroyer.)
Some useful options:
| Options | Explanation |
|---|---|
bs=BYTES | defines the block size/number of BYTES to be read or written at a time. (default=512) |
| count=N | specifies that only N number of blocks should be copied. |
| noerror instructs dd to keep going if there is an error and sync instructs dd to pad the input block with NULs if there was a read error. |
status=progress | available in dd v8.24 and newer, it shows the progress of the operation. (To check dd‘s version, type $ dd --version ) |
Note: The optimum block size to use depends on the underlying storage media. In general larger block size means faster reading and writing.
Practical things that can be done using dd
Let’s go over some of the practical applications of the dd command here.
1. Cloning entire drives/partitions
This is one of the most popular uses of dd command. You can identify the partitions using the fdisk command:
$ sudo fdisk -l


Note: The partitions shown above (for 2 SSDs, one NVMe and other SATA) may be different than what you have on your system.
To clone a partition type:
$ sudo dd if=/dev/sda of=/dev/sdb bs=64M conv=noerror status=progress
This command clones the entire /dev/sda to /dev/sdb reading and writing 64 MiB at a time and it will continue cloning if there are any errors while reading a block. The of option will generally be an external empty hardrive (/dev/sdb in this case).
2. Creating compressed backups of partitions
Sometimes cloning the partition may be too big of a process. You might want to create a compressed backup so that it takes less space. dd when used with the gzip command can do exactly that:
$ sudo dd if=/dev/sda conv=sync,noerror status=progress | gzip -c > sda_backup.tar.gz
Since there isn’t an of option, dd will write /dev/sda to stdout. | (pipe character) just redirects stdout of dd to stdin of gzip. The -c option dictates gzip to write the archive on stdout which is then redirected to a tar.gz file.
You can even backup on a remote machine if you have ssh access to that machine and you have ssh set up on your machine. Chances are that the remote machine already has ssh. To install it on your local system follow this tutorial.
To backup on a remote machine type this on your local machine:
$ sudo dd if=/dev/sda bs=1M conv=sync,noerror status=progress | gzip -c | ssh username@remote_machine 'cat > backup.tar.gz'
Enter your password and voila, a remote backup starts.

In the screenshot above, I created backup of random 40 Mib(or 42MB) from my local machine on a remote machine over ssh.
Listing the contents on the remote machine using the ls command:

Now instead of writing to gzip‘s stdout the backup is streamed to the remote server’s stdin which is read by the cat command.
The cat command without any options just writes to stdout what it reads form stdin. Redirecting the stdout to a .tar.gz file has the effect of cat command reading the backup and writing it to the .tar.gz file.
3. Creating a bootable USB drive
You can even create a bootable USB drive using dd. You’ll need the .iso file of your Operating System for this.
The USB drive needs to be unmounted first. To unmount type:
$ sudo umount /dev/<usb_drive_partition>
To list the USB drive’s partition, either use fdisk -l or use the lsblk command:
$ sudo lsblk

Now that the drive is unmounted, we can create a bootable drive out of it. Here I’ll create a bootable drive on /dev/sdb with Ubuntu 20.04 on it:
$ sudo dd if=~/Downloads/ubuntu-20.04.1-desktop-amd64.iso of=/dev/sdb bs=64M status=progress
/dev/sdb is now a bootable drive.
4. Wiping a drive with the dd command
A drive can be wiped either by overwriting with 0’s or random data using dd. Here I will wipe the /dev/sdb drive. Be absolutely sure which drive you are going to type in the of option.
To overwrite with 0’s type:
$ dd if=/dev/zero of=/dev/sdb bs=1M status=progress
/dev/zero is a special device that provides as many null characters (ASCII NUL, 0x00) as are read from it. It will overwrite /dev/sda with 0’s having the effect of wiping it.
To wipe the drive by overwriting it with random data, type:
$ dd if=/dev/urandom of=/dev/sdb bs=1M status=progress
/dev/urandom is also a special device from which random data can be read.
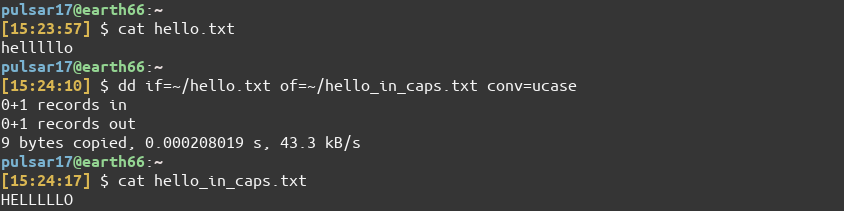
5. Converting files to uppercase
This is an obscure use of dd. However it’s interesting that dd can do this too!
$ dd if=file of=new_file conv=ucase
Conclusion
In this article we learnt how to use dd. dd is a very useful, albeit dangerous command if used incorrectly. To learn more about dd command, look at its man page.