
In this article, we’ll learn about how to mount CIFS share in CentOS 7. Server Message Block (SMB) of which the version SMB1 is also known as Common Internet File System (CIFS). It is a network file system protocol.
A network file system provides access to the local directories and files of the server remotely to a different server as if they were locally attached to the server.
The CIFS VFS was added to mainline Linux kernels in 2.5.42.
Most of the CIFS code is implemented as part of the Linux kernel. There are some userspace pieces that are maintained separately as part of the cifs-utils project.
Source: https://wiki.samba.org/index.php/LinuxCIFS
If you want to simply mount a CIFS share on a Linux platform you must able to mount it out of the box without any need for installation of any package. But for more options to mount CIFS share will require cifs-utils package to be installed which is recommended.
Steps to Mount CIFS share
To simply mount CIFS share, execute mount command with sudo command:
sudo mount -t cifs -o username=shareusername,password=sharepassword //server/share /mnt
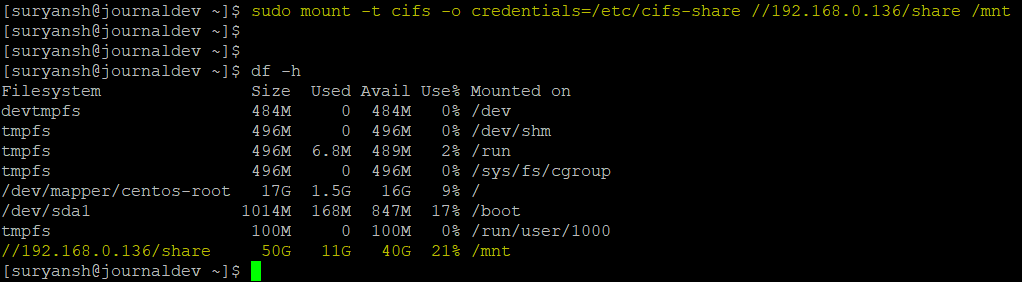
You can also execute df -h command check your mount.

Now you can simply go to your mount location (in our case it is /mnt) to access the remote files and directories.

For more options to mount cifs share, you’ll need to install cifs-utils package which can be easily installed using the yum command with sudo command:
sudo yum install cifs-utils
From here you’ll require cifs-utils package. Instead of mentioning credentials in the command, you can use a file containing credentials in the following format,
username=value
password=value
domain=value
You can leave domain=value as domain= if you don’t want to specify the domain. Like in our case we stored credentials in /etc/cifs-share and then you can execute the command:
sudo mount -t cifs -o credentials=/location/to/credentials //server/share /mnt
To make your credentials file only readable by the root user and not anyone else we can make use of chown and chmod command to set permissions:
sudo chown root:root /etc/cifs-share
sudo chmod 700 /etc/cifs-share
By default cifs share is mounted with full permissions in Linux, you can change these permissions by file_mode and dir_mode,
sudo mount -t cifs -o credentials=/location/to/credentials,file_mode=0777,dir_mode=0777 //server/share /mnt
You can read more about it’s options at https://linux.die.net/man/8/mount.cifs or, execute man mount.cifs in terminal.
Auto Mounting CIFS share
To mount cifs share automatically up on reboots, add the follow line with your own cifs share details in /etc/fstab file.
//server/share /mnt cifs credentials=/location/to/credentials,file_mode=0777,dir_mode=0777 0 0
To test it out execute:
sudo mount -a
It should automatically mount your cifs share.
Unmounting CIFS share
To unmount your CIFS share, simply execute:
sudo umount /mnt
You can also read more about umount at https://linux.die.net/man/8/umount or, simply execute man umount in terminal.
Conclusion
Since the Linux kernel has native support for cifs, you can directly mount the cifs share without any installation. But it is recommended to install cifs-utils for more options to mount cifs share (like using credentials file, setting modes, etc..) and, to automount your cifs share every time you boot or reboot, you can add it to the /etc/fstab file. We hope this article was helpful to you. Happy Learning!