
Let’s learn to install ZFS on Ubuntu. ZFS or the Z File System is an enterprise-grade file system designed to overcome many problems in the previous file systems. It has the functions of both the traditional file systems and the volume managers.
Originally developed by Sun Microsystems and first shipped with Solaris, it is known for data integrity, and protection against data corruption, high performance, easy-to-create snapshots, support for huge data storages, native level encryption, and much more.
Steps to install ZFS on Ubuntu
Since Ubuntu 16.04, ZFS is included in the official repositories of Ubuntu, so now it is very easy to install ZFS on Ubuntu. Before we proceed with the installation, make sure your repositories are up to date by executing:
sudo apt update
Now we can install ZFS on Ubuntu with the help of apt command with sudo:
sudo apt install zfsutils-linux
Once you are done installing, we can now proceed to learn some basic commands to use ZFS.
You can run zfs --version to see if ZFS is installed,

Understanding the Basics of ZFS
Before we proceed with learning about a new file system, it is important to take a backup of your files.
1. Creating a simple ZFS pool
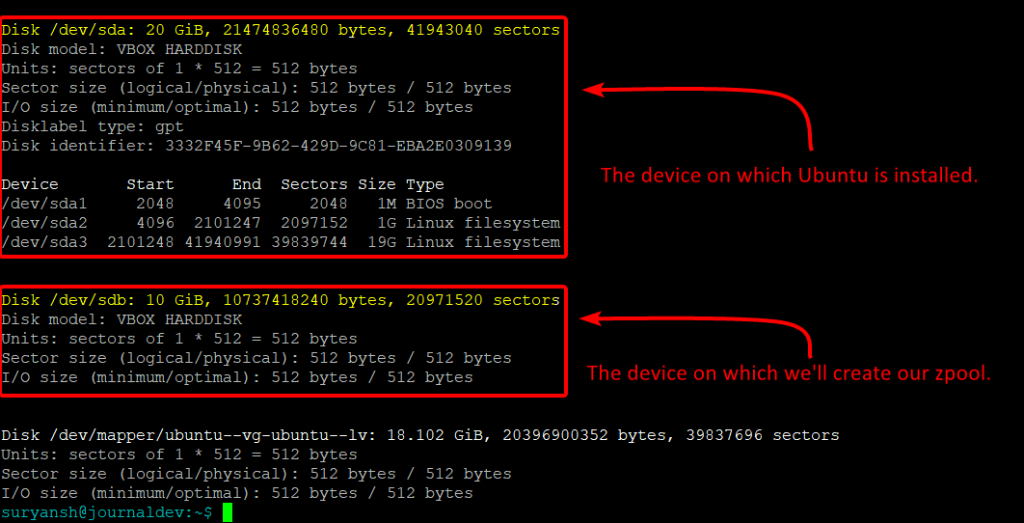
To find out the installed drives use fdisk command:
sudo fdisk -l
and it will list all the installed drives on your machine,
If you have no space for a ZFS pool on your only disk, then to make space for your ZFS pool you’ll need to resize one of your devices for which you can make use of resize2fs utility.
But, you cannot resize the partition on which Ubuntu is installed, while running it. Even if you try to resize a LVM Ubuntu partition booting a Live Server from a Ubuntu ISO image, it may result in data loss. There are workarounds for this case, but getting on them is out of the scope of this article.
We highly recommend using a different disk as we do in this tutorial.
Now to create a pool, execute zpool command with sudo command:
sudo zpool create example /dev/sdb
we can see our freshly created pool using df command:
df -h
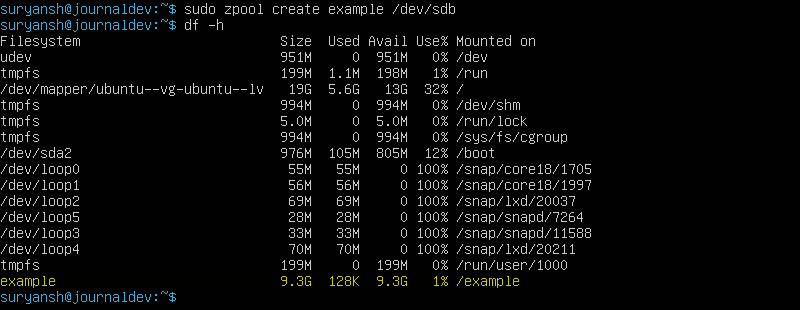
The pool has been successfully created and is now accessible on the system, users can now create and browse files.
We have added 8GB of gibberish data to test out our newly installed filesystem.
2. Determining the integrity of the files
ZFS is known for its data integrity, and on ZFS verifying checksum to verify data integrity is know as zfs scrubbing. It is important to routinely run scrub to protect your data against silent corruption and ensuring data integrity.
For ZFS scrubbing run:
sudo zpool scrub example
and to see the status of the pool execute:
sudo zpool status example
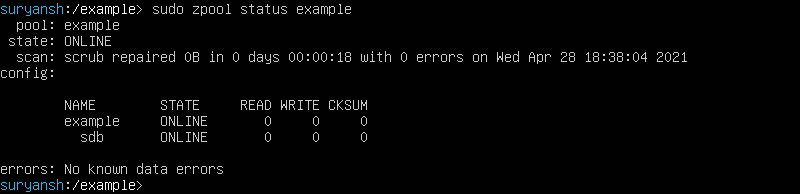
so we have now learned how to verify integrity in ZFS.
3. Creating Snapshots in ZFS
When a snapshot is created everything is duplicated, and afterward, they only record the changes. Snapshots can be only created for a dataset and not for individual files.
To create a snapshot execute:
sudo zfs snapshot dataset@snapshotname
And to roll back a snapshot execute:
sudo zfs rollback dataset@snapshotname
This will undo any changes made after that snapshot.
To get a list of all the snapshots execute:
sudo zfs list -t all
To remove a snapshot execute:
sudo zfs destroy dataset@snapshotname
This will delete the snapshot specified in the command.
Conclusion
ZFS is a great file system with features like scrubbing, snapshots, trimming, mirrors and RAIDs, and a whole list of features.
Installing ZFS (zfsonlinux) is a very easy and a simple task on Ubuntu, and you can get started with ZFS on Ubuntu within few minutes.
We hope you enjoyed learning! Happy Learning!