

If you, like me, are a fan of the lightweight and reliable VIM text editor and want to stick to it instead of moving to the newer, fancier Integrated development environments like PyCharm or Atom, you have come to the right place. Text editors on Linux, on the other hand, are extremely lightweight but lack a lot of features as compared to IDEs. However, it is possible to use Vim and Emacs as a fully fledged IDE with a bit of customization. In this tutorial, we will try to customize the Vim Editor to have IDE features such as code completion etc.
Also read: Vim Tutorial – All You Need, To Get Started with VIM
What to expect with your Vim IDE?
Obviously, we cannot implement all features of an extensive IDE like PyCharm into Vim. In this tutorial, we will be looking at implementing basic features that will improve your coding experience. This includes stuff like syntax highlighting, autocomplete, git integration, etc.
Prerequisites
For a lot of features mentioned here, we will be installing plugins through vim-plug and Vundle. So make sure you have already installed and set up vim-plug and Vundle and know how to use it. If you need any help in setting them up, refer to vim-plug and vundle articles.
1. Syntax and Indentation Support
The first thing you need in any text editor or IDE is highlighting syntax for each programming language such as Python or C. Thankfully, Vim comes with in-built syntax highlighting by default.
To enable this feature in vim, go to /etc/vim/vimrc or /etc/vimrc which is the vim configuration file and uncomment the following lines. By uncommenting, I simply mean remove the # (hash) that might be present before these lines. If they are already commented, then you are good to go.
if has("syntax")
  syntax on
endif
Now you can enable or disable syntax from the text editor whenever you wish.
To enable the syntax, go to normal mode and type
:syntax on
and to disable this feature, you can use:
:syntax off
As an alternative, you can install vim-polyglot for syntax and indent support. As mentioned earlier, I will be using vim-plug to install this plugin. To install vim-plug, execute the following command.
curl -fLo ~/.vim/autoload/plug.vim --create-dirs \
    https://raw.githubusercontent.com/junegunn/vim-plug/master/plug.vim
After you have installed vim-plug, open ~/.vimrc (make it if it isn’t already present) and enter the following lines.
set nocompatible

call plug#begin()

Plug 'sheerun/vim-polyglot'

call plug#end()
After this, use the following command in vim to source the config.
:source %
And this command to install all the plugins mentioned in the vimrc.
:PlugInstall
For more thorough instructions on how to work with vim-plug, refer to this article.
2. Line Numbering
You can also directly enable line numbering from vim commands. To enable line numbers, go to normal mode and then use the command
:set number
This mode can be disabled by using the command
: set nonumber
3. File Manager Integration
Configuring file system integration is the first feature we will be using an external plugin for. We will be installing for this is NerdTree.
To install NerdTree, enter the following lines in vimrc.
call plug#begin()

Plug 'https://github.com/preservim/nerdtree', { 'on': 'NERDTreeToggle' }

call plug#end()
Then, install the plugin, as we did in the first section.
Now you can toggle the NerdTree on and off by using :NERDTreeToggle
4. Pair autocompletion
Pair autocompletion refers to the insertion or deletion of brackets, parenthesis, and quotes in pairs. This can be achieved through the Auto-pairs plugin, which can be installed through vim-plug.
Just add the following lines in ~/.vimrc as follows and hit :PlugInstall like we have done before.
call plug#begin()

Plug 'LunarWatcher/auto-pairs'

call plug#end()
You can toggle auto-pairs on and off by setting up a key for it in vimrc as follows.
let g:AutoPairsShortcutToggle = '<C-P>'
The toggle key in this case is Ctrl + P
5. Keyword autocompletion
Keyword autocompletion is probably the most sought after feature in any IDE. While it is hard to get a very sophisticated keyword auto-completion without setting up a language server, we can still use basic keyword auto-completion using simple-complete.
Add the plugin to vimrc as follows and install using :PlugInstall
call plug#begin()

Plug 'maxboisvert/vim-simple-complete'

call plug#end()
simple-autocomplete tries to complete the keyword after you have typed two letters, and you use tab to autocomplete the word.
6. Git Integration
Git is an essential part of any programmer or developer’s life, and leaving vim to use it is not the most efficient way to use git. For this reason, the legendary vim plugin artist, Tim Pope himself, created vim-fugitive. Vim-fugitive makes it possible to use git commands from vim terminal itself.
To install vim-fugitive, we will not use any external plugin manager but the default plugin management system used by Vim. This requires making a ~/.vim directory and putting the plugin repository in it. To do this, execute the followings commands.
mkdir -p ~/.vim/pack/tpope/start
cd ~/.vim/pack/tpope/start
git clone https://tpope.io/vim/fugitive.git
vim -u NONE -c "helptags fugitive/doc" -c q
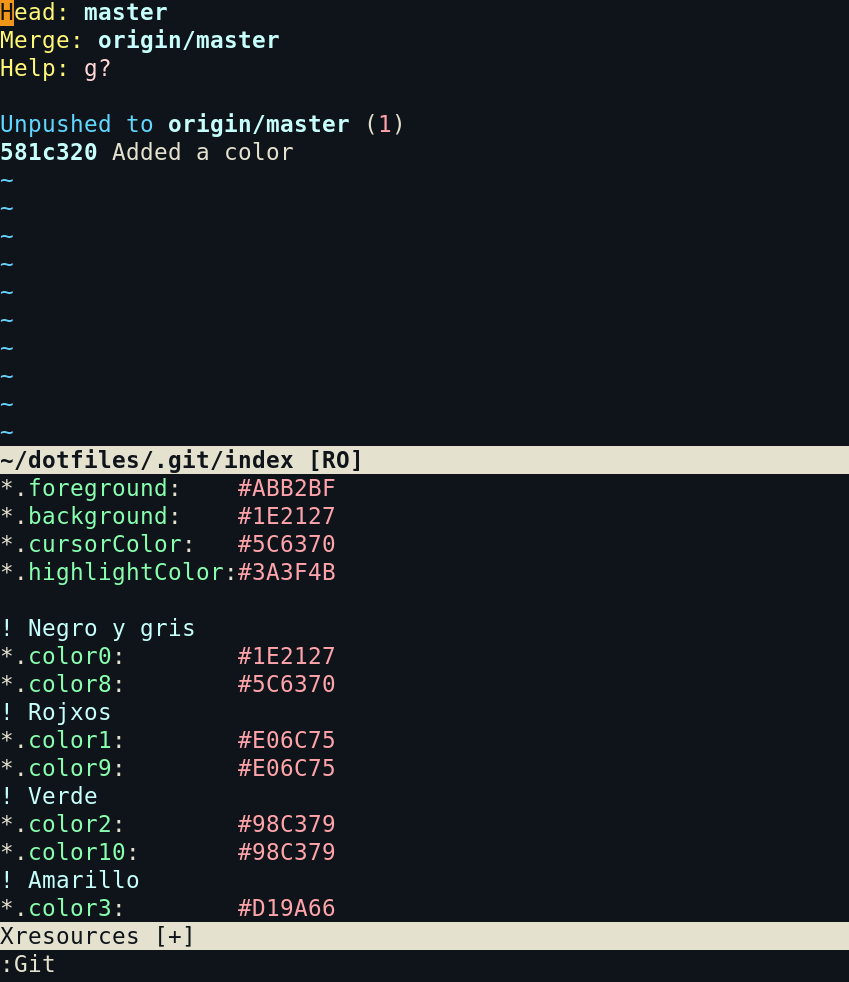
Now the next time you open a text file in vim, which is tied to git, execute :Git or :G in the vim. This will bring up a summary window with dirty files and unpushed and unpulled commits. Almost all the commands used traditionally in git can be used here. Here are some common ones.
:Git add <filename>: Add files to staging area:g?: List of maps for numerous operations including diffing, staging, committing, rebasing, and stashing:Git commit: Commit the staged content.:Git push: Push Staged content to remote repository.
Additional commands :
:GMove :Does agit mvon the current file:GDelete: Does agit rmon the current file and simultaneously deletes the buffer:GBrowse: Opens up the remote repo in web browser.:Gread: Variant ofgit checkout -- filenamethat operates on the buffer rather than the file itself:Ggrep: Works likegit grep
Other Plugins That Make Vim More Efficient
1. VIM Move
Vim Move or Move allows you to move lines and selections up and down in a visual manner. It can be installed via Vundle. This demo taken from the GitHub page is impressive enough to convince anyone to install it.
2. Fswitch and Protodef (C++)
If you work with C++ a lot, then you are in luck. Fswitch and Protodef allow you to switch between implementation files and header files, as well as pull function prototypes from the header files. They both can be installed via vim plug.
call plug#begin()
Plug 'derekwyatt/vim-fswitch'
Plug 'derekwyatt/vim-protodef'
call plug#end()
For a how-to-use guide, refer to the Vim pages here and here.
Conclusion
Using Vim editor requires a lot of patience, as the learning curve is quite steep with this editor. The vim shortcuts make the overall usage on Unix systems really easy once the vim users get the hold of them.
In this article, we discussed some ways by which you can turn vim setup, more like a perfect IDE. This included messing with configs and installing a bunch of plugins. There are also a lot of hidden features of Vim which you should explore, such as split view and resizing the editor if you are using it on a smaller screen, maybe using the Tmux app.
This kind of setup is perfect for people who like working with fast, minimal software. To find more interesting vim plugins to install, you can visit VimAwesome and browse through the categories. You can also try out the Neovim editor, which boasts several advance features over Vim. Have fun and keep exploring.