

In this article we discuss the function and usage of the chroot command in Linux with examples.
What is the chroot command?
The chroot command changes the apparent root directory of the current process as well as its child processes. In a Unix based system, the root refers to the base directory(/). Chroot creates a fake root environment inside which the process runs. The processes run in such an environment cannot access files and commands outside that environment or we can say that“the process is jailed within that environment”. Therefore the created environment is also called the “chroot jail”.
Where is the chroot command used?
The choort environment can be particularly useful for the following purposes:
- Recovering your filesystem and reinstalling bootloader: We can use the chroot command to mount a damaged filesystem to a mount point on a live CD. Doing so allows us to work on the damages system and attempt to fix it as though it were mounted normally at root(/).
- Software Testing: The test environments provide a good way to run and test new software that otherwise could have caused system-wide issues. Generally, containers are used for this kind of tasks but chroot environment can be an easy go-to for testing small scripts without leaving a scratch on your main system.
- Running Software with incompatible dependencies: Two software with clashing dependencies can be run by keeping an application and its dependencies in a separate chroot folder.
How to use the chroot command on Linux?
With the theory all cleared, let’s learn how to use the chroot command.
Syntax of chroot with arguments:
chroot [OPTION] NEWROOT [COMMAND [ARG]...]
The runs the COMMAND with the root directory set to NEWROOT.
The OPTIONs available for chroot are:
| userspec=USER:GROUP | To specify user and group (ID or name) to use |
| groups=G_LIST | To specify supplementary groups as g1,g2,..,gN |
| skip-chdir | Does not change the working directory to ‘/’ |
If no COMMAND is specified, the default command “$SHELL” -i is run.
Syntax of chroot with options:
chroot OPTION
The OPTIONs are:
| help | To display help and exit. |
| version | Prints version information and exits. |
Example usage of the chroot command
For a demonstration of chroot command, we will be creating a chroot environment and run the bash shell inside it.
1. Create the chroot directory. Let’s name it fake_root.
mkdir $HOME/fake_root
2. Create the required directories inside the fake_root using the mkdir command. The bin usually contains the binaries and lib,lib64 jointly contains the libraries required by these programs.
mkdir -p $HOME/fake_root/{bin,lib,lib64}
3. Copy the required binaries from the root to the chroot environment. It is also sometimes a good option to include text editors like vim for small editing purposes.
cp /bin/{bash,ls} $HOME/fake_root/bin/
4. These binaries has dependencies which are stored inside lib and lib64. We need also copy these dependencies inside the chroot environment if we want the binaries to work correctly.
ldd /bin/{bash,ls}
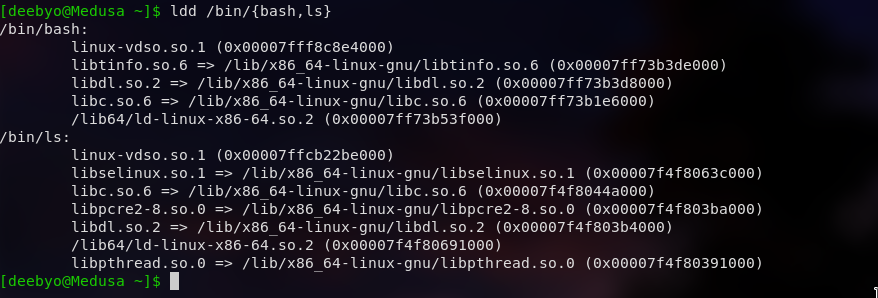
5. Copy the dependencies to the chroot environment using the cp command
cp --parent {/lib/x86_64-linux-gnu/libtinfo.so.6,/lib/x86_64-linux-gnu/libdl.so.2,/lib/x86_64-linux-gnu/libc.so.6,/lib64/ld-linux-x86-64.so.2,/lib/x86_64-linux-gnu/libpthread.so.0,/lib/x86_64-linux-gnu/libselinux.so.1,/lib/x86_64-linux-gnu/libpcre2-8.so.0,} ~/fake_root/
6. After you have successfully copied the dependencies, run the chroot command
sudo chroot $HOME/jail /bin/bash
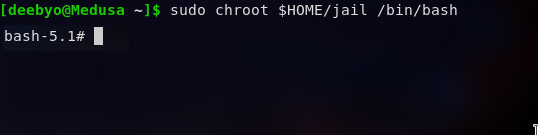
After activating the chroot environment you can test it by checking if you can access the files outside the fake_root without escalating the root privileges.
Conclusion
This brings us to the end of this article on the chroot command. Stay tuned to learn more about such Linux Commands in future.