
In this article, we’ll learn how to change DNS server on Linux! DNS or Domain Name Server is a standard protocol that helps Internet users discover websites using human-readable addresses. For example, if you type google.com in your web browser, it’s the DNS server that figures out that the site you are requesting is actually located at the IP address 8.8.8.8 and If the DNS of your device is misconfigured, you won’t be able to access the internet. You can also customize the DNS of your device if any website is blocked on your system on a DNS level.
People also change the DNS of their device/router if they want to use an ad blocker (with the help of Adguard DNS service or through a pi hole). In this tutorial, we will look at the different methods through which you can change the DNS server on your Linux device.
How to change your DNS server on Linux?
The DNS configurations are stored in a file named resolv.conf. Here is a step-by-step guide to change it.
Step 1: Open /etc/resolv.conf in a text editor with admin privileges using the following command:
sudo nano /etc/resolv.conf
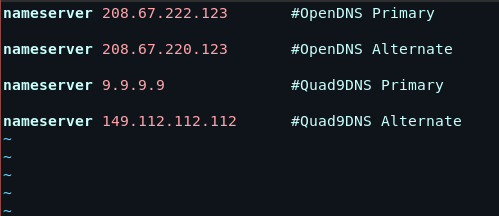
Step 2: Add the IP address of the new DNS which you want to use. For example, if you want to use 208.67.222.123 as your DNS, add nameserver 208.67.222.123 it to the configuration file. You can also use 1.1.1.1 which is the Cloudflare DNS resolver, if you want to use DNS as an ad blocker, then you can use the AdGuard Domain Nameserver (94.140.14.14) You can also use Google’s DNS which is located at 8.8.8.8.
nameserver 208.67.222.123 #OpenDNS Primary

nameserver 208.67.220.123 #OpenDNS Alternate

nameserver 9.9.9.9                 #Quad9DNS Primary

nameserver 149.112.112.112 #Quad9DNS Alternate
Step 3: Save resolv.conf. If you are using nano to edit the file, press Ctrl + X and then Y when it asks you to save the file.
How to permanently customize DNS settings on Linux
When you change DNS on your Linux operating system using the above method, the changes will only be temporary. You will see that resolv.conf will reset after a restart or anytime you run the dhclient command.
However, there are multiple ways to make them permanent. We will discuss some of them here.
1. Change systemd configs from the command line
One way you can make the DNS changes permanent is by not changing it from /etc/resolv.conf but from the systemd config itself (which can not be overwritten).
To do that, open /etc/systemd/resolved.conf with admin privileges.
sudo nano /etc/systemd/resolved.conf
Now uncomment the DNS and Fallback DNS lines and add your preferred name servers.
[Resolve]
DNS=9.9.9.9

FallbackDNS=149.112.112.112
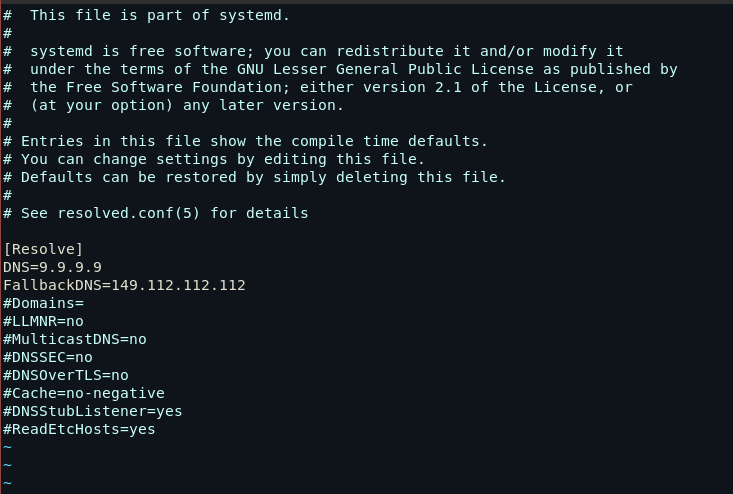
Now save the file to change the nameservers.
Use resolvconf
You can install a package called resolvconf to manage the device’s DNS. This package acts as a mediator between programs that supply DNS information and applications that use DNS information.
When this package is installed, it autogenerates DNS settings and overwrites the information in /etc/resolv.conf with its own settings.
Hence, if we change the default DNS settings in this program, our desired DNS settings will be the ones that are written in /etc/resolv.conf every time, hence making it permanent.
To install resolvconf:
- On Debian or Ubuntu :
sudo apt install resolvconf
- Arch :
sudo pacman -S openresolv
- On Fedora or CentOS:
sudo dnf install openresolv
Now we want to place our DNS in the header file of the settings that will be autogenerated. To do that, open /etc/resolvconf/resolv.conf.d/head and add the nameservers just like we did for resolv.conf
sudo vim /etc/resolvconf/resolv.conf.d/head
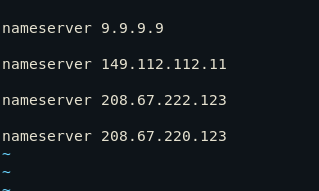
Add the following lines, which will configure your IPV4 DNS:
nameserver 9.9.9.9
nameserver 149.112.112.112
nameserver 208.67.222.123
nameserver 208.67.220.123
How to check the current DNS server in Use
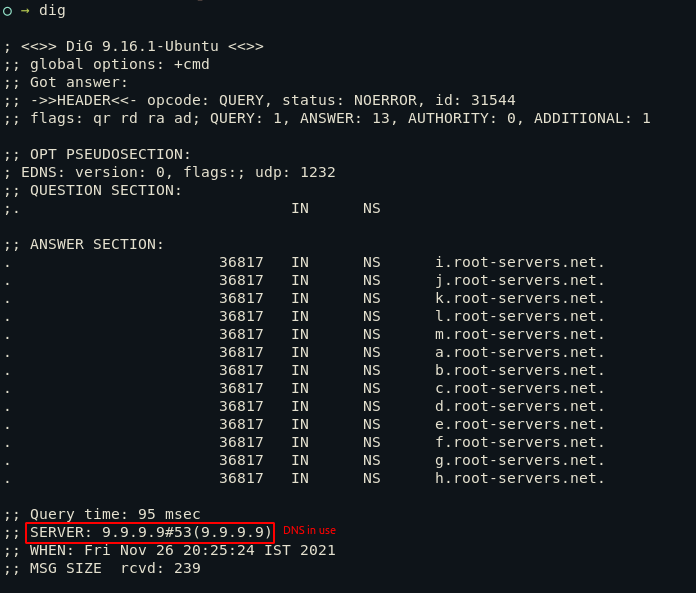
You can verify that our device is using the new DNS by running the dig command.
dig
Also read: dig command on Linux for DNS lookups
Conclusion
We have seen how to make temporary and permanent changes in the DNS settings on different Linux distributions using the command line, as well as how to verify if those changes are applied. To learn more about DNS and the networking configs, you can head over to the man pages. Thank you and keep exploring!