

The ‘stdio.h’ header plays a crucial role in C programming, serving as the gateway to fundamental input and output operations within the language’s vast landscape. Its absence can significantly impede the compilation of C programs, leading to frustration for developers. This guide will provide comprehensive instructions for installing ‘stdio.h’ on a Linux system, ensuring a seamless and robust development environment. Alternatively, if you’d like to know how to run C programs on Linux, you can check out another article here.
What is its purpose?
Before diving into the installation process, let’s briefly explore the advantages and benefits of having ‘stdio.h’ readily available in your development environment:
1. Standard Input and Output Operations:
This important header file provides essential functions like ‘printf’ and ‘scanf’ that enable developers to interact with console, making it an indispensable component for standard input and output operations in C.
2. Portability Across Systems:
Being a standard header, ‘stdio.h’ ensures portability of C programs across different systems. Code written with standard input and output functions is more likely to run seamlessly on various platforms.
3. Compatibility with Standard Libraries:
Many standard C libraries and third party libraries rely on the functionalities provided by ‘stdio.h’. Having it installed ensures compatibility with a wide range of libraries and simplifies the integration of external components.
Prerequisites:
Before starting the installation process, please ensure that your Linux system meets the following prerequisites:
1. Compiler Installed:
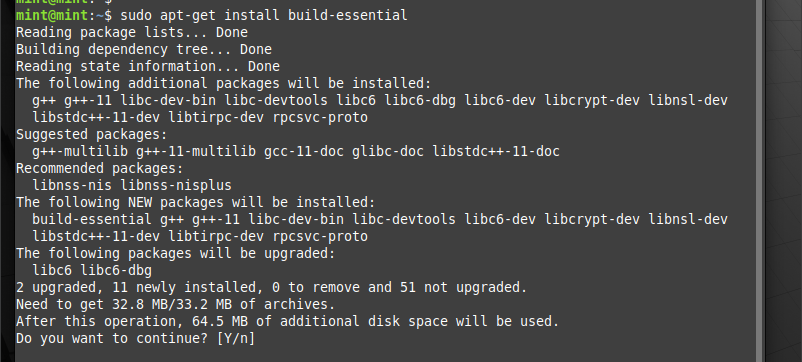
A C compiler, such as GCC(GNU Compiler Collection), should be installed on your system. If not, you can install it using your distribution’s package manager. For example, on Debian/Ubuntu-based systems:
sudo apt-get update
sudo apt-get install build-essential
2. Basic Terminal Knowledge:
Familiarize yourself with basic terminal commands. The installation process involves running commands in the terminal, and a basic understanding of the terminal will be beneficial.
Installation Process:
Now, let’s embark on the step-by-step process of installing ‘stdio.h’ on your Linux system:
1. Open a Terminal:
Launch a terminal on your Linux system. This can typically be done by pressing ‘Ctrl + Alt + T’ or searching for “Terminal” in your system’s application menu.
2. Check for Existing stdio.h:
It’s essential to confirm whether ‘stdio.h’ is already available on your system. This file is a standard header and is usually included with the C compiler. You can check its presence by running the following command:
ls /usr/include/stdio.h

If the file exists, you likely don’t need to install it separately.
In case the file doesn’t exist, you can try running the following command to check whether stdio.h exists at all, or not, on your Linux system:
find /usr/include/ -name "stdio.h"
If it’s found, simply copy the file to the /usr/include folder, else you can choose to reinstall all build tools for C and C++ using:
sudo apt install --reinstall build-essential

3. Install Essential Development Packages:
Ensure that your system has the necessary development packages installed. These packages contain essential header files and libraries. Use the package manager specific to your distribution to install these packages. For Debian/Ubuntu systems:
sudo apt-get install libc6-dev

For RedHat based systems, use this:
sudo yum groupinstall "Development Tools"
For systems using Alpine Linux, use:
apk add libc-dev
4. Verify the installation:
Compile a simple C program that includes ‘stdio.h’ and verify that the compilation process succeeds without errors. Create a file named ‘test.c’ using a text editor of your choice. You can check out another article here to follow along and setup Eclipse IDE for C/C++ development. Back to Code!
Create a sample text file:
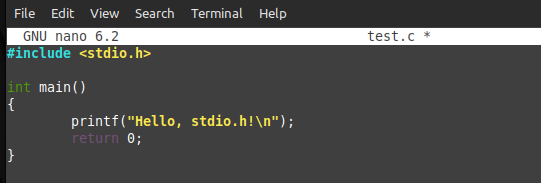
nano test.c

Add the following lines to the files:
#include <stdio.h>

int main() {

    printf("Hello, stdio.h!\n");

    return 0;

}
Save the file and compile it using the following command:
gcc test.c -o test
If the compilation is successful, run the executable:
./test

You should now see the output “Hello, stdio.h!” on your terminal. And there you go!
Conclusion
Installing the ‘stdio.h’ header file on a Linux system is essential for establishing a robust C development environment. Having this standard header readily available, provides benefits such as streamlined input and output operations, as well as improved code portability with numerous libraries. After all, this is one of the most basic, yet powerful libraries in the C language.
This tutorial has successfully allowed developers to troubleshoot and reinstall the standard header as quickly as possible. It’s important during development to embrace the power of standard libraries to enhance efficiency and success in your coding journey.