

Nowadays, many web hosting services are available, making building and developing websites relatively easy. Web hosting providers generally offer multiple hosting plans, an easy domain registration process, and a user-friendly web hosting control panel.
Another way to host a website is to build your own web server by using a personal computer and storing website files in local storage. Note that you’ll still have to register a domain name and choose the domain extension to access the website easily.
This tutorial will cover eight steps on installing a web server and hosting a website on a Linux-based computer. Keep in mind that since you are creating a web server on a local computer, having a fast and stable internet connection is crucial to ensure optimal uptime. Let’s get started.
What Is LAMP and How Does It Work?
The best way to create a local web server is to install LAMP, one of the most popular stacks for building and deploying dynamic web applications. The LAMP stack uses Linux, Apache, MySQL, and PHP as its foundation.
Below is a brief explanation of how LAMP works:
- Requests will be pointed to the Apache web server whenever a user visits your website.
- The web server will look for the requested web page file and pass the information to PHP. PHP interprets and pulls the necessary data from the MySQL database to render the web content.
- Finally, the Apache web server delivers the web content and displays it on the user’s web browser.
How to Set Up a LAMP Stack and Host a Website on Ubuntu

In this section, we will go over the steps of configuring the LAMP stack. Before proceeding to the tutorial, we recommend creating backups or a restore point on your operating system in case you encounter unexpected errors while installing LAMP.
1. Install Ubuntu Operating System
The first step is to install a Linux operating system. We recommend installing Ubuntu, one of the most popular Debian-based distributions. If you are a Windows user, you can choose whether to do a dual boot or a fresh installation. As for Linux users, you may skip this step.
You can download the Ubuntu installer from the official directory. After that, create a bootable USB drive using third-party software, such as Rufus. Once finished, boot Ubuntu OS from the USB, and follow the installation wizard.
2. Install the Apache Web Server
There are multiple steps to install and configure Apache, which we will cover in this section.
Installing SSH Client
Before installing Apache, you need to install the SSH client on your Linux computer. First, open Terminal by pressing Ctrl + Alt + T and type the following command to check for updates and upgrades:
$ sudo apt update && sudo apt upgrade
Then, install the SSH client by entering the command below:
$ sudo apt install openssh-server
Once installed, activate the SSH server with the following command:
$ sudo systemctl enable --now ssh
Then, check whether the SSH server is running by entering:
$ sudo systemctl status ssh
Installing Apache
The next step is to install the Apache web server. In the Terminal window, type the following command:
$ sudo apt-get install apache2
Verifying the Apache Installation
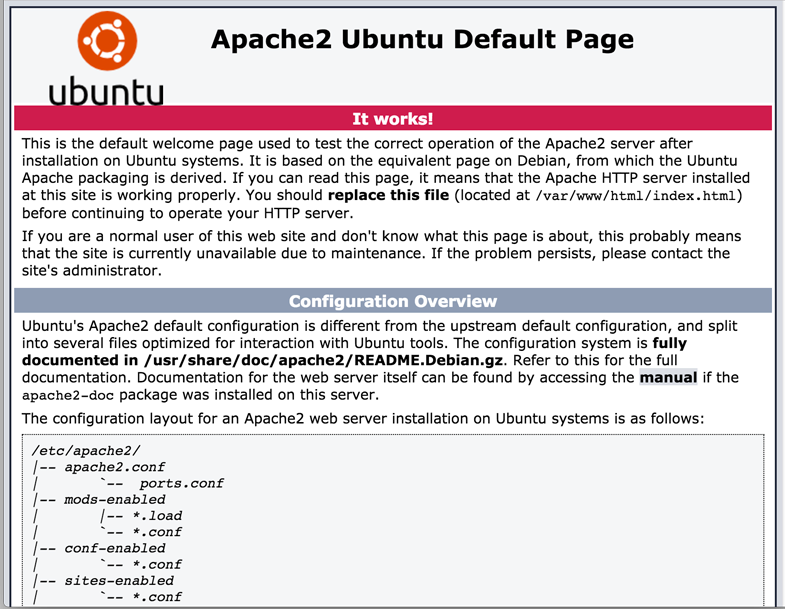
After successfully installing Apache, verify the installation by entering this URL into your web browser’s address bar: http://<your_ip_address_here>.
To find your local computer’s IP address, navigate to Settings → Network, then click the gear icon on your current network interface. You can find your IP address’ information on the Details tab.
The page should look like the following example:
However, if you receive an error message, try configuring the firewall by installing Uncomplicated Firewall (UFW). Type the following command in the Terminal window:
$ sudo apt-get install ufw
After that, enter the commands below to allow HTTP and HTTPS traffic to pass through the firewall:
$ sudo ufw allow http
$ sudo ufw allow https
Then, verify the installation again to check whether it solves the issue.
3. Install MySQL
MySQL will be the database management system for your web application. To install MySQL, enter the command below in the Terminal window:
$ sudo apt-get install mysql-server
The installer will prompt you to create a password for the MySQL root user. After that, check the status of the MySQL service using the command below:
$ sudo systemctl status mysql
4. Install PHP
PHP is a web server scripting language for executing applications. Installing the stable version of PHP and its additional modules is highly recommended. So, in the Terminal window, input the following command:
$ sudo apt-get install php libapache2-mod-php php-mcrypt php-mysql php-cgi php-curl php-json
Once completed, check if you have successfully installed the latest PHP version using the command below:
$ php -v
5. Make a Directory for Your Domain
After successfully installing the LAMP stack, you can set up the virtual host. First, you must create a specific directory for storing your website files.
Use the command cd to move from your active directory to the /var/www directory. Open Terminal and enter the following command:
$ cd /var/www
After that, create a directory using the command below:
$ sudo mkdir -p /var/www/domainname.com/
Remember to replace domainname.com with your own website’s domain name.
Next, change the file ownership and assign necessary permissions inside the /var/www/domainname.com directory using the following commands:
$ sudo chown -R $<your_username>:$<your_username> /var/www/domainname.com
$ sudo chmod -R 755 /var/www/domainname.com
6. Create a Sample Web Page for Testing
After creating the directory to store your website files, create an HTML file or a sample web page using a text editor. In this tutorial, we will use the Nano editor. To start, type the command below:
$ nano /var/www/domainname.com/index.html
Next, copy and paste the following HTML code inside the text editor:
<html>
    <head>
        <title>Welcome to My Website</title>
    </head>
    <body>
        <h1>Thank you for visiting my humble web page!</h1>
    </body>
</html>
Save the file by pressing Ctrl + O, then Ctrl + X to exit the text editor.
7. Create a Virtual Host File and Activate It
At this stage, we have successfully created a local website directory and a sample web page. The next step is to make the website accessible online. To do that, create a virtual host file inside the Apache default directory:
$ sudo nano /etc/apache2/sites-available/domainname.com.conf
Next, add the following lines of code inside the domainname.com.conf file:
<VirtualHost *:80>
    ServerAdmin [email protected]
    ServerName domainname.com
    ServerAlias www.domainname.com
    DocumentRoot /var/www/domainname.com
    ErrorLog ${APACHE_LOG_DIR}/error.log
    CustomLog ${APACHE_LOG_DIR}/access.log combined
</VirtualHost>
Replace the information for the ServerAdmin, ServerName, ServerAlias, and DocumentRoot fields with your own settings. Then, save the changes and exit the text editor by pressing Ctrl + O, then Ctrl + X.
After that, enable the virtual host configuration file using the a2ensite command:
$ sudo a2ensite domainname.com
Then, disable the default configuration file using the a2dissite command:
$ sudo a2dissite 000-default.conf
After successfully performing these actions, restart Apache with the following command:
$ sudo systemctl restart apache2
8. Test Virtual Host
The final step is to test the virtual host. But first, it is important to perform error testing on the virtual host configuration. Type the command below in the Terminal window:
$ sudo apache2ctl configtest
If there is no error, the output of the command will show the confirmation message: Syntax OK. In that case, restart the Apache service using the sudo systemctl restart apache2 command.
Finally, you can test your virtual host by entering your domain name in the web browser’s address bar. If the web browser displays the sample web page, you have successfully created your own server.
Conclusion
With the Apache web server running on your own Linux machine, it is possible to self-host multiple websites and install your favorite web applications, such as WordPress.
In this article, you have learned how to configure an Apache web server using the LAMP stack to locally host a website. To recap, here is a list of the eight steps:
- Install the Ubuntu operating system.
- Install Apache web server.
- Install MySQL.
- Install PHP.
- Make a directory for your domain name.
- Create a sample web page.
- Create a virtual host file.
- Test the virtual host.
We hope this article has helped you understand how to host a website on a Linux server. Good luck on your online journey!