
In this module, we are going to have a look at how to install Kitty and why should we switch to it. Kitty is a feature-rich terminal written in a mix of C and Python. It uses OpenGL for rendering everything. It is very fast and efficient and also comes prepacked with a lot of features.
What Is Kitty?
Kitty is a terminal emulator in Linux which uses OpenGL for processing. As a result, it is extremely fast and efficient by nature. It also comes pre-packed with some cool features called Kittens which can come in handy a lot of times. It supports all modern terminal features: graphics (images), Unicode, true-color, OpenType ligatures, mouse protocol, hyperlinks, focus tracking, bracketed paste, and several new terminal protocol extensions.
One of the best features about Kitty terminal is that it is accessible even via shell scripts and shell prompts and even over SSH which makes it very instrumental to work with.
How To Install Kitty on Ubuntu?
You can install kitty via pre-built binaries or from source. Here we’ll discuss both one at a time.
1. Installing the pre-built binaries
You can install the pre-built binaries with the curl command using this simple one-liner :
$ curl -L https://sw.kovidgoyal.net/kitty/installer.sh | sh /dev/stdin
This should install the binaries in ~/.local/kitty.app
Next up, we need to add the binary to PATH. To do this, you can set PATH to include ~/.local/bin so that we can launch kitty easily. [Read how to add do so here]
Next, create a symbolic link in ~/.local/bin to point to our binary with :
$ ln -s ~/.local/kitty.app/bin/kitty ~/.local/bin/
After this, we might as well want the kitty icon to appear in the taskbar and in the menus. For that we need to install the kitty.desktop file with :
$ cp ~/.local/kitty.app/share/applications/kitty.desktop ~/.local/share/applications
$ sed -i "s|Icon=kitty|Icon=/home/$USER/.local/kitty.app/share/icons/hicolor/256x256/apps/kitty.png|g" ~/.local/share/applications/kitty.desktop
2. Building From Source
When building from source, first we would need to install some dependencies with :
$ sudo apt install git gcc cmake pkg-config libdbus-1-dev libxcursor-dev libxrandr-dev libxi-dev libxinerama-dev libgl1-mesa-dev libxkbcommon-x11-dev libfontconfig-dev libx11-xcb-dev liblcms2-dev libpython3-dev
Next up, we need to clone the Github Repo and cd into it with :
$ git clone https://github.com/kovidgoyal/kitty && cd kitty
Now, we can build the binary with :
$ make
This should build the binary in ./kitty/launcher/kitty
Kitty Configuration Extra Features
After you’ve installed Kitty, let’s get to the configuration files and look at some of the interesting features that kitty offers.
1. Kitty Configuration
Kitty has a very detailed configuration file which let’s you customize various aspects of it. The global configuration file /usr/share/doc/kitty/kitty.conf
You can also specify user specific configs by creating your own config files at ~/.config/kitty/kitty.conf or copying the global config at the local said location and edit it.
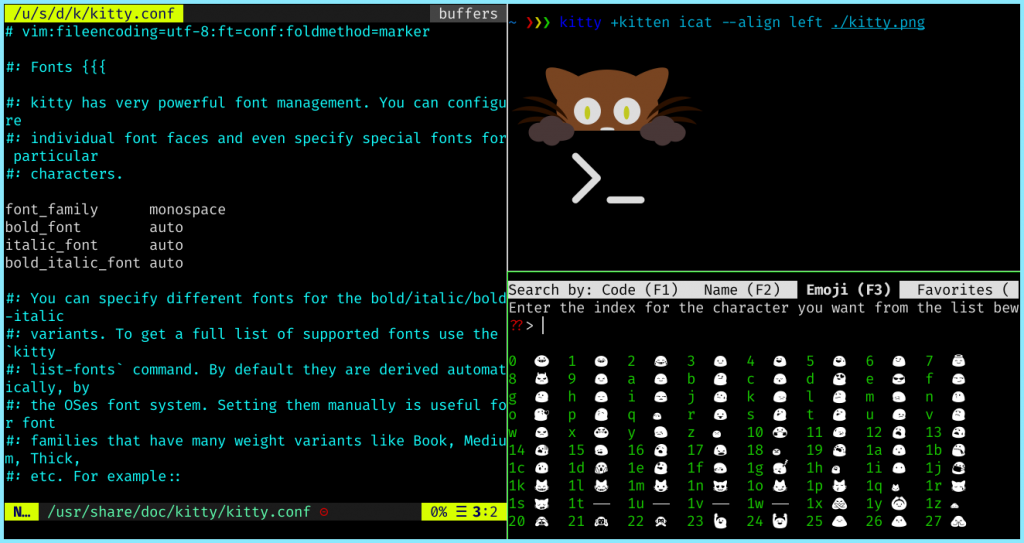
2. Kitty Features
Kitty has a framework for easily creating terminal programs that make use of its advanced features. These programs are called kittens. They are used both to add features to kitty itself and to create useful standalone programs. Some of the more popular kittens are :
- icat : displays images in terminal
- diff : a fast, side-by-side diff for the terminal with syntax highlighting and images
- hints : select and open/paste/insert arbitrary text snippets such as URLs, filenames, words, lines, etc. from the terminal screen
- unicode input : input unicode characters like emoticons on the terminal
There are several more inbuilt kittens and if none of them fit your needs, you can even create your own!
Conclusion
Thus we saw the different aspects of the Kitty terminal. It’s an excellent terminal emulator with so much customizability that it is essentially facilitates a “mouse-free” workflow. It is also extremely fast since it is based on OpenGL which also drastically efficiency. It is one of my favourite Terminal Emulators and it might even replace your default terminal emulator on Ubuntu once you try it !