
Docker is an application that simplifies the process of managing application processes in containers. Containers let you run your applications in resource-isolated processes. Containers are similar to Virtual Machines, but are much less resource-intensive, as they only need the absolute minimum to run a particular application, and does not require installation of a separate Operating System.
Let’s look at how we can install and run the Docker on our Ubuntu 18.04 from the Command Line, in a few steps.
Step 1: Retrieve and add the GPG Public Keys
Again, similar to other tutorials regarding package installation on Linux, we always need to get the public key for that package so that we know that it is valid. We can then download the required data and install the package securely.
So let’s get the GPG public key for Docker, which is available at the link:
https://download.docker.com/linux/ubuntu/gpg
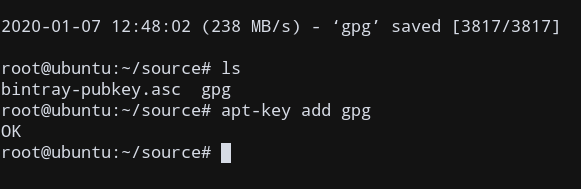
To download the key, we will use the wget command from the Terminal.
wget https://download.docker.com/linux/ubuntu/gpg

The downloaded key in my case is called gpg. After the public key is downloaded, add it to the system keys using apt-key.
apt-key add gpg
Step 2: Verify Key Fingerprint
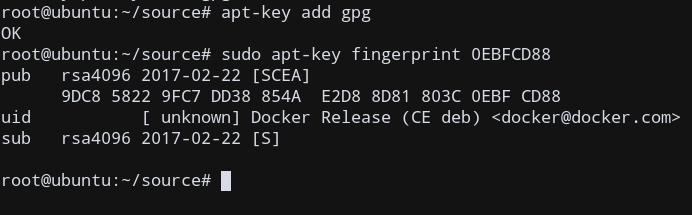
Now, to verify that we have added the proper key, we need to check the fingerprint for Docker’s key.
Verify that you now have the key with the fingerprint 9DC8 5822 9FC7 DD38 854A E2D8 8D81 803C 0EBF CD88, by searching for the last 8 characters of the fingerprint.
sudo apt-key fingerprint 0EBFCD88
You should get an output similar to the below screenshot.
Step 3: Install Required Packages
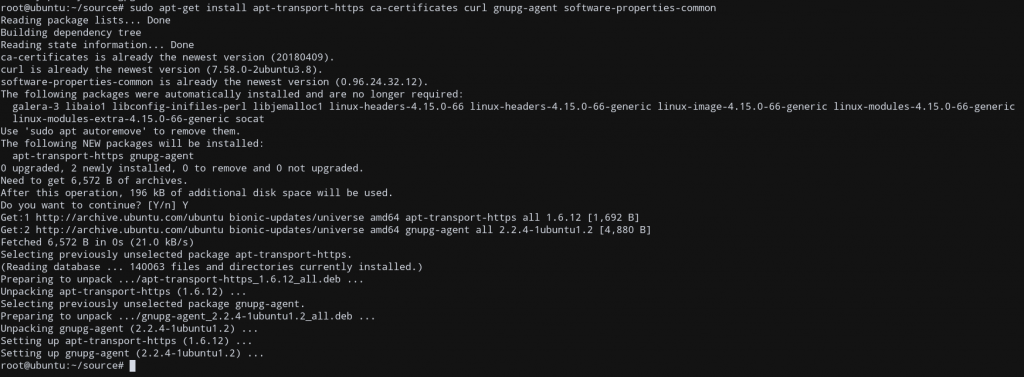
To set up the Docker repository, our system must have packages which allow us to download files over HTTPS. So, you need the below packages, which can be downloaded using apt or apt-get.
# Install packages to allow apt to use a repository over HTTPS:
sudo apt install apt-transport-https ca-certificates curl gnupg-agent software-properties-common
Now that we have the necessary requirements, we can now add the Docker repository to our list of sources.
Step 4: Add the Docker Repository to the Sources List
We need to add the Docker source to our list of sources in the system so that any future updates can occur using that source URL when using apt update.
We need to modify /etc/apt/sources.list.
Use any text editor (like nano, vi, etc) and open /etc/apt/sources.list. I will be using vi editor to edit the file.
root@ubuntu:~/source# vi /etc/apt/sources.list
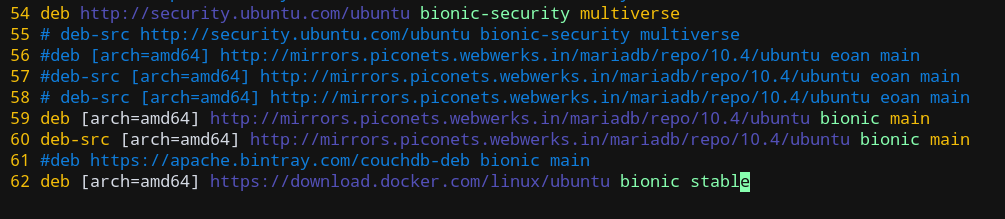
Go to the end of the file, and add this line to ensure that we add the repository source link.
deb [arch=amd64] https://download.docker.com/linux/ubuntu bionic stable
Exit the editor, after saving your changes.
Now, we are ready to update the system and install our package!
Step 5: Install Docker on Ubuntu
Now that we have our sources with us, we are ready to install Docker!
It’s simple. First, we update our system and other critical packages. Then, we fetch and install the latest version of Docker from the source. The version that we will be installing is the Docker Community Edition (docker-ce), so we then install that using apt install.
sudo apt update
sudo apt install docker-ce
Now, if there aren’t any errors, we will return to our shell prompt, and our install has completed successfully!
Step 6: Verify Docker Installation
If Docker was installed correctly, it would have then automatically started a Docker daemon process. So, we need to use the systemctl command and check if the docker service has started or not.
sudo systemctl status docker
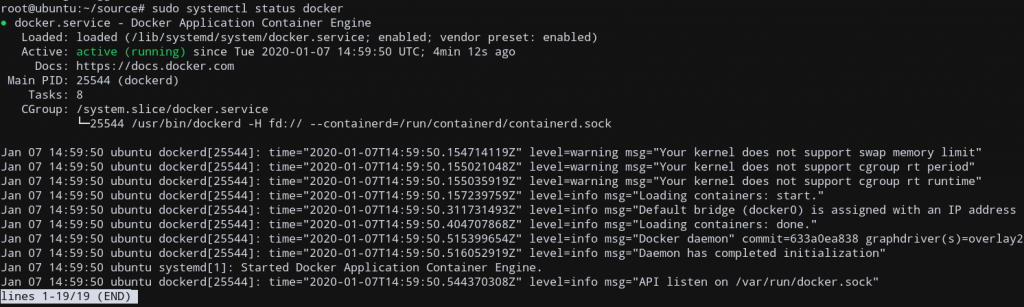
If the command works as expected, then you will see an output similar to mine, indicating that the docker service is active, which means that our installation was indeed successful!
Now, let us now look at how we can configure Docker and run a Docker Container.
Step 7: Execute Docker Commands without sudo
By default, the docker command can only be run by the root user or by a user in the docker group, which is automatically created during Docker’s installation process. If you attempt to run the docker command without prefixing it with sudo or without being in the docker group, you’ll get an output like this:
docker: Cannot connect to the Docker daemon. Is the docker daemon running on this host?.
See 'docker run --help'.
To avoid typing sudo for every docker command, add your username to the docker group.
sudo usermod -aG docker ${USER}
Now, log out and log in again to apply for your user membership successfully on the docker group. Now, there is no need to prefix any docker command using sudo!
Step 8: Run a Docker Container
A Docker Container, being similar to a Virtual Machine, also needs an image to work on. There are various images hosted on Docker Hub, Docker’s official website for hosting images. Any image you need can be fetched from this website.
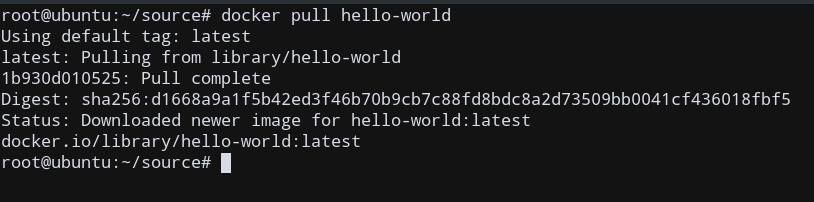
Let us now try to run a simple hello-world Docker Container, which prints ‘Hello World’ and exits.
1. Fetch the image
To pull the corresponding Docker image, use:
docker pull helo-world
2. Run the container
Now we have the image, using which we can run the Docker container.
To check if we actually have the image, let us list all our Docker images on the system, using docker images.

We have the image hello-world in our system, as expected. Now, let us run the container.
Simply execute:
docker run hello-world
Now, this container will run and print Hello World, before terminating.
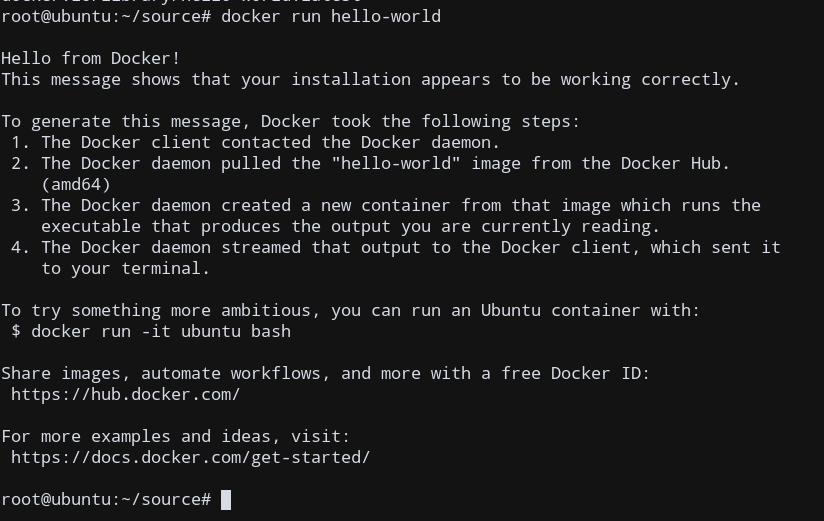
We have thus completed running our first Docker Container!
Similarly, we can fetch and run other interactive Docker Containers as well, thus showing the ease of usage of docker. To illustrate this, let us show one more example: Installing a Debian image!!
Running a Docker Debian Container
We use the same commands as earlier, using docker pull debian, to download the image.

Now, to run this container, since this needs an interactive terminal session, we use:
docker run -it debian
The -it option specifies an interactive terminal session (Combining the -i and the -t options)
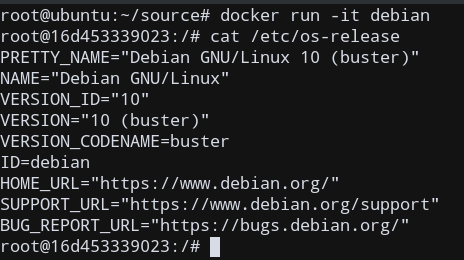
As you can see, we are using a Debian system inside an Ubuntu OS, without the number of resources that a Virtual Machine uses. The image size is itself only 114 MB. Amazing, isn’t it?
Conclusion
In this tutorial, we showed you how we can install Docker on Ubuntu 18.04 from the Terminal, and how we can fetch images and run Docker containers using the docker command. I hope this tutorial serves you well and clears any doubts regarding Docker installation or running a Docker container on Ubuntu.