

tune2fs command in Linux is used to manipulate the filesystem parameters of an ext 2/3/4 type file system. tune2fs command is part of e2fsprogs package.
Synopsis of the tune2fs command
The syntax for the tune2fs command is as follows:
tune2fs [ -l ] [ -c max-mount-counts ] [ -e errors-behavior ] [ -f ] [ -i interval-between-checks ] [ -j ] [ -J journal-options ] [ -m reserved-blocks-percentage ] [ -o [^]mount-options[,...] ] [ -r reserved-blocks-count ] [ -s sparse-super-flag ] [ -u user ] [ -g group ] [ -C mount-count ] [ -E extended-options ] [ -L volume-name ] [ -M last-mounted-directory ] [ -O [^]feature[,...] ] [ -T time-last-checked ] [ -U UUID ] device
The tune2fs command requires administrator privileges (root or sudo user) to operate.
Usage – tune2fs command
The usage of the tune2fs command has been described below with examples.
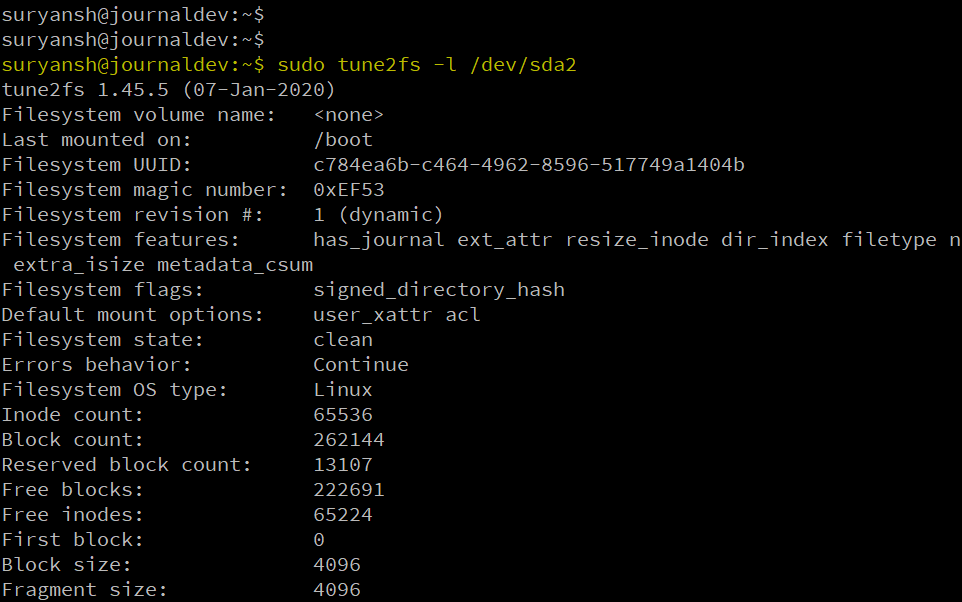
How to list file system parameters using tune2fs?
The -l option is used with the tune2fs command will show the current file system parameters.
Example:
sudo tune2fs -l /dev/sda2
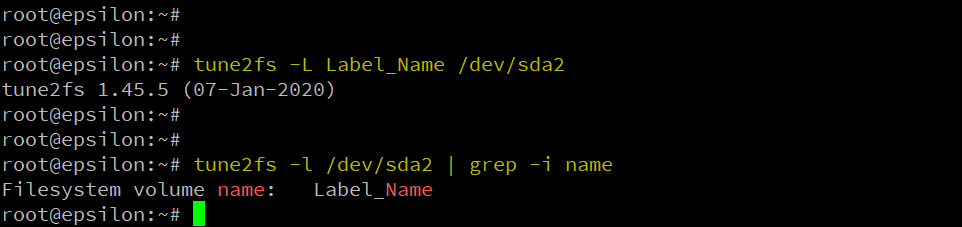
How to set the volume label using tune2fs ?
The -L option is used with the tune2fs command to set the volume label.
Example:
sudo tune2fs -L Label_Name /dev/sda2
You can verify the new volume label by using the -l option with the tune2fs command.
sudo tune2fs -l /dev/sda2 | grep -i name
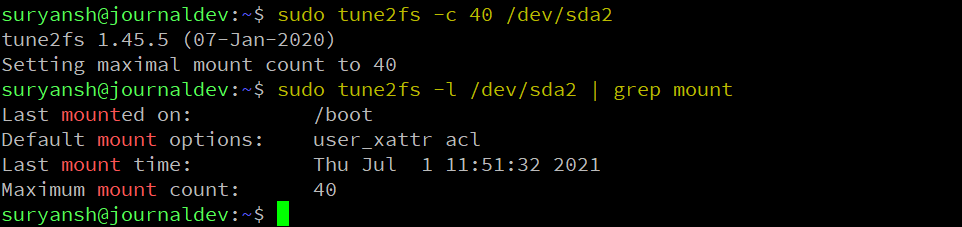
How to set maximum mount count using tune2fs?
The maximum mount count is the number of mounts after which the filesystem should be checked by the e2fsck utility. By default, it is set to -1, if the maximum mount count is 0 or -1 then it will be disregarded by the e2fsck.
To find out maximum mount count and mount count, execute:
sudo tune2fs -l /dev/sda2 | grep -i mount

The -c option is used with tune2fs to set the maximum mount count, after which the filesystem should be checked by the e2fsck utility.
Example:
sudo tune2fs -c 40 /dev/sda2
How to set time intervals between two filesystem checks ?
The -i option with tuneTune2fs Command In Linux2fs is used to set the time interval between two filesystem checks.
Example:
sudo tune2fs -i 3m /dev/sda2
The above command will check the filesystem every three months (m for months, w for weeks, & d for days) on /dev/sda2
You can use both the maximum mount count and the time intervals between two filesystem checks.
Example:
sudo tune2fs -i 3m -c 150 /dev/sda2
How to disable filesystem check on reboot?
To disable filesystem check by e2fsck utility on reboot, set the maximum mount count to -1 or 0.
Execute the following command to disable checking filesystem on the next boot:
sudo tune2fs -c 0 /dev/sda2
sudo tune2fs -i 0 /dev/sda2
How to set mount counts using the tune2fs command ?
The -C option is used with the tune2fs command to override the default number of times the filesystem has been mounted.
Example:
sudo tune2fs -C 37 /dev/sda2
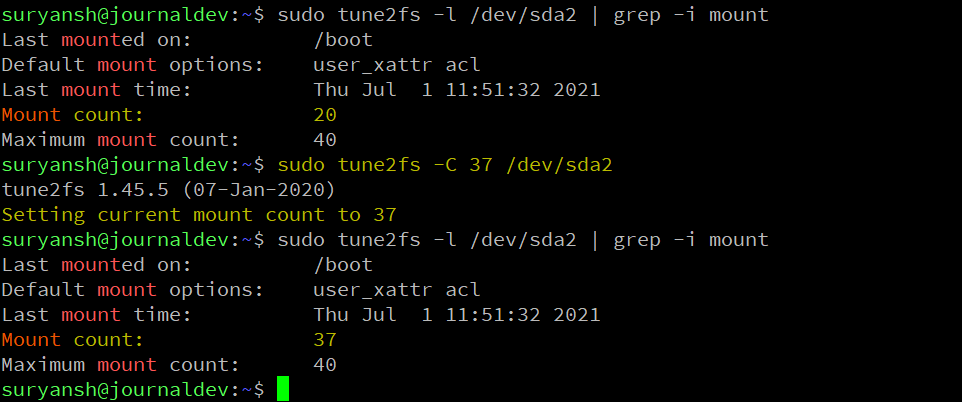
If the mount count is set greater than the maximum mount count, then the filesystem will be checked by the e2fsck utility at the next reboot.
How to adjust tunable filesystem parameters?
The -O option is used with tune2fs to set filesystem features (features separated by a comma) in the indicated filesystem.
Note: Back up your data before using this option as it might corrupt your file system, and you may lose data.
Example:
sudo tune2fs -O uninit_bg,dir_index /dev/sda2
Check the default Block size of your system
This command can also be used to check the default block size of the system, just run the following command and Tune2fs will print a message in your Terminal:
tune2fs -l /dev/sda1 | grep Block
Conclusion
tune2fs is a great system utility for Linux System Administrators to adjust various ext 2/3/4 filesystems parameters. For a more detailed overview of the tune2fs command, you can find its man page.
Thank you for reading!
What is the purpose of using tune2fs -l on an ext4 filesystem in Linux?
The command tune2fs -l is used to display the tunable parameters of an ext4 filesystem, which helps in managing and optimizing its performance and reliability.
Can I safely run tune2fs -l while the ext4 filesystem is mounted?
Yes, you can run tune2fs -l on a mounted ext4 filesystem without causing issues, as it only reads the filesystem parameters without making changes.
What information does tune2fs -l provide about the ext4 filesystem?
The output of tune2fs -l includes details such as the filesystem UUID, reserved space, mount options, and the number of times the filesystem is mounted, among other parameters.
How does reserved space work in ext4 filesystems, and how can tune2fs help?
Reserved space in ext4 filesystems allows users to keep a portion of the filesystem free for root and system processes. Tune2fs can adjust the amount of reserved space using the -m option.
Is it possible to use tune2fs to recover from filesystem corruption?
While tune2fs can adjust parameters to help prevent further issues, it is not a recovery tool. For filesystem corruption, other tools like fsck should be used first to address the corruption directly.
What happens if I run tune2fs while the ext4 filesystem is mounted with journaling enabled?
Running tune2fs on a mounted ext4 filesystem with journalling enabled is generally safe, as it does not write changes to the filesystem. However, modifications to parameters should be executed on unmounted filesystems to avoid potential issues.
Can tune2fs truncate the reserved space in an ext4 filesystem?
Yes, tune2fs can truncate the reserved space by adjusting the reserved blocks percentage, but it should be done with caution to ensure there is still enough free space for system operations.
How can I find the filesystem uuid using tune2fs?
You can find the filesystem UUID by running the command tune2fs -l where is the path to your ext4 filesystem. The UUID will be displayed in the output.
Also Read
Understanding the Netcad command in Linux