

If you have already put in the hours in vimtutor you will soon be looking for an autocomplete feature to use in vim. This is where CoC shines. CoC stands for Conquer of Completion. It is a Language Server Protocol (LSP) client that is used for language-specific autocompletion. With CoC, you can be even faster in text editors like vim, neovim or VScode. But first we’ll need to install a plugin manager in vim. So let’s get going and see how to set up CoC in vim.
Install a plugin manager in Vim
To install any plugins in vim, the user will first need a plugin manager. Since installing plugins manually is a very tedious job, and you will have to copy and paste all of the files manually to very specific directories and subdirectories. There are many plugin managers for vim like vim-plug, pathogen, vundle etc. In this article, we’ll be going through the installation of vim-plug. If you want to check out how to install vundle you can check out this article.
To install vim-plug you will need to visit this link which is the official vim-plug GitHub repo, and copy the plug.vim in a directory named autoload inside your vim configuration folder (which usually resides in the home folder and is name .vim). Next, you will need to create a directory structure for the plugins to be installed correctly in the required location. The directory structure is given below:
.vim
├── autoload
├── backup
├── colors
├── plugged
└── templates
Make sure to keep your plug.vim file inside the autoload directory. Now to install plugins you need to follow a proper format and make some changes to your .vimrc file. Normally, the .vimrc file is located in the home directory. So open up the .vimrc file with your favourite editor (say vim 😉), and go to the end of the file. Now type the following code to install your favourite plugins:
call plug#begin('~/.vim/plugged')
    Plug 'preservim/nerdtree'
    Plug 'jiangmiao/auto-pairs'
call plug#end()
This will keep all of the plugins inside the plugged folder which is in the .vim folder. Now save the file and quit out of vim. Next, launch vim and give the following command:
:PlugInstall
This will install the plugins you have mentioned in the vimrc and take care of everything else. Now when you reload vim (that is close out and open it again), all of your plugins will be in work. Notice that you only need to mention the GitHub username and the repository name in order to install a plugin, this is super useful. For a more detailed info about vim-plug you can check out this article.
Install CoC in vim
Before installing coc, you will need to make sure that you have the necessary dependencies on your system, namely vim 8 and above and node versions 14.14 and above. You will also need yarn to be installed on your system. To check if it is installed or not, give the following command:
yarn --version
And if you do not have yarn installed on your system, you can give the following command to install yarn globally:
npm install --global yarn
Now we need to install CoC in vim for that, simply include the following line in your vimrc and give the command “:PlugInstall”
Plug 'neoclide/coc.nvim'
Now we will not be using only coc.nvim, we will still need a few additional packages, so to do that, insert the following into your vimrc, otherwise you can skip this step:
Plug 'neoclide/coc.nvim'
Plug 'rafi/awesome-vim-colorschemes'
Plug 'ap/vim-css-color'
Plug 'SirVer/ultisnips'
Plug 'honza/vim-snippets'
Plug 'preservim/nerdtree'
Plug 'jiangmiao/auto-pairs'
Plug 'tpope/vim-unimpaired'
Now if you run the PlugInstall command, there will be an error popping up which will say that you need to run yarn install inside the coc.nvim directory. After this finishes up, you can go ahead and do that.
Now in order for coc to work, there are a number of configurations, discussing all of these configurations is beyond the scope of this article however, my preferred .vimrc is given below, feel free to use that!
"CoC Settings
" Use tab for trigger completion with characters ahead and navigate.
" NOTE: Use command ':verbose imap <tab>' to make sure tab is not mapped by
" other plugin before putting this into your config.
inoremap <silent><expr> <TAB>
      \ pumvisible() ? "\<C-n>" :
      \ <SID>check_back_space() ? "\<TAB>" :
      \ coc#refresh()
inoremap <expr><S-TAB> pumvisible() ? "\<C-p>" : "\<C-h>"

function! s:check_back_space() abort
  let col = col('.') - 1
  return !col || getline('.')[col - 1]  =~# '\s'
endfunction

" Make <CR> to accept selected completion item or notify coc.nvim to format
" <C-g>u breaks current undo, please make your own choice.
inoremap <silent><expr> <CR> coc#pum#visible() ? coc#pum#confirm()
                              \: "\<C-g>u\<CR>\<c-r>=coc#on_enter()\<CR>"
"Ultisnips Settings
let g:UltiSnipsExpandTrigger="<tab>"
let g:UltiSnipsJumpForwardTrigger="<c-b>"
let g:UltiSnipsJumpBackwardTrigger="<c-z>"

" If you want :UltiSnipsEdit to split your window.
let g:UltiSnipsEditSplit="vertical"

"coc-snippets Settings
"inoremap <silent><expr> <TAB>
"      \ coc#pum#visible() ? coc#_select_confirm() :
"      \ coc#expandableOrJumpable() ? "\<C-r>=coc#rpc#request('doKeymap', ['snippets-expand-jump',''])\<CR>" :
"      \ CheckBackspace() ? "\<TAB>" :
"      \ coc#refresh()
"
"function! CheckBackspace() abort
"  let col = col('.') - 1
"  return !col || getline('.')[col - 1]  =~# '\s'
"endfunction
"
"let g:coc_snippet_next = '<tab>'
Now that coc is installed, you can go ahead and install some plugins specific for coc to work with. This is where you install all of the language-specific plugins inside coc. To install any plugin, you will be required torun the following command in vim:
:CocInstall <package-name>
I recommend the following packages for front-end development and using the vim-snippets and ultisnips in accordance with coc. By this method you can even customise your snippets!
:CocInstall coc-tsserver coc-eslint coc-json coc-prettier coc-css coc-html coc-snippets
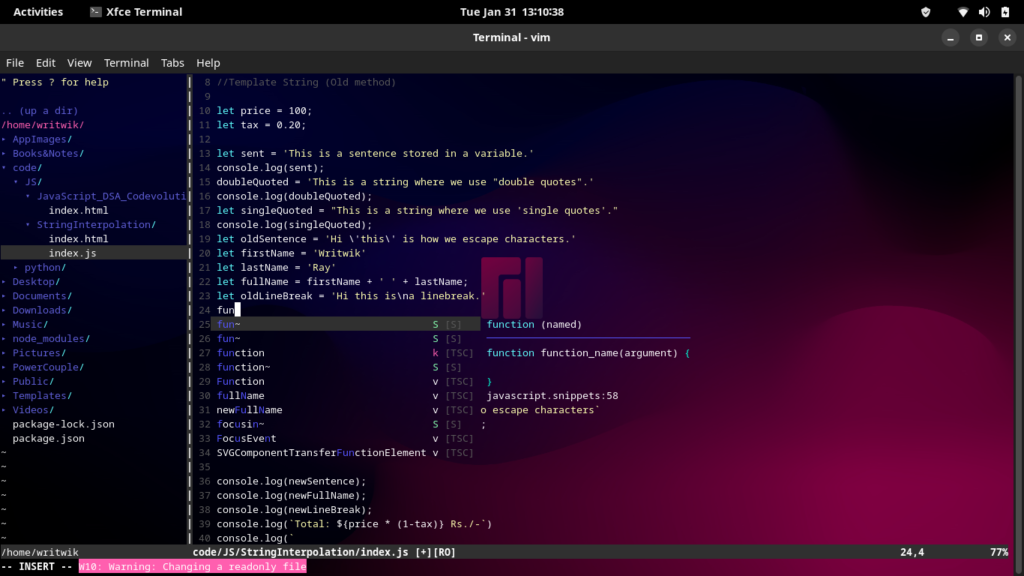
The result of these setting discussed in this article can be viewed in the following picture.
Conclusion
So there you go, readers! You can now easily setup autocompletion for vim and finally ditch the bloated IDEs. Just kidding, you can choose whatever software you see fit. If you are looking for more configuration of the CoC plugin, you can check out this link. And as always, thanks for reading!
What is CoC and how does it support autocompletion in Vim?
CoC, or Conquer of Completion, is a powerful extension for Vim that provides native support for autocompletion. It integrates with various Language Servers to enable intelligent code suggestions and completions, making coding more efficient.
How do I install CoC for Vim?
To install CoC, you can use a Vim plugin manager like vim-plug. Add the following line to your dotfiles: Plug 'neoclide/coc.nvim', {'branch': 'release'}, then run :PlugInstall in Vim.
Can you provide an example of configuring CoC in my Vim setup?
Yes! After installing, create a configuration file coc-settings.json in your Vim configuration directory. A simple example would be: {"suggest.autoTrigger": "always"} to enable automatic suggestions.
What are some common issues users face when setting up CoC?
Some common issues include problems with the installation of Node.js, which is required for CoC to function, or conflicts with other Vim plugins. Ensure that your Node.js is up-to-date and check for compatibility with your other plugins.
How can I customize the autocompletion experience in CoC?
You can customize autocompletion by modifying settings in coc-settings.json. For example, you can adjust the suggest.maxCompleteItemCount to limit the number of suggestions shown.
Is there a way to see documentation for suggested completions in CoC?
Yes! You can view documentation by placing your cursor over a suggestion and pressing gd to go to the definition or K to show the documentation in a floating window.
What should I do if CoC is not working as expected?
If CoC is not functioning properly, first check your Vim version and ensure it supports the features needed by CoC. You can also look at your coc.log for error messages and check online forums for similar issues.
Can CoC support multiple programming languages?
Yes, CoC has excellent support for multiple programming languages through the use of language Servers. You can install additional language servers via CoC commands, allowing you to work with different languages seamlessly.
How do I update CoC and its extensions?
To update CoC, you can run :CocUpdate in Vim, which will check for and install any updates. For extension updates, use :CocInstall followed by the extension name if you want to add new ones.