
In this tutorial, we will learn how to use the lp command in Linux.
In Windows, it’s easy to print the files. By simply using the print shortcut, we can print multiple files. But what about Linux? In Linux, we use lp command to print the files of any mode i.e. landscape or portrait, multiple copies or single copies and so on.
What is the lp command in Linux?
The lp command in Linux stands for ‘Line printer’ which lets you print the files through the terminal. There is no need to change or manage the settings through the GUI. You can simply manage the printers using lp command.
This command is also known as the printer management command Linux. The lp command in Linux is one of the CUPS i.e. Common Unix Printing System.
This allows the system to act as a print server. For more detail, information can check the Ubuntu Official Documentation. the lp command provides options such as:
- -d: to print the file using a particular printer
- -n: print multiple copies of the document
- -q: Set the priority of the printer in the printer queue
- -t: to assign a name to the job
- -o: assigns one or more job
- -i: specifies an existing job to modify
- -m: notifies the recipient when the job is completed.
- -h: denotes the hostname of the server
- -E: forces the encryption while connecting to the server
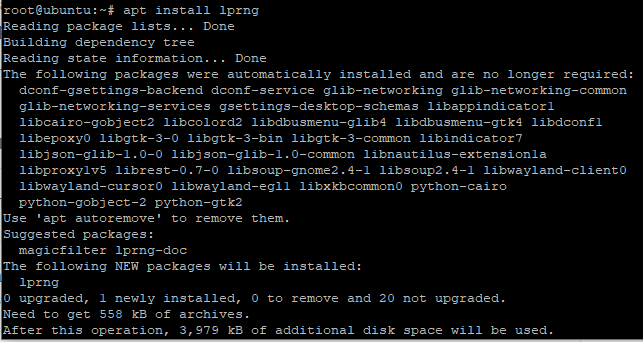
And so on. If you have not installed lp command in the system, use apt install command to do so. Let’s have a look at the command below:
apt install lprng
The syntax of lp command is :
lp [filename]
Let’s discuss some of the common options used with lp command in Linux.
NOTE: Since we’re working with commands that will be different for everyone, we’re using placeholders instead of specifying names of files or printers in the commands below. So make sure that you change the sections enclosed in square brackets in the commands below.
List the number of printers
In windows, we can easily list the list of printers attached to the system by checking the devices. In Linux, we will use lpstat command to do so.
This command will display information regarding jobs and the printers that are connected. It also displays the destination of the default printer used. Let’s have a look at the command below:
lpstat -p -d
The use of -p and -d option is as follows :
- -p: will print the list of all installed printers in the system.
- -d: will print the name of the default printer.
We are using this command to get the name of the default printer so that we can use it in lp command. The output of the following command will be the information of the printers connected to the system. Note the name of the default printer. It would be like this as given below:
scheduler is running
system default destination: PDF
device for Lexmark_Pro700_Series:
usb://Lexmark/Pro700%20Series?serial=90T7099T1914144&interface=1
device for PDF: cups-pdf:/
Lexmark_Pro700_Series accepting requests since Mon 13 April 2020 03:46:06 PM EDT
PDF accepting requests since Mon 13 April 2020 09:51:41 PM EDT
printer Lexmark_Pro700_Series disabled since Mon 12 April 2020 03:46:06 PM EDT -
        Unplugged or turned off
printer PDF is idle
Print the file using default printer
It’s common that at a time only one printer is connected. Therefore, -d option is used to print the file using the default printer. The user has to specify the file name or the path of the file. You can find the name of the default printer
lp -d [Printer_name] [path or filename]
Multiple copies using -n option
Using GUI, it’s easy to set the number of copies required. In Linux, the -n option is used to print the multiple copies of the particular file. The user has to specify the number after -n option in the command. Same as above, use the file name or the path to the file required to be print. Let’s have a look at the command below:
lp -d [Printer_name] -n 5 [Path_of_the_file or filename]
It’s important to mention the name of the printer. “5” denotes that the printer will print 5 copies of the file specified.
Print the file using specific Orientation
You might be aware that there are two types of orientation i.e. Landscape and Portrait. Folks, you can select the orientation of the page as per your choice. “-o” option is used to specify how should the document be printed. It is followed by the name of the orientation mode. Let’s have a look at the command below:
lp -d [Printer_name] -o landscape [File_name or path]
Instead of Landscape, you can also use portrait orientation mode.
Set the paper size using -o option
The -o options offer many features. The user can set the size of the paper using -o option. The default size of the paper is A4. But if you print the document in another size i.e. A3 or A5, the user has to mention the size in the command. Commonly, there are 3 sizes of printer supports A4, letter and legal. Use the “media” attribute to specify the size of the document. Let’s have a look at the command below:
lp -d [Printer_name] -o media=legal/A4/letter [File_name or path]
Don’t mention all the names. Use one size that you need the print out to be in.
One-side or Two-side printing with the lp command in Linux
The lp command in Linux also lets us specify printing on one-side and double-sides. Use the “sides” attribute to specify the double-sided printing or single-sided printing as the value. To do so, type the following in the terminal:
lp -d [Printer_name] -o media=legal/A3/letter -o sides=two-sided-long-edge [File_name or path]
The “sides” have two values mainly two-sided-long-edge used with the portrait mode while two-sided-short-edge used with the landscape mode.
The lp command in Linux to Scale the document
The users want the document to be fit into the page after printing. The lp command in Linux provides such a feature. Use -o option followed by the “fit-to-page” as the value in the command. This is called the scaling of the page. To do so, type the following in the terminal:
lp -d [Printer_name] -o media letter -o fit-to-page [File_name or path]
Printing multiple files at a time
Earlier, we specified to print the multiple copies of the particular file but here we will specify how to print multiple files at a time. The user has to mention the name of the files required to be printed. Use -d option to specify the default printer. Let’s have a look at the command given below:
lp -d [Printer_name] [file_name1][file_name2][file_name3]
The files will be printed simultaneously.
Print documents with the border
The lp command in Linux provides an option to specify the border of the page. Use -o page-border=value with lp command. The value of the page-border can be single, double, single-thick, or double-thick. Let’s have a look at the command below:
lp -d [Printer_name] -o page-border=single [filename]
The value can be changed according to the user.
Set the priority of the document
Yes! you can set the priority of the file wherever it is in the queue, the printer has to print that document first. This is helpful when there are printers shared in an office. Use -q option to set the priority of the document. Here, the user needs to set the value of -q i.e. between 1 (lowest priority) to 100 (highest priority). The default value of -q is 50. Let’s have a look at the command below:
lp -d [Printer_name] -q 75 [filename]
Set the name of the print job
It’s quite easy to understand if we assign a name to the job. The lp command in Linux provides an option to assign the name to the print job using -t option. The name assigned should be in double quotations. Therefore, it’s easy to identify which document is printed through its job name. Let’s have a look at the command below:
lp -d [Printer_name] -t "Important document" [filename or path]
Status of the printers
Earlier, we used lpstat command to get the list of the installed printers. Here, if you want to use display the status of the currently installed printers, use lpc status to do so. The user can use this command to display the names of the printers that are connected to the system. Let’s have a look at the command below:
lpc status
Conclusion
We have discussed all the related options to lp command. I hope that you understood the concept. If face any issues, do let us know in the comment section. Feel free to give feedback.