
An AppImage arrives as a single file, and it runs without touching your package manager. Marking it executable and starting it takes three commands.
Everything a normal install does for you stays your job, which is why a fresh AppImage so often needs a missing system library, a mount helper, or a menu entry added by hand before it behaves like an installed application.
What an AppImage is, and what it will not do for you
An AppImage is two parts glued into one file: a small runtime that mounts what follows it, and a SquashFS image holding the application. Running that file mounts the image read-only through Filesystem in Userspace (FUSE) rather than unpacking anything into your system directories.
Nothing lands in /usr, and no package database records that the application exists.
The design buys portability, because the application carries the libraries that differ between distributions. What it does not buy is dependency resolution.
A deb or a Flatpak tells the package manager which packages to fetch. An AppImage ships its own copies and expects the base system to supply the rest, which is why one file starts cleanly and the next one asks for a library your distribution never installed.
Projects publish these files on their own download pages, and the AppImage project keeps a catalogue of the applications that do. That is a different distribution model from a repository, and the difference shows up when a library is missing.
| Format | Where the files live | Dependencies | Updates |
|---|---|---|---|
| AppImage | one file wherever you put it | bundled, apart from the system graphics and core libraries | only when the builder embedded update information |
| deb package | /usr, recorded in the package database | resolved from the repositories | apt, when you choose to run it |
| Flatpak | a user or system install under a shared runtime | taken from the Flatpak runtime | flatpak update or a store refresh |
| Snap | a squashfs image managed by snapd | taken from the snap’s own base | automatic by default |
If your habits come from the repository side of Linux, the closest siblings to this workflow are installing an RPM package on Ubuntu and running a downloaded bin file. Both are exercises in getting software into place without the package manager.
What you need before the first AppImage
AppImages ask very little of a system, so the preparation is short. The architecture of the file you download and the availability of FUSE decide whether the application starts at all.
- A 64-bit desktop distribution. Vendors publish one file per CPU family, and desktop is the target platform.
- The asset that matches your machine, which uname -m answers in one word.
- Write access to your home directory, where the file and its menu entry will live.
- FUSE, which current desktop systems already have, and an extraction fallback for the systems that do not.
uname -m
The answer is x86_64 on Intel and AMD machines and aarch64 on 64-bit ARM. That single word decides which download link you take, and it is the difference between an application that starts and one the kernel refuses to execute.
Run your first AppImage
This walkthrough uses Audacity 4.0.0, released on 3 September 2026, because it is a large desktop application whose distribution package trails the upstream release. The commands are the same for any other AppImage.
Download the file and its checksums
mkdir -p ~/AppImages && cd ~/AppImages
curl -LO https://github.com/audacity/audacity/releases/download/Audacity-4.0.0/audacity-linux-4.0.0-aarch64.AppImage
curl -LO https://github.com/audacity/audacity/releases/download/Audacity-4.0.0/CHECKSUMS.txt
Swap aarch64 for x86_64 in the file name if uname -m reported x86_64. Audacity publishes the checksum table beside the downloads, which is the copy worth comparing against.
Verify the bytes before you run them
That checksum table is a three-column listing rather than the two-column format sha256sum reads, so put the expected line into a file first.
grep aarch64 CHECKSUMS.txt | awk '{print $3"  audacity-linux-4.0.0-aarch64.AppImage"}' > audacity.sha256
sha256sum -c audacity.sha256

The file I checked for this walkthrough printed OK, meaning the bytes on disk match the bytes the project published. A FAILED line means the download was truncated or altered, so delete the file and fetch it again.
A checksum proves the file arrived intact, and it says nothing about who built it. The format also reserves a section for a vendor signature, and the build I tested leaves that section empty, so the published checksum is the strongest check available on this one.
Make it executable and start it
mv audacity-linux-4.0.0-aarch64.AppImage audacity.AppImage
chmod +x audacity.AppImage
./audacity.AppImage --version
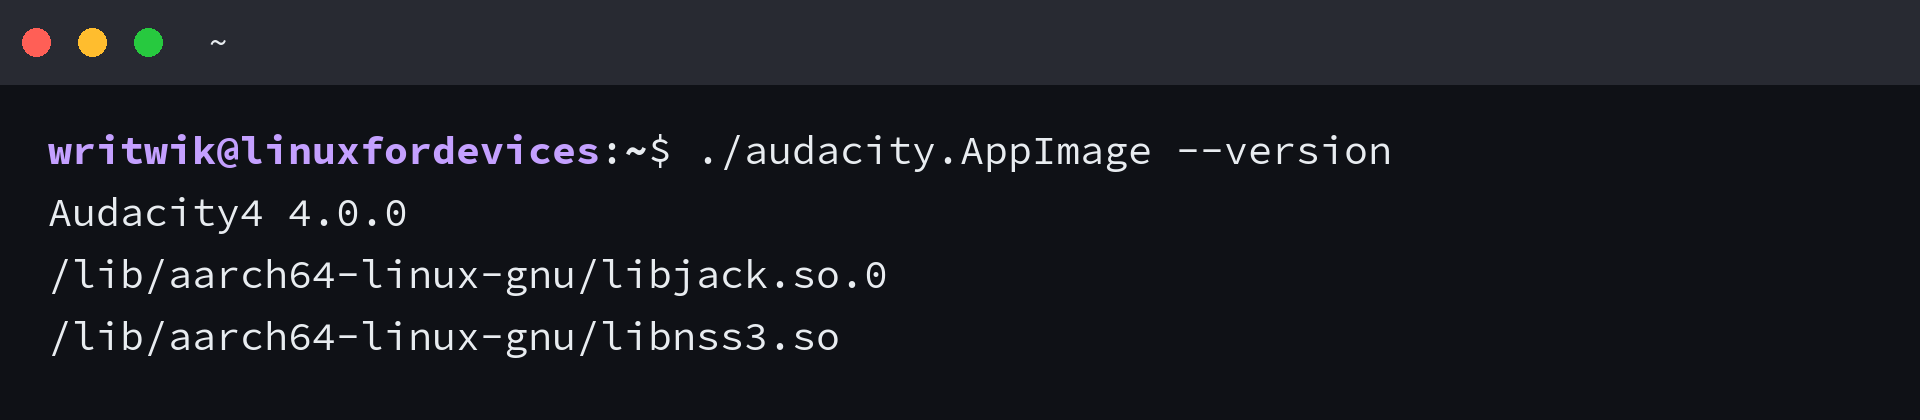
The wrapper prints the system libraries it resolved before the application’s own output, so the version line is the last one. In a file manager the same file opens on a double click once the execute bit is set, and each file manager labels that checkbox differently: Allow executing file as program in Nautilus, Nemo and Caja, Is executable in Dolphin, and Execute set to Anyone in PCManFM.
Rename the file before you point a menu entry at it, because the vendor’s file names are long and the entry stores an exact path.
Put the AppImage in your application menu
Desktop integration is what makes an AppImage feel like an installed application. The bundle I extracted already carries the pieces a menu entry needs: a desktop file, icons at several sizes and an AppRun launcher.
Take the icon out of the bundle
Extraction writes a directory named squashfs-root, and a quoted path argument narrows it to the files you want.
./audacity.AppImage --appimage-extract 'share/icons/hicolor/512x512/apps/*'
cp squashfs-root/share/icons/hicolor/512x512/apps/audacity4portable.png ~/AppImages/audacity.png
The same icon ships at smaller sizes for menus that render at 16 or 32 pixels. The 512 pixel copy is the one that stays sharp when a launcher scales it up.
Write the desktop entry by hand
The desktop entry specification expects one file per application, named after the application, in the applications directory inside your home folder.
cat > ~/.local/share/applications/audacity.desktop <<'EOF'
[Desktop Entry]
Type=Application
Name=Audacity
Exec=/home/writwik/AppImages/audacity.AppImage %U
Icon=/home/writwik/AppImages/audacity.png
Terminal=false
Categories=AudioVideo;Audio;
EOF
| Key | What it does |
|---|---|
| Type and Name | required by the specification, and the name is what the menu shows |
| Exec | the absolute path to the file, because desktop entries do not expand a tilde |
| Icon | the PNG you copied from the bundle |
| Categories | the section of the menu the entry lands in |
| %U in the Exec line | passes files the application can open, which is what a right-click Open With entry needs |
Validate the entry and refresh the menu
cd ~/.local/share/applications
desktop-file-validate audacity.desktop && echo OK
update-desktop-database

The validator stays silent on a well-formed file, which is why the echo carries the result. Current desktops pick the entry up without a re-login, and older ones find it after the next session start.
AppImage Pool and Gear Lever automate this whole section. AppImage Pool is a desktop application for managing AppImages, and Gear Lever integrates a file in one click. The mechanics underneath both are the same as creating desktop shortcuts from the terminal.
Update an AppImage in place
An AppImage carries no upgrade path of its own, so whether an updater can do anything depends on a piece of metadata the person who built the file decided to include.
That metadata sits in a section of the runtime named .upd_info. When the section is empty there is nothing to read, and the build I tested for this walkthrough is one of those.
readelf -p .upd_info audacity.AppImage
The command answers with No strings found in this section, and appimageupdatetool says the same thing in its own words.
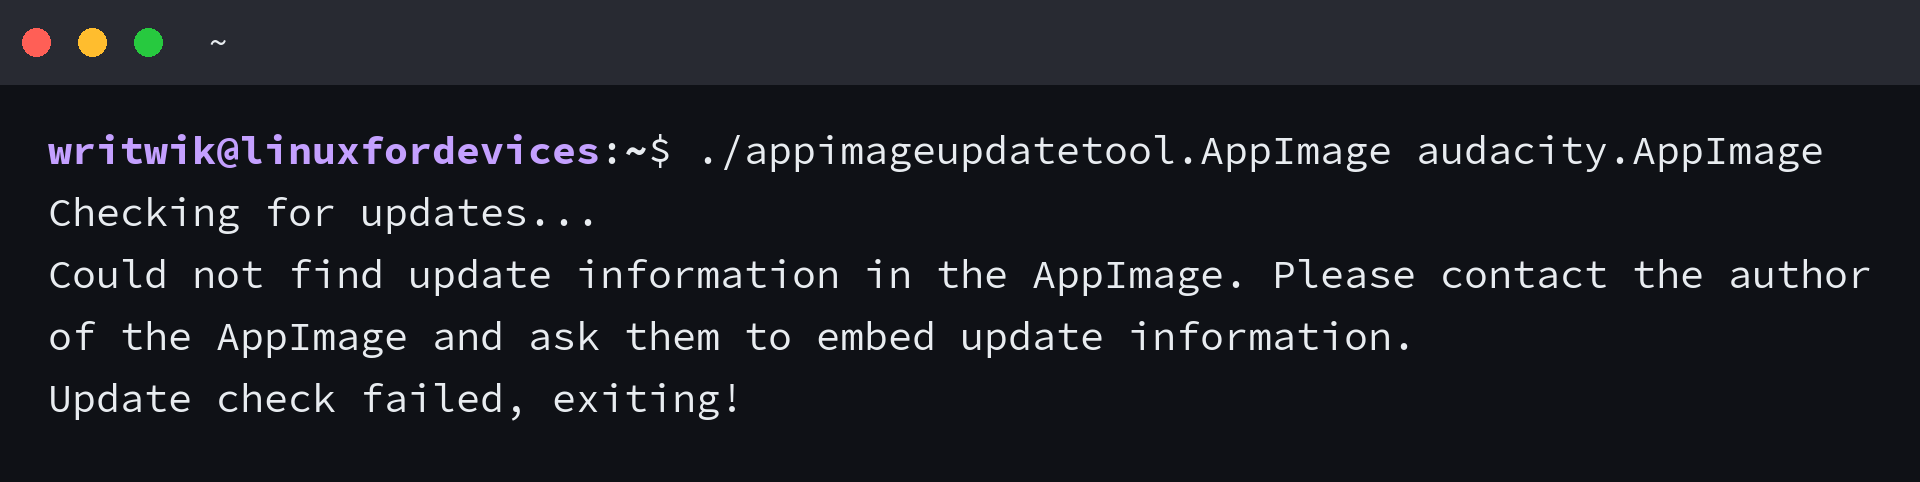
When a builder does embed update information, the section holds a zsync or a GitHub releases URL and the updater can fetch only the changed blocks instead of the whole file. Without it, the update is a fresh download.
mv ~/Downloads/audacity-linux-<new-version>-aarch64.AppImage ~/AppImages/audacity.AppImage
Verify the new file against the vendor’s checksums and keep the same name on disk, then the desktop entry you wrote earlier continues to work without an edit.
Projects that ship the same application through several channels are worth comparing on this point, and the ways to install Kdenlive show one app offered as an AppImage, a Flatpak and a Snap at the same time.
Remove an AppImage without leaving anything behind
Nothing about removing an AppImage needs care, because no package database entry exists and no dependency tree has to unwind. The package manager has nothing to clean up either.
rm ~/AppImages/audacity.AppImage ~/AppImages/audacity.png
rm ~/.local/share/applications/audacity.desktop
update-desktop-database ~/.local/share/applications
dpkg -S /home/writwik/AppImages/audacity.AppImage
The last command answers that no path was registered, which is the confirmation that nothing else needs undoing. I removed both items on the machine used for this walkthrough and the package database reported nothing to clean up.
Settings the application wrote to your home directory stay behind. They are harmless leftovers, and a re-download picks them up again.
- The AppImage file is gone from the directory you kept it in.
- Its desktop file is gone from the applications directory.
- The launcher no longer lists the application after a menu refresh.
The contrast is a package removal, where uninstalling a package with apt has to consider dependencies the package manager installed on your behalf.
When an AppImage will not start
Startup failures arrive in three shapes, and no two of them have the same fix. The first pair look alike on screen and are nothing alike underneath.
The runtime says the file needs FUSE
Older AppImage runtimes load the version 2 FUSE library at run time. Distributions that moved to FUSE 3 stopped shipping that library, so the runtime gives up with this message.
dlopen(): error loading libfuse.so.2
AppImages require FUSE to run.
You might still be able to extract the contents of this AppImage
if you run it with the --appimage-extract option.
Install the FUSE 2 library under whatever name your distribution gives it. Ubuntu 24.04 and later call it libfuse2t64, Ubuntu 22.04 and Debian call it libfuse2, Arch calls it fuse2, and Fedora wants both fuse and fuse-libs.
sudo apt install libfuse2t64
Without root access, extract and run the application instead, which skips the mount.
./audacity.AppImage --appimage-extract-and-run
APPIMAGE_EXTRACT_AND_RUN=1 ./audacity.AppImage
Current builds need this less often. The runtime in the file I used mounted on a machine with only FUSE 3 installed, because recent type 2 runtimes carry their own copy of the FUSE library and look for a fusermount helper on the path instead.
The loader reports a missing shared library
A bundle carries the application’s own libraries, and the graphics stack is not part of the bundle. When one of those system libraries is absent, the loader stops the process.
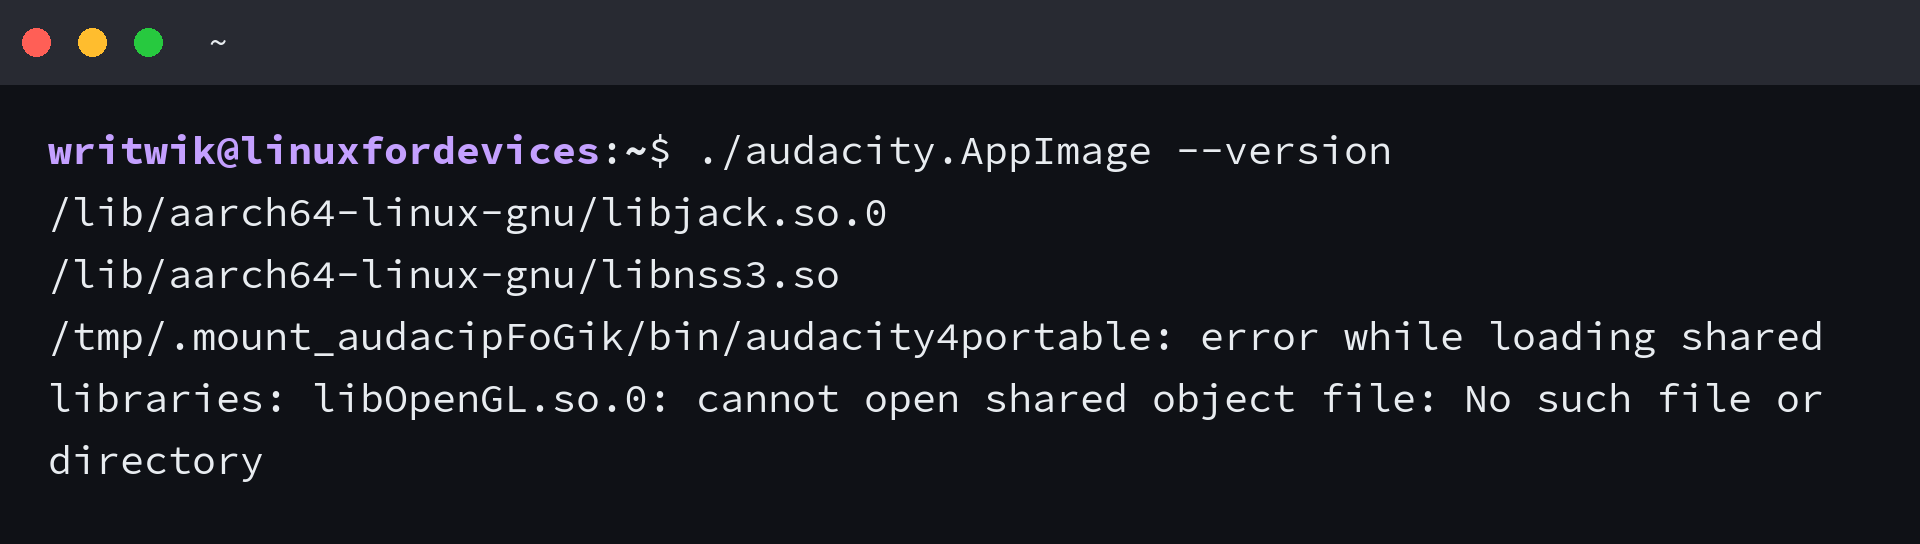
The error names the library, and dpkg -S names the package that provides it. On a Debian or Ubuntu system, the two commands below turn that message into an install.
dpkg -S libOpenGL.so.0
sudo apt install libopengl0
The build in this walkthrough printed its version line as soon as libopengl0 was installed, so I know the absent library was the whole failure and not a symptom of something larger.
The file will not run at all
These failures happen before the application starts, which makes them the fastest ones to identify from a terminal.
| What you see | What it means | What to do |
|---|---|---|
| Exec format error | the file is built for a different CPU family | download the asset that matches uname -m |
| Permission denied | the execute bit is missing | chmod +x on the file |
| Nothing at all, or a window that closes at once | the bundle started and the application inside it failed | run it from a terminal and read the last line it prints |
An execute bit that never got set produces the second row of that table too. The package commands above are worth looking up if they are new to you.
When an AppImage is the wrong choice
The format optimises for shipping, and whoever builds a file decides what travels inside it. That trade puts the download on the project’s own page instead of in a repository, and it leaves maintenance with the person running the application.
Choose the opposite trade when you want somebody else to keep the software current. A deb resolves dependencies from the repositories, a Flatpak sandboxes the application and updates it centrally, and a Snap updates itself without being asked.
I check for update information before trusting an AppImage with work, and a single command tells you which side of that line a particular file sits on.
readelf -p .upd_info your.AppImage
A section containing a zsync or a GitHub releases URL means an updater can keep the file current. No strings found means you are the updater, and the project’s release page is where you watch for the next version.
If that answer is the wrong one for the job, setting up Flatpaks on Linux and how snaps work cover the two formats that maintain themselves, and managing Flatpak permissions with Flatseal is the next step once a sandbox is in play.
Frequently asked questions
Do I need sudo to run an AppImage?
No. The file runs as your user, and it writes nothing outside your home directory unless the application asks for more.
Where should I keep AppImages?
Any directory in your home folder works, and one folder of their own keeps them together. Keep the file name stable, because the desktop entry stores the exact path.
Is an AppImage portable?
The file is self-contained, and the application inside it still writes settings to your home directory. Portable mode is something the builder has to implement, not something the format gives you.
Which file do I download on a 64-bit machine?
The one that matches uname -m, which is x86_64 on Intel and AMD hardware and aarch64 on 64-bit ARM. A file built for the other architecture fails with an Exec format error.
Does an AppImage update itself?
Only when the builder embedded update information in the file. When that section is empty, the update is a fresh download that you verify and move over the old file.
Can I run an AppImage without FUSE?
Yes. The –appimage-extract-and-run option extracts the application, starts it, and cleans up when it exits, which skips the mount entirely.