

Archbang is a Linux distro heavily based on the famous Arch Linux. It is one of the oldest distros based on Arch Linux. It promises to provide an easier installation experience compared to its infamous parent distro which is one of the hardest to install for a Linux newbie.
Many consider Arch Linux as the best Linux distro available as it provides the ‘authentic’ Linux computing experience. It is also the highest-rated distro on DistroWatch.com as of now. Similarly, Archbang also lives up to the expectations and also boasts a fantastic rating of 9.22/10 right now.
Which desktop environment does Archbang use?
Archbang uses the i3 desktop environment. Archbang has always been using the Openbox window manager until recently when they switched to i3.
The goal of i3 is to create an environment which works well with a multi-monitor setup and provides unparalleled customization capabilities.
Prerequisites for installation
To download and install Archbang, some of the prerequisites are:
- Installation media: Such as a bootable USB drive or a disk burnt with Archbang ISO
- Stable internet connection: Not necessary ultimately, but it is recommended if you want to install updates after the OS installation.
Downloading Archbang
To download Archbang, you need to visit its official site: archbang.org
While the website doesn’t look as appealing as Ubuntu or Elementary OS sites, we assume that if you are willing to use an Arch-based OS, you are here for functionality and not looks. Head over to the ‘links‘ page and click on ‘ArchBang ISO images‘ which will take you to the Sourceforge link to download the ISO file.
Installing Archbang
Installing Archbang is simple, you don’t have to go through the command line interface as seen in Arch Linux. Follow the steps below to install Archbang on your system:
1. Boot up (or reboot) your system while you have your installation media inserted into your PC and open the boot menu (The key which you have to press to access the boot menu depends on your motherboard/laptop brand. Usually, it is either ESC, F2, F10, or F12)
2. Select your installation media among the list of drives in the boot menu
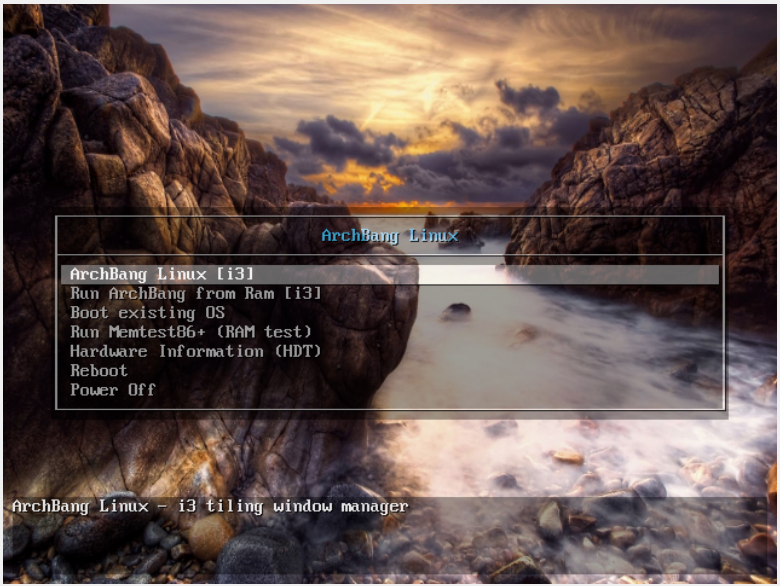
3. If you see the following screen, you have successfully booted into the Archbang installation media and can proceed with the installation now
4. Shortly after loading some files, the system will boot up the live OS and you will see the Archbang desktop. Now you have to press Super + I (Super key is synonymous with Windows key) as instructed on the ‘KEYBOARD SHORTCUTS’ side panel.
5. If you want to change the partition configuration, you can go ahead and enter 1 or you can press 2 to get straight ahead into the installation
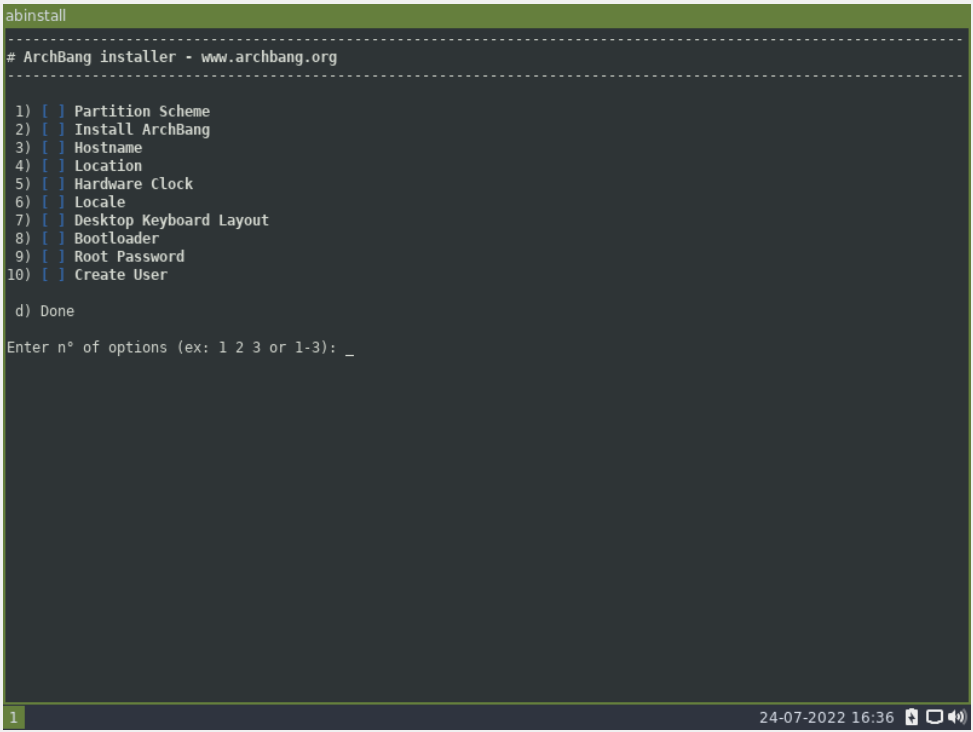
6. Set up the hostname after the installation is complete. Similarly, set up the hostname, location, and hardware clock.

7. While selecting locale, select en_US if you wish to choose US English. If you are not sure about which language code to choose, go to this page for reference

8. Now, you need to select the keyboard layout (you can again refer to the above-mentioned page for the layout codes)
9. For the bootloader, we recommend Grub2
10. Now after setting the password and finally creating the user, you can reboot and you will be greeted with the desktop.
Summary
Alright, we admit that installing Archbang wasn’t as trivial as something like Ubuntu or Linux Mint, but when we said it was easy, we were honestly telling you that the process is straightforward and follows a linear flow. After the removal of the Zen installer from Archbang, we have no choice but to use the terminal here. We hope that this guide was able to help you get acquainted with the installation process smoothly.