
Arch Linux is one of the most popular, if not the most popular GNU Linux distro. Arch was first released back in 2006 by Judd Vinet and if we take a look at distrowatch we can see that this distribution uses a rolling release cycle is rated 60 (180 hits per day) on the popularity count.
But it is notoriously hard to manually install this distribution onto your main machine, seeing this few Linux enthusiasts have put forward a guided arch linux installer script called archinstall, and using this script instead of the manual method, it’s a breeze to install Arch! So let’s not waste any more time and move forward to the installation guide!
Downloading and Booting the Arch ISO
To install Arch using the archinstall script, first download and boot the Arch ISO. Then, run the archinstall script with the commands ‘sudo pacman -Syy’, ‘sudo pacman -S archinstall’, and ‘archinstall’.
Follow the prompts to configure settings such as language, keyboard layout, disk partition, filesystem, bootloader, swap, hostname, accounts, desktop environment, audio, additional packages, and network configuration. Once all settings are confirmed, proceed with the installation process.-
After installation, reboot the system and log in with the created user account.
First visit this link and install the Arch Linux ISO. Now you will also need an 8GB or higher capacity Flash Drive, connect it to your computer and make sure it is empty. Now you can use Rufus or Balena Etcher to create the bootable Flash Drive.
Once created, plug in the Flash drive to the computer you want to install arch on, boot up the machine and look for boot from Installation Media or the name of the Flash Drive. You can see it will boot into the Flash Drive and there, you will be greeted with the shell.
Ensure your computer has a stable internet connection before proceeding to the next step.

Using Archinstall Script to Install Arch Linux
Now give the following command to install and run the latest version of the archinstall script.
sudo pacman -Syy
sudo pacman -S archinstall
archinstall
Now, after you launch the script, the first option is going to be the language settings. By default, it is set to en-us, which is fine for our purposes, and we’ll leave it at that.
Next, we have the keyboard layout and the Mirror region, both of which we will also leave as is. Now you can choose your own locale language for us, we’ll choose English USA. Now go to the drive menu and select it.
It will show you all the drives that are connected to your computer, and you will have to choose your drive carefully. Be cautious when selecting the drive, as any data on the chosen drive will be wiped and may be difficult to recover. You can also manually partition the drive, although be careful otherwise it may cause data loss.
Now select the Disk Layout option and then choose the second option, which is to wipe the disk and use a best-effort default partition layout. Next we’ll go with an ext4 filesystem. Additionally, you can also choose a disk encryption and set up a password for that.
Next, leave the bootloader settings as is and move on to the Swap settings. You can choose to have swap enabled or disabled, we’ll go with the default. Now choose a hostname for your archlinux machine. Then set up a root password and keep a note of this password as it will be very important.
Now, create a new user, and you can then choose to give the user root privileges. It is recommended to keep one user as non-root and one another user as a root user.
You can now move on to the Profile settings, where you can choose some pre-defined settings for the desktop environment. You have many choices here. We went with the GNOME desktop. Also choose the graphic drivers in this step.
Next, you can choose the audio tab and choose the pipewire or Pulseaudio package. Now under additional packages you can list out the packages you want on your system, for us, it would be: neofetch, vim, Firefox.
Then, under Network configuration, choose Network Manager. Finally set your timezone and you’ll be done.
Completing the Arch Linux Installation
Now check through all the setting and see if you have missed out on anything, once confirmed go ahead and hit the Install option. Next you will be prompted to press Enter to continue, do that and wait for the installation to finish.
Now a popup might appear about chroot, ignore it for now and choose no. Next, reboot the system and log in with the user you have created. And that’s how you install Arch in just 5-8mins in your main machine!
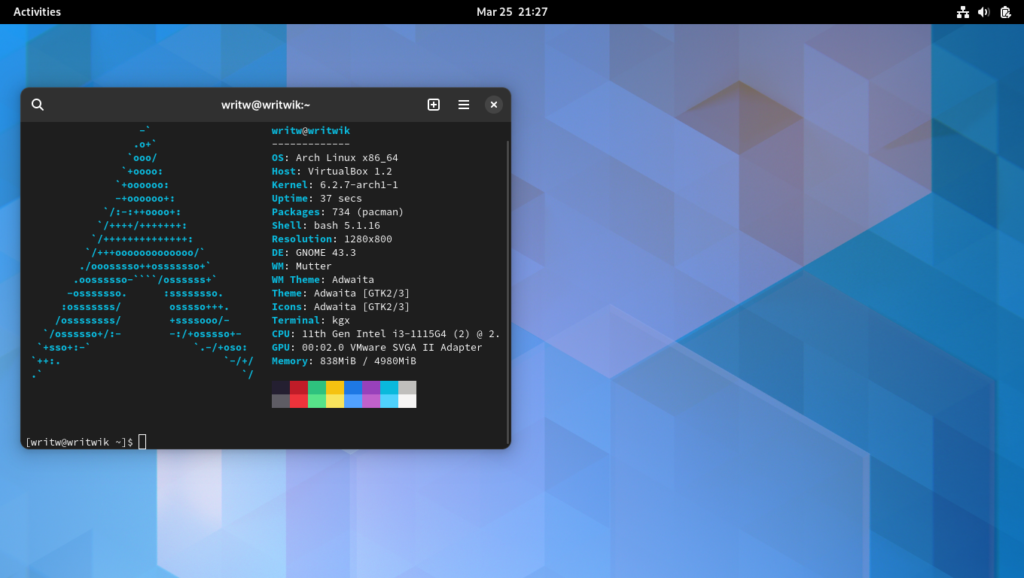
Now, the installation is complete!
Conclusion
So there you go guys! The script made the installation of Arch way simpler than the other methods. For more such tutorials, be sure to follow LinuxForDevices! Check out this article if you are finished with the Arch Linux installation and move on to the terminal for further configuration.
References
ArchWiki on the ArchInstall script
FAQs
What is Archinstall and how does it help with Arch Linux installation?
Archinstall is an official installer for Arch Linux that simplifies the installation process by providing a guided setup. It allows users to perform the installation in a more user-friendly manner, making it easier for those who may not be familiar with the traditional command-line installation.
Where can I find the official documentation for Archinstall?
You can find the official documentation for Archinstall on the Arch Linux Wiki. This guide includes detailed instructions and information on how to use Archinstall effectively, including troubleshooting tips and common use cases.
Does Archinstall support both UEFI and BIOS systems?
Yes, Archinstall supports both UEFI and BIOS systems. The installation process will adapt based on the system’s firmware type, ensuring a smooth installation regardless of the underlying configuration.
What are the minimum requirements to use Archinstall?
To use Archinstall, you need a system that meets the minimum requirements for running Arch Linux, which typically includes an Intel or AMD processor, at least 512 MB of RAM, and a minimum of 2 GB of disk space for the base installation.
Can I customize my installation process with Archinstall?
Yes, Archinstall allows for customization during the installation process. You can select packages, configure partitions, and set up user accounts according to your preferences, making it a flexible option for users.
Is there a way to see the installation progress while using Archinstall?
Yes, during the installation process, Archinstall provides feedback and updates in the terminal, allowing you to see the progress of the installation and any actions being performed.
How can I recover from a failed installation with Archinstall?
If the installation fails, you can review the logs generated during the process for any errors. The documentation provides guidance on common issues and how to troubleshoot them. Additionally, you can always restart the installation process if needed.
Are there community resources available for support while using Archinstall?
Yes, there is a vibrant community around Arch Linux that offers support through forums, chat rooms, and documentation. You can always reach out to the community for help with specific questions or issues you encounter during the installation process.
What does the term “library” refer to in the context of Archinstall?
In the context of Archinstall, “library” refers to the collection of software packages and tools that are available to be installed. This library includes essential packages for performing tasks, like networking and system configuration, that enhance the overall installation experience.
How much time does it typically take to complete an installation using Archinstall?
The time it takes to complete an installation using Archinstall can vary based on your hardware and the choices you make during the process. Generally, it can take anywhere from 15 minutes to an hour, depending on factors like downloading packages and configuring the system.