

Linux users love automation, and the OS also provides a lot of opportunities to automate tasks easily. The bind command is a keyboard short that you can create to run specific macros or commands quickly without having to type them out. Let’s go over the bind command and understand the use here.
What’s the bind command?
The bind command in Linux is a built-in command which comes with the Bash shell. This command is used to assign functions and macros to a key or a sequence of keys. Thus, this command allows us to create hotkeys instead of having to type in the entire command/function/macro name every time you need to use one. All Linux based functions come with various preset key bindings. The bind command can essentially be used to create, modify, and remove key bindings through a bash shell.
Basic Syntax of the command
The best way to understand any command is through understanding it’s syntax. Here is how the syntax for the bind command in Linux looks like.
bind [-lpsvPSV] [-m keymap] [-f filename] [-q name] [-u name] [-r keyseq] [-x keyseq:shell-command]
This might seem overwhelming, but really it’s not. The command by itself is really simple to use and you can create macros in just one line. We’ll see that later, but for now let’s see what some of the options mentioned here mean.
| Option | Effect |
| -l | Lists the names of all the functions available for key binding. |
| -s / -S | Lists all the key sequences which are assigned to invoke macros along with their values. Using -S gives this output in a format that can then be used as an input for the bind command. |
| -p / -P | List the names of all the functions available for binding along with any key that the function might be bound to. Using -P gives this output in a format which can then be used as an input for the bind command. |
| -v / -V | List all the variables, along with their values, which are used as key bindings. Using -V gives this output in a format that can then be used as an input for the bind command. |
This list covered the basics of the bind command but if you wish to know more about it, feel free to explore the man pages using the man command or using the web man page. Moving on to the second parameter. We use -m keymap, as the name suggests, to define the key mapping scheme of our keyboard. The two most popular ones are as follows.
- emacs: This is the default emacs style key mapping.
- vi: This is the keymapping based on the vi text editor for Linux.
There are variations of these two key mapping schemes which might be worth checking out for you.
- Our next parameter, -f is used to read key binding configurations from a file.
- If you wish to check if a function is already bound to a key, we use the -q tag followed by a function name.
- You can remove all the key binding configurations for a function by using the -u prefix tag.
- When you wish to remove the function bound to a key sequence, you use the -r tag followed by the key sequence.
- Likewise, to bind a key sequence with a bash command, you use the -x tag followed by the key sequence and the command. These should be separated by a single colon sign.
Using The bind Command in Linux
Now we have developed an understanding of the bind command in Linux along with its parameters. Now it’s time to use this knowledge for practical application of the bind command. For this tutorial, we will go over some examples to learn how to use the bind command.
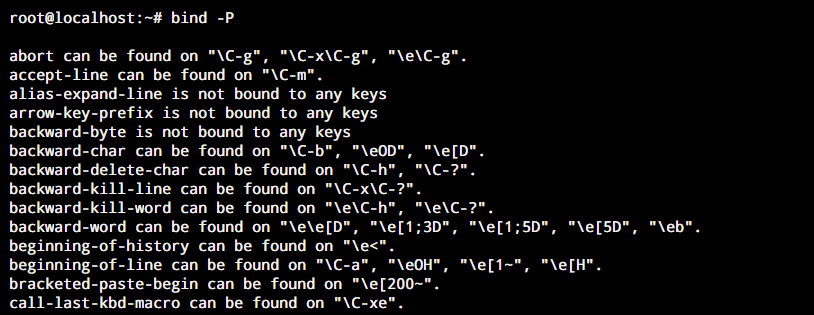
1. Listing all the keybindings and available variables
Now you may not remember all the keybindings that are available in the system so the bind command keeps track of those here. You can simply run the command below to get a list of all the keybindings.
bind -P
2. Creating a new Key bind
Creating custom key bindings is an important feature of the bind command in Linux. With the help of these, we can call any function without using its full name or execute our macros with a single key. Let’s assign the key Ctrl+u to print ‘hello’ on the screen.
bind '"\C-u":"Hello!"'
As you can see, Ctrl is represented by \C- in the above command. We can see this working in the screenshot below.

3. Listing All Custom Key bindings
Now if you don’t see your modified or custom created keybinding in the list above, it’s okay. This is a feature, not a bug. Most of your custom keybindings will be created with the default option -x even though we really don’t use any option apart from the key sequence and the command(as we’ve seen above).
So for key bindings created with the -x option, you need to run the follow command to view the binding.
bind -X

3. Removing an Existing Keybind
Sometimes you notice a key binding which you don’t wish to use accidentally. Or you may wish to use a particular key binding for a separate command. For this, you can utilise the -r option of the bind command to remove the earlier function for a key sequence. Let’s demonstrate it by removing the key binding we just created. This can be done using the following command.
bind -r "\C-u"

Now, the key sequence Ctrl+u is unbounded. This can be used for some other command or left alone.
5. Reading Key bindings from a File
If you have a bunch of keybindings exported from some other system, here’s how you can import them. For starters the format of the file should be exactly the way you declare the bindings, except the bind command itself.
#key bindings file format
\<key sequence>:"<command or command sequence>"

#command to read the keybindings file
bind -f <filename>
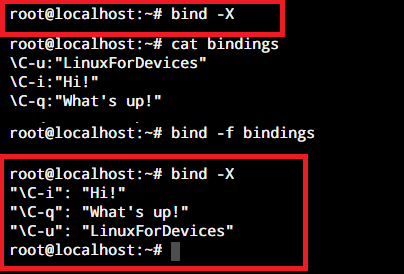
As you can see the bindings that I have used in the file, are now available for use in the system. I’ve used the cat command here to display the contents of the file.
Wrapping up
The bind command in Linux is a helpful tool for any Linux user who wishes to optimize their workload. This is especially useful if you work with a lot of functions and macros on a regular basis.
With this tutorial, we hope you were able to understand the bind command in Linux and learn its usage. If you have any suggestions, feedback, or queries, please leave them down in the comment section below.