

In this tutorial, we will discuss how to install MongoDB on CentOS 7.
There are lots of things that come under the umbrella of MongoDB. MongoDB is simply a Database. It’s not an RDBMS(Relational Database Management System). It’s a NoSQL database where the data is stored in a different format than the traditional row and column format.
Some of its features:
- JSON format: it stores the data in a flexible format that’s similar to JSON.
- Mapping of data: In NoSQL, everything is stored in a mapping of key-value pair which makes easier to access the data. In SQL, it’s hard to access the data as it is stored in rows and columns.
- Distributed Database: It is a distributed database at its core, provides high availability, horizontal scaling, and geographic distribution.
It is used by Adobe, Comcast, Royal Bank of Scotland, Expedia, Amazon and so on. Let’s now go over the steps to install MongoDB on Centos. Not using CentOS? Here’s our previous tutorial on installing MongoDB on Ubuntu.
Configure the yum (YellowDog Updater Modified)
It helps to easily install, update, remove or search software packages on a system. Once you configure yum, it will install directly. If you don’t configure yum, it will print the following error:
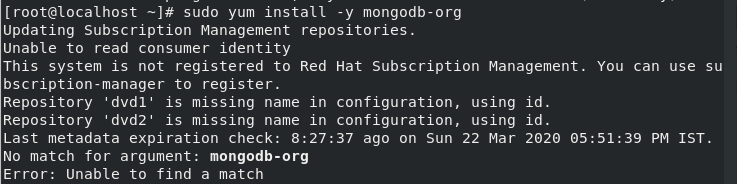
Change the Repo
Basically, we are doing the configuration for yum for this you have to create a repo file in the yum.repos.d directory. This directory can be accessed in the /etc/ folder. Perform the command to change the directory as shown below in the figure.
# cd /etc/yum.repos.d

Create a Repo File
After changing the repo, now you need to create a repo file. It should be saved with the “.repo” extension as yum recognizes the file with .repo extension. Why we are creating a repo file? It’s because to add some configuration details that would help to install the MongoDB from its sources. The file can be created using the touch command.
You can also use cat command with ‘>’ redirection symbol. For example, cat > mongodb-org-4.2.repo. The command is given as follows:
# touch mongodb-org-4.2.repo
# gedit mongodb-org-4.2.repo

Add the code in yum file
After successfully creating a repo file using the touch command, the last step is to add the following code given below in the repo file created.
[mongodb-org-4.2]
name=MongoDB Repository
baseurl=https://repo.mongodb.org/yum/redhat/$releasever/mongodb-org/4.2/x86_64/
gpgcheck=1
enabled=1
gpgkey=https://www.mongodb.org/static/pgp/server-4.2.ascb
The baseurl is given through which it will download the software. The public key is provided which will be used by the packet management system. It makes the work easy. As while installing MongoDB on Ubuntu, you need to first import the key and then add the repository link. Here, all steps got combined in just a single step. It’s really amazing.
Using Yum To Install MongoDB on CentOS 7
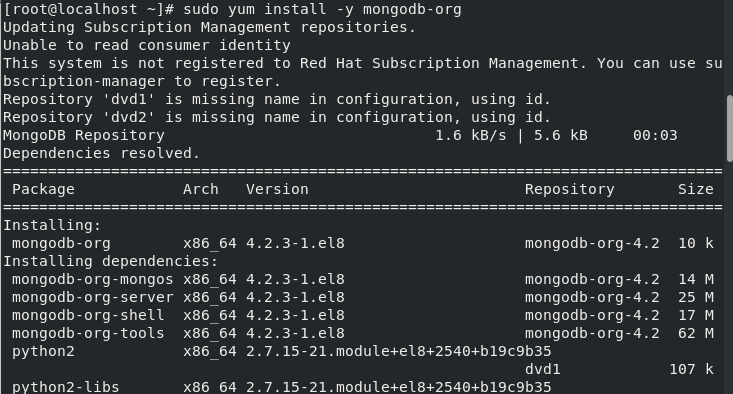
After configuring the yum file successfully, the next step is to install the MongoDB on Debian. This command will fetch all the necessary software packages that are important. I have described the command below with the attached screenshot where you could find that it is installing all the necessary packages in the Package field. You can also check further details like version, repository, and size too.
The command for this is as follows:
# sudo yum install -y mongodb-org
The output for the following will be:

When you install MongoDB on CentOS, the following packages will be installed:
- mongodb-org: the meta package which is the collection of four packages which are listed below. The packages are:
- mongodb-org-server: This package contains the mongod daemon and a configuration file. You must be aware of the daemon, these are the services/programs running on your system internally. For more details, you can also refer the documentation Click here.
- mongodb-org-mongos : It contains the mongos daemon. For more details, refer to this: Click here.
- mongodb-org-shell: It contains the Mongo shell through which various administrative tasks can be performed. For more details, refer to this: Click here.
- mongodb-org-tools: this package consists of the tools which are used for exporting and importing data such as mongoimport bsondump, monodump, mongoexport, mongofiles and so on.
If you want to install the specific version of MongoDB, you need to specify the exact version that is required. As command specified above would install the latest version of MongoDB.
The command used to specify a version number when you want to install MongoDB on CentOS:
sudo yum install -y mongodb-org-4.2.3 mongodb-org-server-4.2.3 mongodb-org-shell-4.2.3 mongodb-org-mongos-4.2.3 mongodb-org-tools-4.2.3
This will install the specific version of MongoDB.
Managing MongoDB Services
Now that you know how to install MongoDB on CentOS, let’s learn how to manage the services.
Start the MongoDB services
After successfully installing MongoDB Packages, the next step is to start the services so as to use it. As for any software to work upon, it’s important to start the services. We will use the systemctl command to start the services. We can also use the service command. It totally depends on you which commands to use. For this, we can use any of the two commands listed below:
# sudo systemctl start mongod
OR
sudo service mongod start

Use any of the commands, the result will be the same.
Check the status of MongoDB
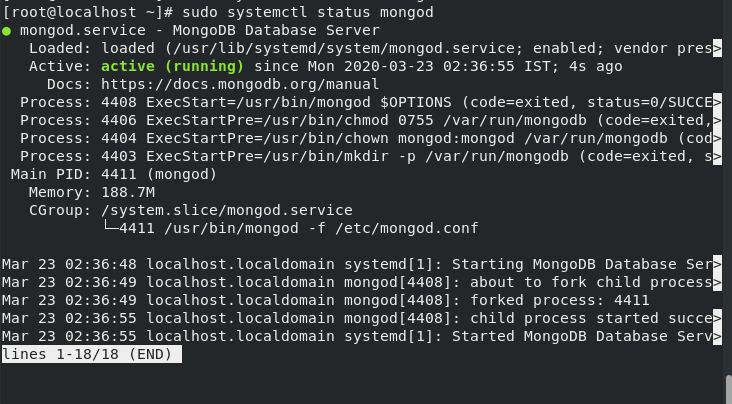
After enabling the services, you need to check the status that whether it has successfully started or not. Basically, we will use systemctl command as used above to start the services. This command will let us know whether the MongoDB is active or inactive. To do so, use the following command as given below:
# sudo systemctl status mongod
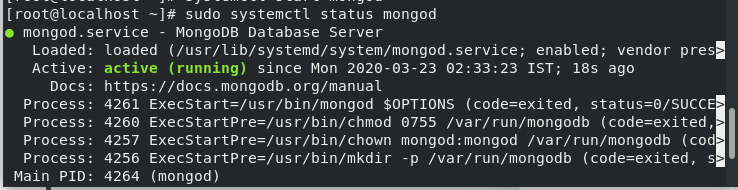
In the figure given above, you can see the highlighted region denoting active, simply means that the services have been successfully started.
Restore the services
Earlier we discussed starting the service. Now, what if, when you start the services you encounter an error. The error can be failed to start the service or anything. Anything can happen! Be cool. However, in general cases the error appears as shown below:
Failed to start mongod.service: Unit mongod.service not found.
If you face such kind of error so in this case, you need to reload the services again. We need to activate daemon services. Daemon is those services that run internally. Use daemon-reload to reload the services again. For reloading the services again, use the following command as given below:
# sudo systemctl daemon-reload

Stop the MongoDB services
You know how to start the service. Now, what if you want to stop the MongoDB services after you install MongoDB on Centos. Simply use the stop keyword with systemctl command to stop the service. There are two commands. You can use any of the command listed below:
# sudo systemctl stop mongod
OR
# sudo service mongod stop

Check the status of whether the services have been stopped or not, you can use the status command as discussed earlier. The status shown will be like:
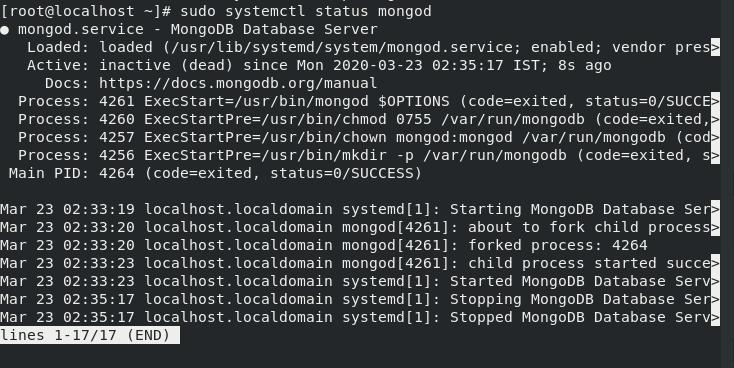
You can see that the services are inactive. To exit this command, press “q” you will be redirected to the localhost command.
Restart the services
This process will be required after you install MongoDB on Centos. You are well known for how to stop, reload and start the services. We should also learn how to restart the services. For this, just simply use restart with systemctl command. Similarly, I have listed two commands below. You can use any one of them. Let’s look at the command at how to restart the MongoDB services:
# sudo systemctl restart mongod
OR
# sudo service mongod restart

Let’s check the status of the services using the same command as discussed earlier.
You can see the highlighted portion as active.
Begin with MongoDB
As the services have been successfully started, let’s begin to work with MongoDB. Till now, you have successfully installed the MongoDB. To work upon it, a simple keyword Mongo is used. You should be aware of the queries used in MongoDB. If not, then learn about how to use it efficiently.
For this, you need to use the following command:
# mongo
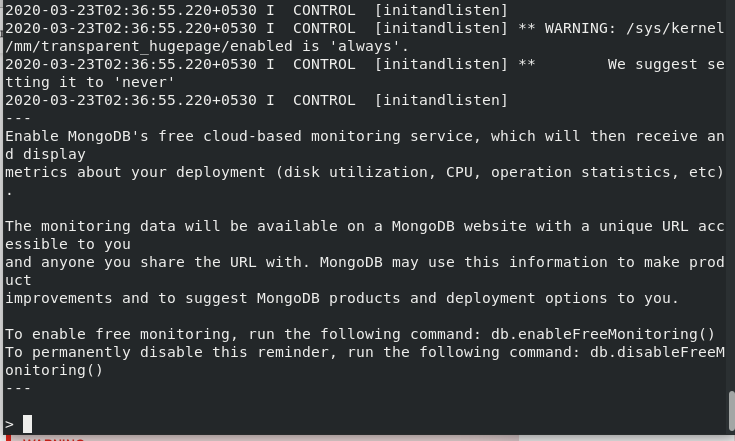
After executing the following command, you would see an interface given in the figure above. Here, you can perform the DB operations.
How to create users in MongoDB?
MongoDB provides the feature to create users in the database. Why? because of the security issues. The security is the main point to be considered. What if, you don’t use the pin on your google pay account, so anybody could use your phone and transfer as much as the amount he wants! That’s why user authentication is important. By creating users, it provides you the feature of adding the password, so that nobody could access it.
For this, firstly connect to the admin database using the following command:
# use admin

After executing the following command, you need to create the user. For this, use the following code given below:
db.createUser(
  {
    user: "mongoAdmin",
    pwd: "1234",
    roles: [ { role: "userAdminAnyDatabase", db: "admin" } ]
  }
)
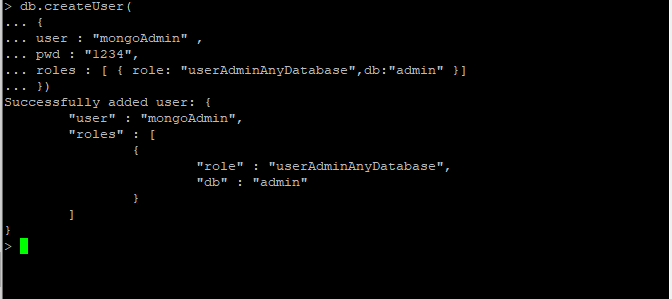
You can set any password as of your choice.
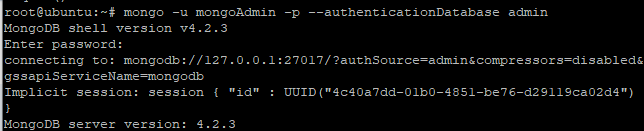
Login with user authentication details:
As you have set the user password and details, therefore you can log in with the user name and password as given below:
Check the version of MongoDB
Basically, If you want to check the version of MongoDB installed in the system. We will use db.version() to know the version of the database. Type the following command given below in the MongoDB shell only. It will the version installed on your system.
db.verison()

Exit the shell
Basically, in some of the databases, we use exit() to quit the database. Here, we will use quit() to exit the database. If you are done with your work, you can exit the MongoDB shell using the following quit command:
quit()

How to uninstall the MongoDB in CentOS 7?
Till now, we have discussed how to install, start the services, create the users in MongoDB and so on. To uninstall or to erase the MongoDB, it’s just a three-step process. Let’s learn how to uninstall the MongoDB from the system.
Stop the MongoDB services
Every running software requires to be stopped first. Similarly, the first step is to stop the services of MongoDB. Simply use the service command with a stop keyword. The command for the following is given below:
# sudo service mongod stop

Erase the Packages of MongoDB
After stopping down the services, the second step is to remove and purge the MongoDB packages installed. Here, we will use the yum command to erase all the packages. This can be done using the following command:
sudo yum erase $(rpm -qa | grep mongodb-org)
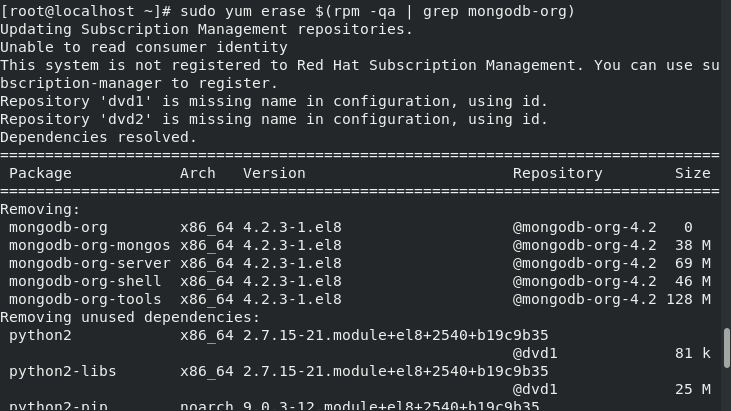
For this, you will use the yum command to erase the packages.
Remove the data directories
While installing the packages, it creates the directories. So we also need to remove them as well. The last step is to remove the data directories created at the time of installing. Those directories are installed in /var/log/mongodb directory. “-r” option is used to remove the directory. It is used with rm.
For this, use the following command as given below:
# sudo rm -r /var/log/mongodb
# sudo rm -r /var/lib/mongo
This command will remove the data directories created at the time of installing.
Hence, MongoDB has been successfully uninstalled.
Conclusion
That’s it now! We have our very own MongoDB server installed on our system. Learn the queries as well to use MongoDB efficiently. If facing any issue, then do let us know in the comment section.