
In this guide, we’ll go through the steps to create an encrypted persistent live Kali USB. Kali Linux is probably the most popular penetration testing Distro out there. However, due to it being a rolling release and unstable in nature, it is not advisable to run it as a daily driver.
Steps to Setup Encrypted Persistent Live Kali USB
It is advised to use a ‘Live’ installation, preferably on a USB stick when it comes to Kali Linux. Not only will this prevent your main system from crashing but also allows you to have a portable Kali Linux system that you can plug into any computer and boot from the USB to have it up and ready! We would also learn how we can encrypt our USB for added security all in this module!
1. Download The Live ISO
First you need to download the Kali Live ISO from here. Once you have downloaded the ISO image, you can verify it’s integrity with :
sha256sum -c kali-linux-2026.2-live-amd64.iso.txt.sha256sum
kali-linux-2026.2-live-amd64.iso: OK
The output states that we are good to go, thus we can now proceed to the next step !
2. Select USB Disk
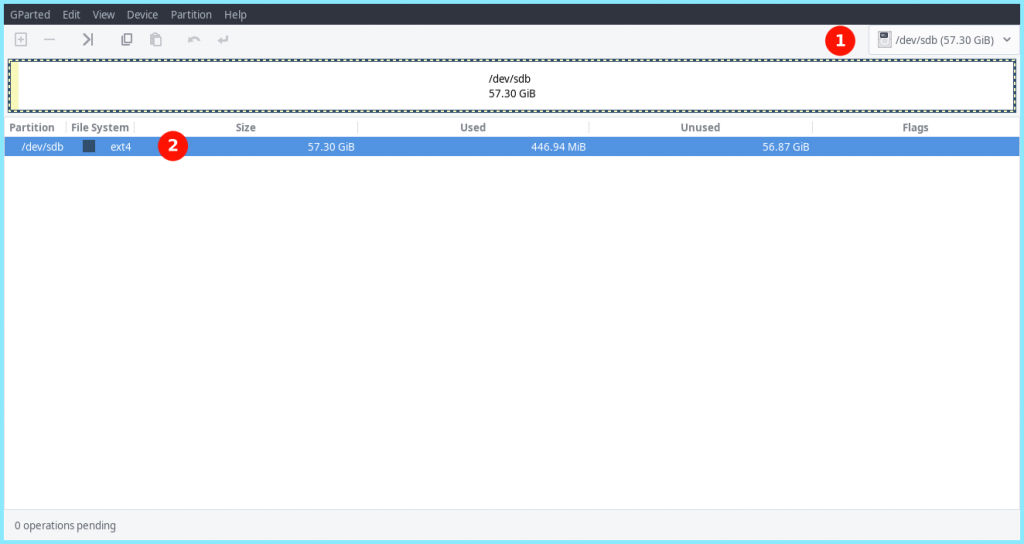
Next, we need to format our USB on which we are going to burn our ISO. For this, we are going to use gparted which lets us do this very easily using a GUI interface.
Go to Gparted and select your USB stick from the top right selection menu.
3. Format The USB To EXT4
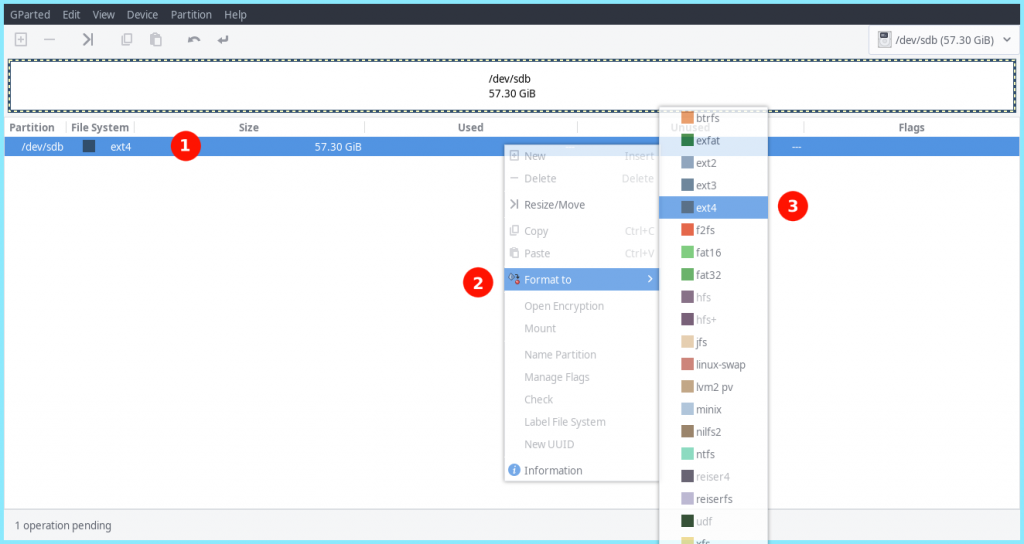
Next, we need to format our USB stick to the standard Ext4 partion type. To do this, Right click on you existing File System >> Format >> Ext4. If you would rather run this from a terminal, our guide to formatting USB drives in Linux covers the mkfs command version of the same step.
4. Applying Our Changes
Next up, we need to apply our changes with
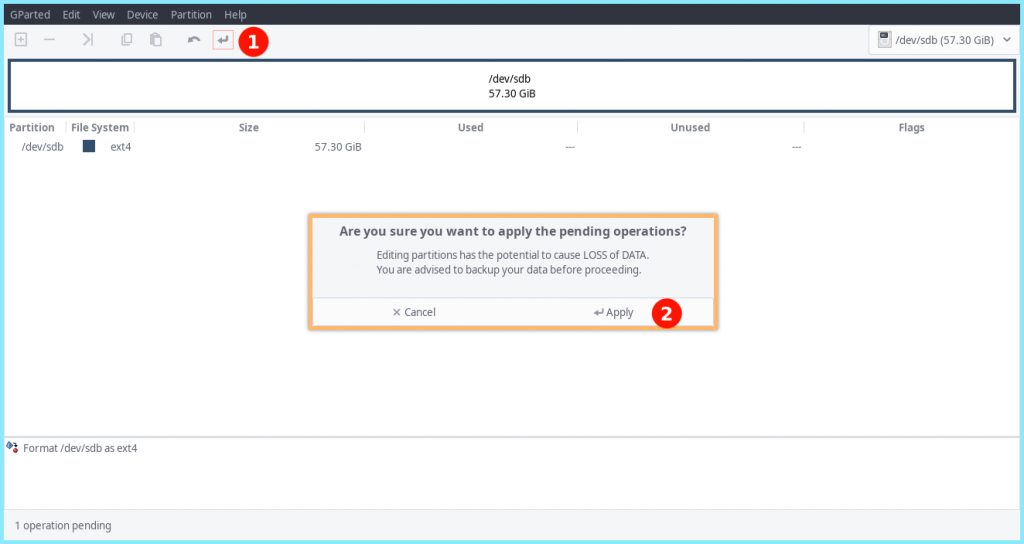
When done, we should get the following prompt :
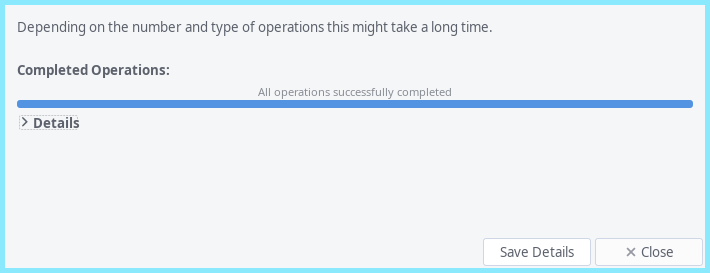
Once all our changes have been applied we can move onto the next step.
5. Burn Our ISO Onto The USB
Next, we will burn the ISO onto our USB device. First we need to locate our USB with with the lsblk command:
$ lsblk
NAME   MAJ:MIN RM          SIZE RO TYPE MOUNTPOINT
sda      8:0    0 1000204886016  0 disk
├─sda1   8:1    0    1073741824  0 part /boot/efi
├─sda2   8:2    0  994832285696  0 part /var/lib/lxd/storage-pools/default
└─sda3   8:3    0    4295180288  0 part [SWAP]
sdb      8:16   1   61530439680  0 disk
Here, our USB device is denoted by the block device : sdb (you can find the more details on how to locate your USB block device here)
Next we cd into the directory which has our ISO file and burn it onto our USB stick with the dd command:
$ sudo dd if=kali-linux-2026.2-live-amd64.iso of=/dev/sdb bs=4M oflag=sync status=progress
Here we have used the very dangerous dd command, aka the disk destroyer command. Let’s explain the parts of this command :
- dd – This is our disk destroyer command
- if – File to read from which in this case is our ISO file : kali-linux-2026.2-live-amd64.iso
- of – File to write to, which in this case is our block device /dev/sdb
- bs – Byte size, i.e, number of BYTES to read/write to at a time, which in our case is 4M
- oflag – Instruct the dd command on how to write to image based on passed flag values, in this case we have passed the value sync which effectively syncs after each output block
- status – It prints the transfer statistics, which in this case is directed by the progress flag
Kali’s own documentation now shows this same command with conv=fsync in place of oflag=sync. Both flags force a full write to disk before the command exits, so either works fine, oflag=sync just syncs a little more often during the copy.
Once we have our USB device ready, we can now move onto the next step
6. Creating Partitions
Next, we need to create some partitions on our USB drive. For this we will be using GNU Parted! You can launch it with :
$ sudo parted
Next, we need to select our USB block device with :
(parted) select /dev/sdb
You can now print information about your USB with :
(parted) print
(parted) print
Model: SanDisk Ultra USB 3.0 (scsi)
Disk /dev/sdb: 61.5GB
Sector size (logical/physical): 512B/512B
Partition Table: msdos
Disk Flags:

Number  Start   End     Size    Type     File system  Flags
 1      32.8kB  3516MB  3516MB  primary               boot, hidden
 2      3516MB  3517MB  754kB   primary
As we can see, we have 2 disk flags. Now, we will create a new unalocated partition comprising from the entire available disk starting from the next free block element. Here, our last occupied block ends at 3517MB so we will start from there till the end of the disk which is at 61.5GB.
(parted) mkpart primary 3518 61.5GB
With this, we should have our new partition ready, which can be verifies with :
(parted) print
(parted) print
Model: SanDisk Ultra USB 3.0 (scsi)
Disk /dev/sdb: 61.5GB
Sector size (logical/physical): 512B/512B
Partition Table: msdos
Disk Flags:

Number  Start   End     Size    Type     File system  Flags
 1      32.8kB  3516MB  3516MB  primary               boot, hidden
 2      3516MB  3517MB  754kB   primary
 3      3518MB  61.5GB  58.0GB  primary               lba
Now to save and exit, you can just time in :
(parted) quit
With this we are ready to move onto our next step
7. Creating Encrypted Persistent Live Kali USB
At this point, our block devices should look something like :
$ lsblk
NAME   MAJ:MIN RM   SIZE RO TYPE MOUNTPOINT
sda      8:0    0 931.5G  0 disk
├─sda1   8:1    0     1G  0 part /boot/efi
├─sda2   8:2    0 926.5G  0 part /var/lib/lxd/storage-pools/default
└─sda3   8:3    0     4G  0 part [SWAP]
sdb      8:16   1  57.3G  0 disk
├─sdb1   8:17   1   3.3G  0 part
├─sdb2   8:18   1   736K  0 part
└─sdb3   8:19   1    54G  0 part
See how our USB block device now has 3 partitions? Now, we will encrypt the USB using LUKs Encryption :
$ sudo cryptsetup --verbose --verify-passphrase luksFormat /dev/sdb3
$ sudo cryptsetup luksOpen /dev/sdb3 my_usb
Here, you will be prompted to enter a password to encrypt your USB with. Once you are done with that, it will create a ‘crypto_LUKS’ superblock signature on our USB.
Next, we need to create a ext4 file system and a label it as ‘persistence’ with the following :
$ sudo mkfs.ext4 -L persistence /dev/mapper/my_usb
$ sudo e2label /dev/mapper/my_usb persistence
Next, we need to create a mount point to mount our encrypted partition and create our persistence.conf file and then unmount the same. To save us the pain of writing sudo again and again, we can switch to root with (see our guide to granting root privileges on Kali if sudo su asks for a root password you haven’t set):
$ sudo su
Then, we need to type in the following commands :
# mkdir -p /mnt/my_usb/
# mount /dev/mapper/my_usb /mnt/my_usb
# echo "/ union" > /mnt/my_usb/persistence.conf
# umount /dev/mapper/my_usb
Finally we need to close the channel to our encrypted persistence partition with :
# cryptsetup luksClose /dev/mapper/my_usb
or
$ sudo cryptsetup luksClose /dev/mapper/my_usb
At this point, our USB should be ready and we can boot from it !
8. Booting Kali From USB
Once you boot into your USB, select Live USB Encrypted Persistence from the Boot menu.
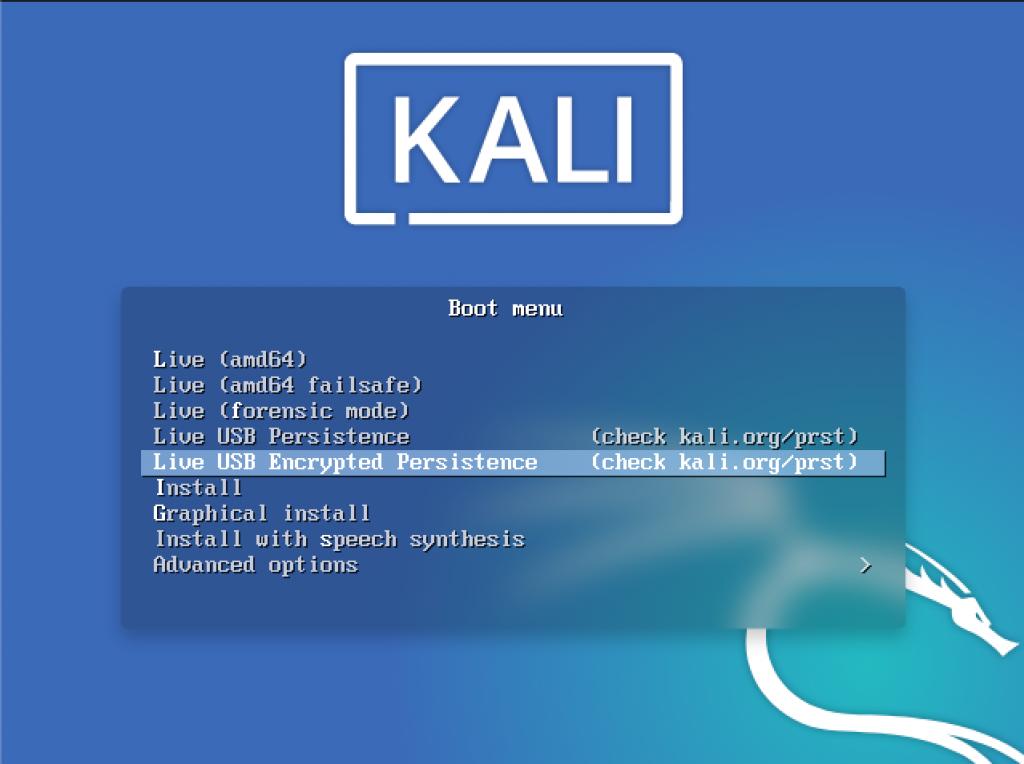
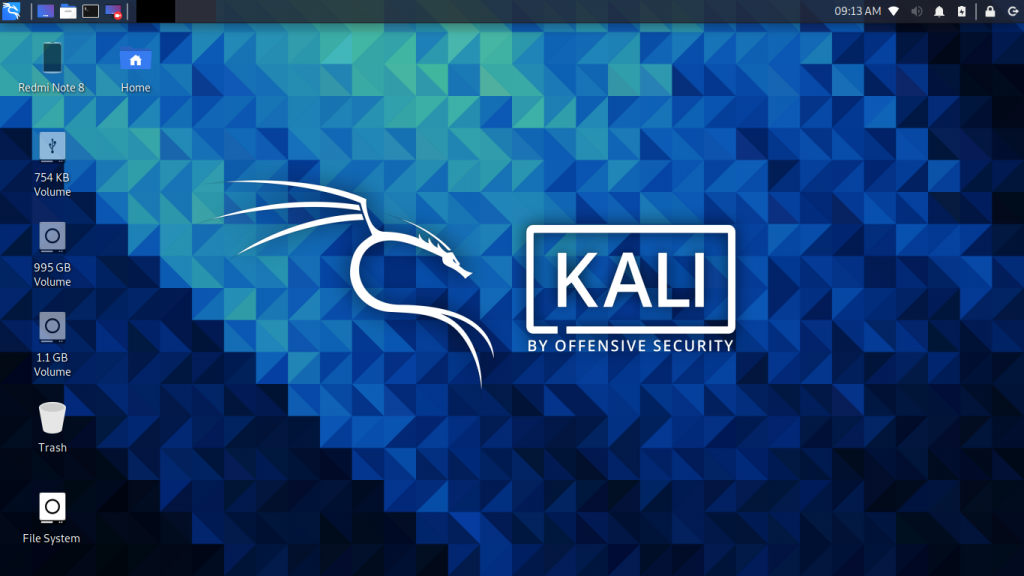
Next, you would be prompted to enter your password and once you enter it successfully you would have your Kali System up and running !
Alternative way to create a persistent Kali USB with Rufus
Windows users who want persistence without opening a terminal can skip straight to Rufus:
- Select your USB and the Kali ISO in Rufus
- Drag the Persistence partition size slider to however much space you want to keep
- Click Start and confirm the warning about erasing the drive
Kali’s own documentation flags this integrated slider as unofficial. It doesn’t work with every image either, including the Kali Everything Live ISO from the 2022.1 release onward. It also skips encryption entirely, so treat it as a quick option for practice USBs, not for anything holding sensitive engagement data.
For Windows users who want the GUI route but still want encryption, Etcher is Kali’s other recommended flashing tool. Flash the ISO with Etcher first, then follow the partitioning and LUKS steps above from inside a booted Kali Live session, since Etcher itself has no persistence feature at all.
Boot menu: disable Secure Boot for Kali Live persistence
Kali does not support UEFI Secure Boot. If Secure Boot stays enabled in your BIOS or UEFI settings, the USB either refuses to boot or throws a signature error before you ever see the Kali boot menu, encrypted or not.
Reboot into your firmware settings (commonly Del, F2 or F10 during startup) and turn Secure Boot off before you try the Live USB Encrypted Persistence option. This trips up more first attempts than any step in the actual partitioning process.
Troubleshooting: persistence not saving
The most common report after following steps like these is booting successfully but losing all changes on the next reboot. A handful of causes account for most of it:
- You picked the plain Live boot entry instead of Live USB Encrypted Persistence, so the overlay never mounted
- The Rufus integrated persistence slider was used instead of the manual LUKS partition, since the two methods aren’t interchangeable
- persistence.conf ended up in the wrong mount point, or was created before the partition was actually mounted
- The USB itself is dying. Cheap flash drives wear out fast under a write-heavy Kali session, so failing writes end up looking identical to a config problem
Re-running steps 6 and 7 above on a fresh partition, this time double-checking the boot menu entry, resolves the overwhelming majority of these reports.
Creating multiple persistence stores
Kali also supports more than one persistence partition on the same USB, each with a different label, selected at boot with the persistence-label parameter. This suits anyone who wants a clean everyday store plus a separate one just for CTF files:
$ sudo mkfs.ext4 -L work /dev/sdb4
$ sudo mkfs.ext4 -L ctf /dev/sdb5
Mount each one and drop a persistence.conf inside it exactly as in step 7, then pick the label you want from the boot menu on any given session.
Setting up an emergency nuke password
Penetration testers often carry sensitive engagement data on this exact USB, which is where Kali’s nuke password feature earns its place. It adds a second passphrase that, when typed at the encryption prompt, destroys the LUKS keyslots instead of unlocking the drive.
$ sudo apt install -y cryptsetup-nuke-password
$ sudo dpkg-reconfigure cryptsetup-nuke-password
The nuke password gets baked into the initrd (the small filesystem the kernel loads before your real disk mounts). It works on any encrypted partition you can decrypt at boot.
Back up your LUKS header first with cryptsetup luksHeaderBackup if you ever want the data recoverable after a nuke, since the destruction is otherwise permanent.
Key takeaways
- Use the Live USB Encrypted Persistence boot entry, not plain Live, or nothing saves
- Rufus’s built in persistence slider is unofficial and skips encryption entirely
- Secure Boot must be off in firmware settings for Kali to boot at all
- persistence.conf with “/ union” enables full filesystem persistence
- Multiple labeled partitions let you keep separate persistence stores on one USB
- A nuke password destroys LUKS keyslots on demand for sensitive engagements
- Encryption adds noticeable slowdown compared to unencrypted persistence
Frequently asked questions
Why won’t my Kali persistent USB save any changes?
You most likely booted the plain Live entry instead of Live USB Encrypted Persistence, or created the partition with Rufus’s unofficial slider instead of manually setting up LUKS encryption.
Does Kali Linux support Secure Boot?
No. Kali does not support UEFI Secure Boot, so it must be disabled in your BIOS or UEFI settings before the Live USB boots.
How much USB space should I set aside for persistence?
Kali’s live image itself takes around 4 to 5GB, so an 8GB drive leaves little room. 16GB or larger gives comfortable space for tools, wordlists and captured data.
Is a persistent Kali USB slower than installing Kali normally?
Yes, especially with encryption enabled. LUKS adds CPU overhead on every read and write. Cheap USB flash storage is also inherently slower than an internal SSD.
Can I use Ventoy instead of dd to make a persistent Kali USB?
Yes, Ventoy supports Kali persistence through its own persistence plugin and a separate .dat backend file, which is useful if you already multi-boot several ISOs from one drive.
Should I use a persistent USB or a Kali virtual machine?
A Kali VM in VirtualBox is easier to snapshot and reset. A persistent USB is better when you need Kali on hardware VirtualBox can’t reach.
What happens if I lose the USB with a nuke password set up?
Without the nuke passphrase being entered, the data stays exactly as encrypted as it was. The nuke password only destroys data when someone actively types it in at boot.