

In this module, we’ll take a look at how to install and configure SMTP server on Ubuntu Linux. Before we get started, let’s understand what an SMTP relay is and then get right into the setup.
Why use SMTP relay?
SMTP (Simple mail transfer protocol) relay routes your emails through a third-party service provider, which will send emails through their servers. It is often great to set up SMTP relay for large volumes of emails instead of managing your own infrastructure.
With SMTP relays, you do not have to manage the mail servers as there are no downtimes, email reaches to the inbox and not into spam, you can send larger email volumes and also view analytics on your dashboard.
Overall, setting up an SMTP server with postfix on Ubuntu can be really useful, as it can help in cutting costs and improving email deliverability.
Steps for setting up an SMTP relay on Ubuntu
In this tutorial, we’ll demonstrate and learn how to install SMTP relay with Mailjet’s free plan on a remote server on Ubuntu 22.04. But the steps should be similar for the other service providers as well.
Step 1: Install postfix server
First we’ll need to set up a local SMTP server, which we’ll do so by setting up postfix, which is a popular open source mail transfer agent. We can easily install postfix by running the following command to install postfix:
sudo apt install postfix
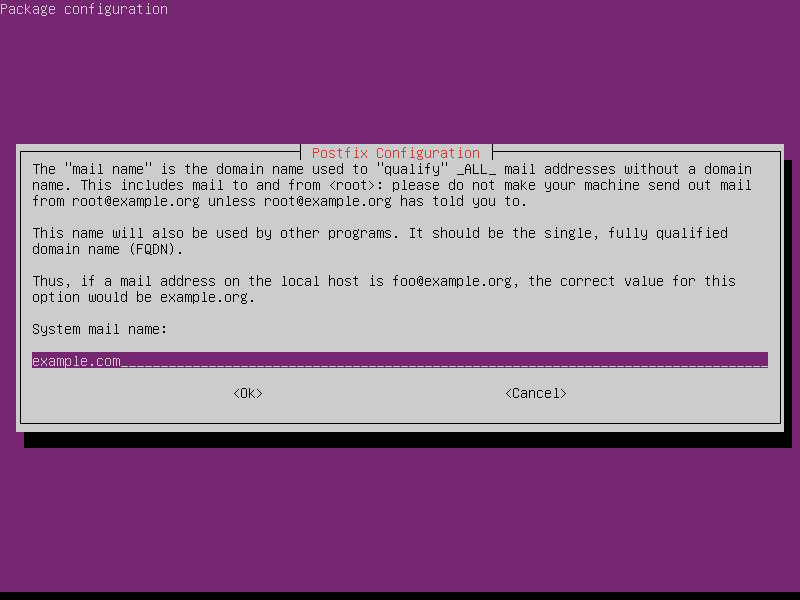
When you enter the command above, postfix‘s configuration window will open, like below:

The postfix configuration window asks you for what kind of service are you setting up postfix for, so it can configure itself for your best needs. In this tutorial we’ll go with “Internet Site” as we are required to send emails over the internet. So you can simply press Enter key.
Now next you are required to enter the domain name for your email service, it should be a fully qualified domain name (FQDN).
and then it will run the script to put up the best configuration according to your needs and the inputted data.
Step 2: Creating Mailjet free account for our SMTP relay on Ubuntu
We are done installing with postfix, but before we continue configuring postfix, we’ll need to first get the required credentials to be successfully able to install and configure postfix server for SMTP relay.
For demonstration, we’ll register a free account on Mailjet. But the process will be similar for the other providers as well, once you are done with the registration using your email account.
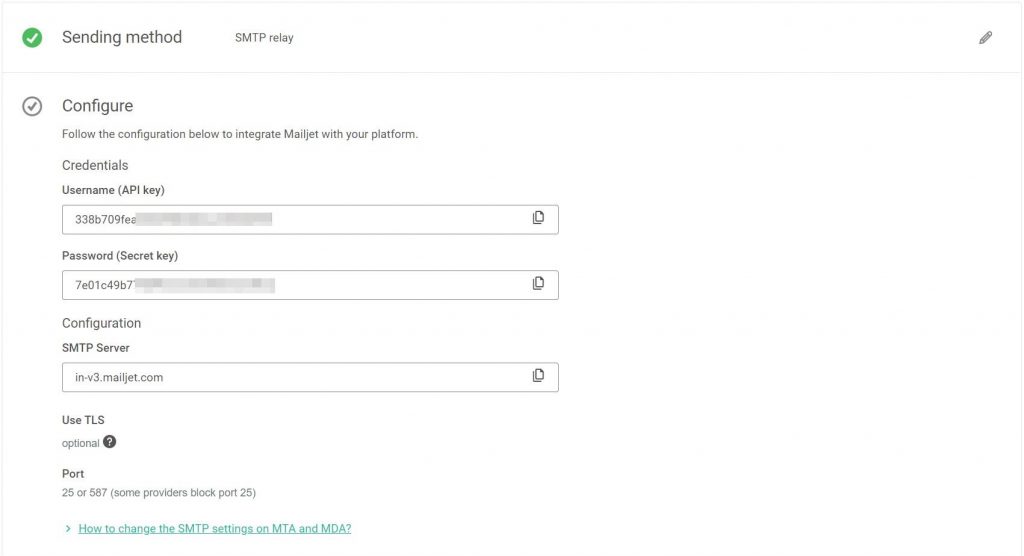
Choose as Developer, and in “Sending methods” choose “SMTP relay”. Once you have chosen SMTP relay as your sending method. They’ll give you the required details:
Step 3: Authenticate your domain name
You must authenticate your domain name to improve emails deliverability and that your emails don’t end up in spam.

Step 4: Setup postfix for SMTP relay on Ubuntu
Now we have the required credentials, so we can get started to configure postfix to send all the emails through the SMTP relay.
We need to edit the main postfix configuration file, which is the /etc/postfix/main.cf file. First, you need to find relayhost in main.cf configuration and enter your relay host.

In our case, we’ve used the host provided by the Mailjet. But it will be different for different providers, so make sure you enter the right relayhost.
Now add the following to the main.cf file, to enable SASL authentication,
smtp_use_tls = yes
smtp_sasl_auth_enable = yes
smtp_sasl_password_maps = hash:/etc/postfix/sasl_passwd
smtp_sasl_security_options = noanonymous
smtp_tls_CAfile = /etc/ssl/certs/ca-certificates.crt
You can read more about these settings in the postfix’s documentation. Once you are done, save the file.
Step 5: Setting up credentials for SASL authentication
Now we’ll create a file at /etc/postfix/sasl_passwd and add the credentials in the following format in plain text form:
[smtp.example.com]:port user:pass

Now we’ll hash the database file using the postmap command:
sudo postmap /etc/postfix/sasl_passwd
Next, we have to restart postfix, just use the following command:
sudo service postfix restart
We are done with configuring SMTP relay! Now to finish up the setup, we should test whether our mail server powered by postfix is working properly!
Test your setup
So that now we are done with configuring SMTP relay email server, now it’s time to put it to test, for this purpose we’ll use the mail command to send mail for our test purposes, if you cannot find the mail command, you can simply install mailutils with the by running the following command:
sudo apt install mailutils
Now to send an email, enter:
echo "This is the email body!" | mail -s "Subject of your email" -a "From: [email protected]" [email protected]
If you receive the email message, congratulations, you have successfully setup SMTP relay server! In case you didn’t receive email, you can find mail logs in /var/log/mail.log which will help in troubleshooting.
Conclusion
And that brings us to the end of this article! Hopefully, you have successfully configured the SMTP relay server setup with postfix on Ubuntu to send and receive e-mails on your client using this article. For security reasons, update your server regularly and make sure that the postfix daemon is running from time to time. You can also configure postfix as a send-only SMTP server, however that is beyond the scope of this tutorial.
If you think we have missed something, then let us know down in the comments below.