

If for some reason, you are not able to run the apt command successfully from the terminal, it is quite possible that your sources.list file is corrupt. Don’t panic, we can easily restore the sources file. But first, we have to understand what are the sources from which we can install applications in Ubuntu. There are basically four repositories in Ubuntu: Main, Universe, Restricted, and Multiverse.
- Main: Applications in this repository are Free and Open Source and are maintained by Canonical’s Developers.
- Universe: This repository contains community maintained software packages. They are Free and Open Source as well.
- Restricted: Software in this repository is not totally free.
- Multiverse: This repository contains all the non-free software.
Note that Free here means Freedom, not price.
How To Restore Default Repositories in Ubuntu?
All the repository-related information in Ubuntu is stored in sources.list file, which is located in the /etc/apt directory. We will restore the default repositories to fix the issue in the apt package manager by completely removing the sources.list file from /etc/apt and create new sources.list file.
1. Deleting sources.list file
Open a Terminal and type the following command to navigate to the /etc/apt directory.
cd /etc/apt
Then move the corrupted sources.list file to a safe location (so that we can copy our PPAs from this file later).
sudo mv sources.list ~/
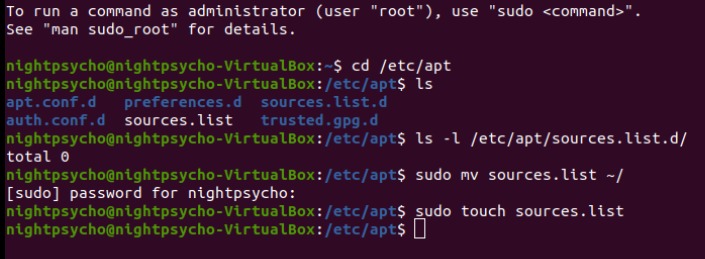
Now, we will create new sources.list file in this directory using the touch command.
sudo touch sources.list
2. Enable Default Repositories
Now, we have created an empty file, and if you try to run the apt command now, it still won’t work. To fix this issue, click on the Activity menu on the top left and search for ‘Software and Updates’.

From here, enable the Main repository, you can also enable the Restricted, Universe, and Multiverse repositories from here. Close the window and click on reload when asked. Type your desktop password when prompted and press enter.
3. Remove Unwanted PPAs
PPAs often clutter your system if you have too many of them installed. And installing them from unverified sources is not recommended. To see the installed repositories on your Ubuntu machine, open the Terminal and type :
ls -l etc/apt/source.list.d/
And you can remove the unwanted PPA by typing :
sudo rm /etc/apt/sources.list.d/REPOSITORY_NAME.list
4. Run Update
Now that we have completed all the steps successfully, we can run an update check to see if our modifications are working correctly. Open a terminal and run :
sudo apt update && sudo apt-full upgrade
We have successfully restored the default repositories in Ubuntu and updated our system.
Summary
Congratulations! You have successfully restored the default state of apt package manager in your Ubuntu installation. You can only learn in the Linux world by breaking things and fixing them yourself by figuring out what’s going on with the help of the Internet. Don’t panic, because there is always a solution!